Building a Socket.io chat app and deploying it using AWS Fargate
This article walks through the process of building a chat application, containerizing it, and deploying it using AWS Fargate. The result of following along with this guide will be a working URL hosting a public, realtime chat web app. But all this will be accomplished without needing to have a single EC2 instance on your AWS account!
If you want to follow along with the article and build and deploy this application yourself you need to make sure that you have the following things:
- Node.js (The runtime language of the chat app we are building)
- Docker (The tool we will use for packaging the app up for deployment)
- An AWS account, and the AWS CLI (We will deploy the application on AWS)
Once you have these resources ready you can get started.
Starting from open source
To power the chat application in this demo we are going to use socket.io, one of the most popular realtime communication frameworks for the web. It operates via a Node.js server side component, and provides client side libraries for every major runtime language, including browser JavaScript.
To run a chat application using socket.io we are going to need a server side application which runs a socket.io server. But it also needs to host some static web content: HTML and JavaScript that can be fetched by a web browser.
When a user loads the URL of this application, their browser will download the HTML and run JavaScript code locally on their computer. This is called a “web application”. The web application will connect to the server side application to send messages in the chat room, and receive messages from other users.
So now that you understand the pieces of this architecture, you need to actually build and deploy it. Fortunately there is already an open source chat room demo in the socket.io examples, and this is a great starting point. All you’ve got to do is open the command line and use the following commands to clone a repository that has the sample code onto your machine:
git clone git@github.com:nathanpeck/socket.io-chat-fargate.git
cd socket.io
git checkout 1-starting-point
Now that you have the sample code, let’s test it out on your local machine:
npm install
npm start
You will see a message that looks similar to this:

This means that the application is now running on your local machine. If you open your browser and enter localhost:3000 in your URL bar you will see the web application:
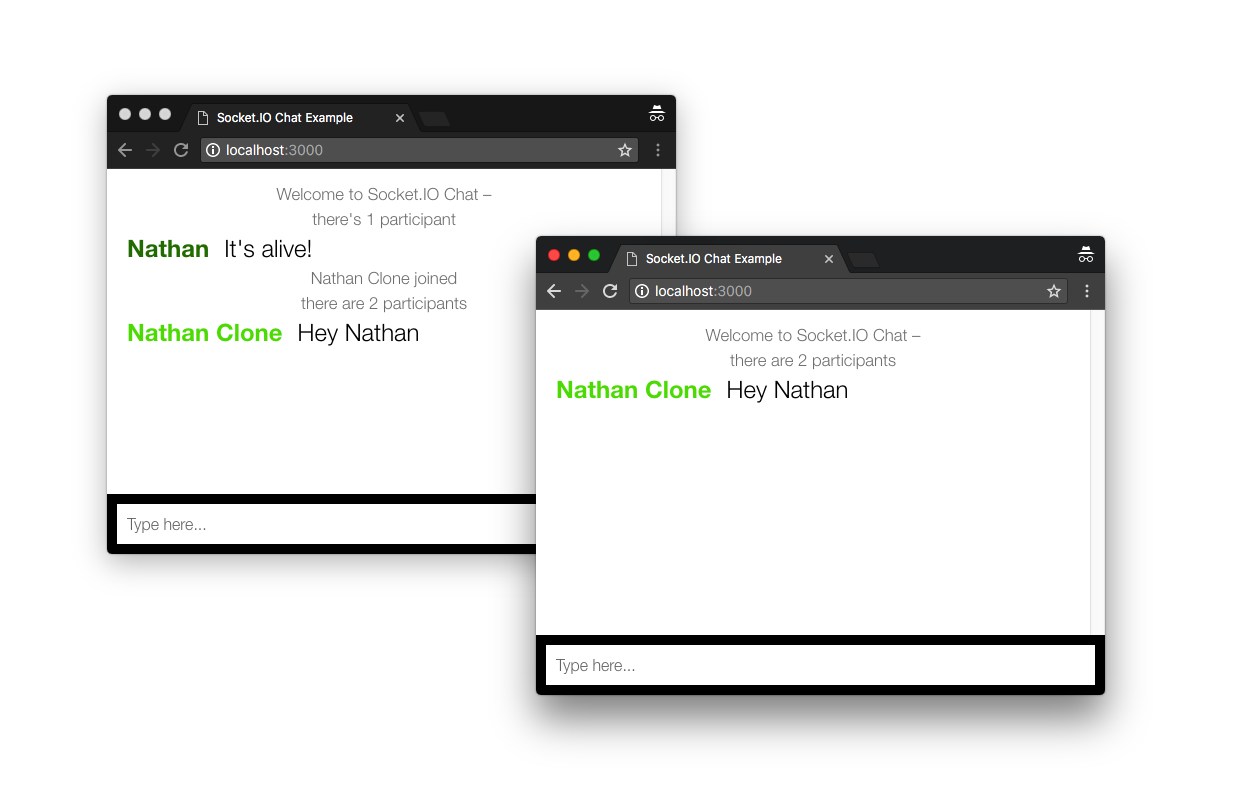
You can open two browser tabs and chat with yourself on your local machine, but that’s not very interesting. You probably want to be able to send your friends a link to the application and chat with them, but right now it is only accessible on your own local machine.
To solve this problem let’s package the application up in a docker container and run it on AWS.
Building a Docker container
The first step to packaging your application into a Docker container is adding a Dockerfile to the project. This file is a series of instructions that tell Docker how to fetch the application and any of its dependencies, do any build steps that are necessary, and finally run the application.
Let’s look at the entire Dockerfile first and then go line by line to explain what each line does, and why it is written the way it is.
Now let’s look line by line to see what each line does:
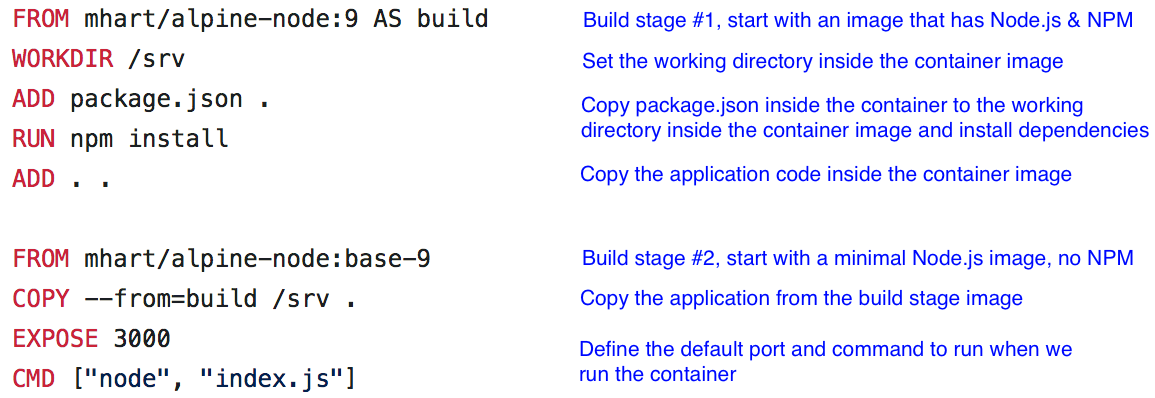
The Dockerfile is organized into two build stages. The first uses a full Node.js environment that includes NPM. It adds the package definition file, fetches and installs the dependencies and copies the application code in. The second phase uses a stripped down Node environment that does not include NPM. It just copies the built app from the previous stage, essentially throwing away all the unneeded extra things that existed in the first stage. This way the image is clean and minimal, containing only the bare minimum of what is needed to run the application.
You can execute this build by using the following command:
docker build -t chat .
This tells Docker to use the Dockerfile in the current directory to build an image, and to tag the image with the name chat
You can then run the chat image as a container on your local machine:
docker run -d --name chat -p 3000:3000 chat
This tells docker to run the image tagged chat, with the name chat. The -d flag tells Docker to run the application “detached” in the background. The flag -p 3000:3000 tells Docker to forward any traffic going to localhost:3000 on your local machine into the container where the application code is listening.
If you run docker ps it will list the running containers on the machine, and once again you can visit localhost:3000 in the browser and see the application running in your browser. It looks the same on the surface, but rather than running directly on your host machine, the application is running inside a docker container.
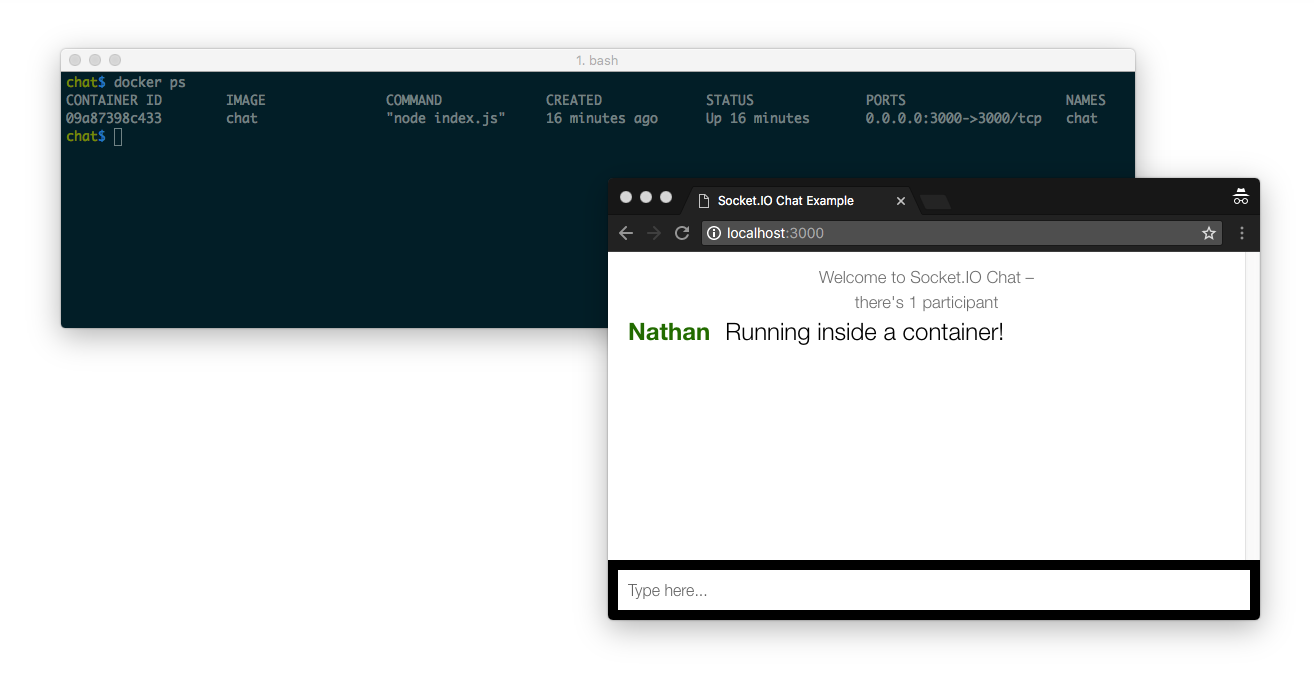
You now have a container that runs on your local machine. The next step is to get this container uploaded off your local machine, into your AWS account, and launch it there.
Pushing your image to a private container registry
The way you get your container image into your AWS account is by creating a container registry and pushing your container image to it. Just like a git repository is a place where you can push your code and it keeps track of each revision to the code, a container registry is a place where you can push your built images, and it keeps track of each revision of your application as a whole.
The AWS service for storing your container images is Elastic Container Registry (ECR). You can create a new private registry for your application by navigating to ECR in the AWS dashboard and clicking the “Create repository” button:

After you click the button and enter a name for the repository you are given a series of commands you can use to push to the repository. The first step is to login to your private registry:
`aws ecr get-login --no-include-email --region us-east-1`
Then you need to retag the local image you built in the previous step so it can be uploaded to the new repository:
docker tag chat:latest 209640446841.dkr.ecr.us-east-1.amazonaws.com/chat:v1
And then push the image:
docker push 209640446841.dkr.ecr.us-east-1.amazonaws.com/chat:v1
Once the image has uploaded you can see it show up in the AWS console when you view the details of the chat repository:
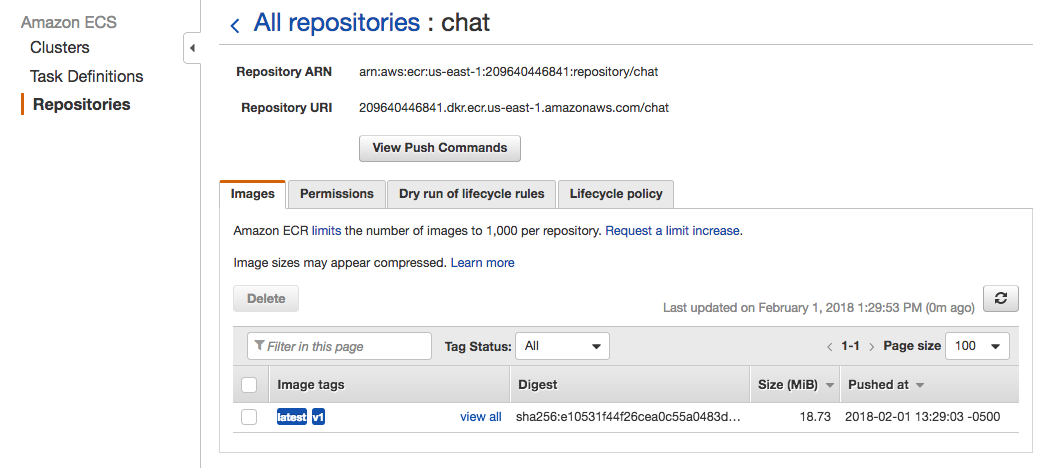
The docker image is now uploaded to a private registry in your own AWS account. The next step is to run it!
Running the application from your docker registry
To launch the docker image on your account under AWS Fargate let’s use some CloudFormation templates from AWS. CloudFormation is an AWS tool which allows you to describe the resources you want to launch on your account as metadata. Then CloudFormation reads this file and automatically creates, modifies, or deletes resources on your behalf. This approach is called “infrastructure as code” and it allows you to quickly and automatically configure your AWS resources without making mistakes by mistyping something or skipping a step.
I’ve added the templates that are needed to deploy the application in a branch of the git repo:
git checkout 3-deployment
The templates you need to use are located at recipes/ inside the project repo. You can use the AWS CLI to quickly deploy a Fargate cluster using the template at recipes/public-vpc.yml
aws cloudformation deploy --stack-name=production --template-file=recipes/public-vpc.yml --capabilities=CAPABILITY_IAM
This command may take a few minutes while it sets up a dedicated VPC for the application, a load balancer, and all the resources you need to launch a docker container as a service in AWS Fargate.
Once it completes you can launch the template at recipes/public-service.yml to get your container running in the cluster. This time let’s use the console so its easier to enter all the parameters.
You can navigate to the CloudFormation console and click the “Create Stack” button, then choose a file to upload. You want to upload the file at services/public-service.yml
After upload you are greeted by a screen where you can customize the parameters:
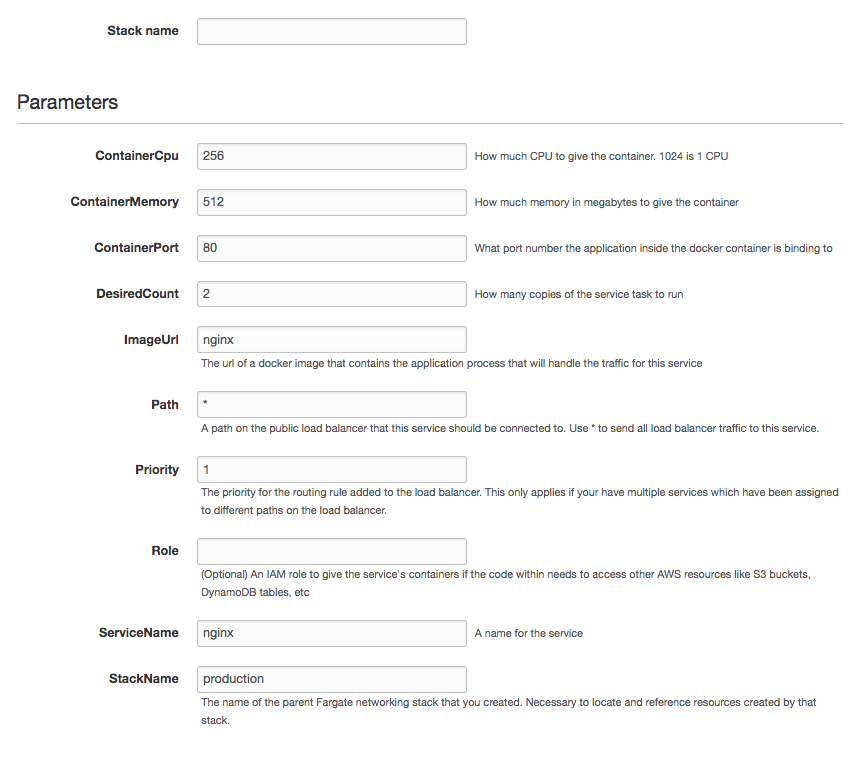
There are a number of parameters here but the only ones we need to worry about right now are:
Stack Name
Let’s name the CloudFormation stack itself chat
ImageUrl
This is the image you uploaded earlier, the same value from the docker push command, something like: 209640446841.dkr.ecr.us-east-1.amazonaws.com/chat:v1
DesiredCount
This is how many copies of the container to run. The default in this template is 2 but we have not yet configured this app to be horizontally scalable, so you need to change this value to 1 (we will extend the application to be horizontally scalable in a follow-up article).
ServiceName
This is a name for the service itself. Once again you can call it chat
ContainerPort
This is the port number that the application inside the container needs to receive traffic on. You need to change it to 3000 since this is the default port that the Node.js app receives traffic on.
Once you enter these values you can click “Next” a few times to review the stack and finally “Create” to launch the stack. It will show up in the console with a status of CREATE_IN_PROGRESS

Once the status changes to CREATE_COMPLETE you are now ready to check out running application. If you click on the production stack and select the “Outputs” tab you will see an output called ExternalUrl
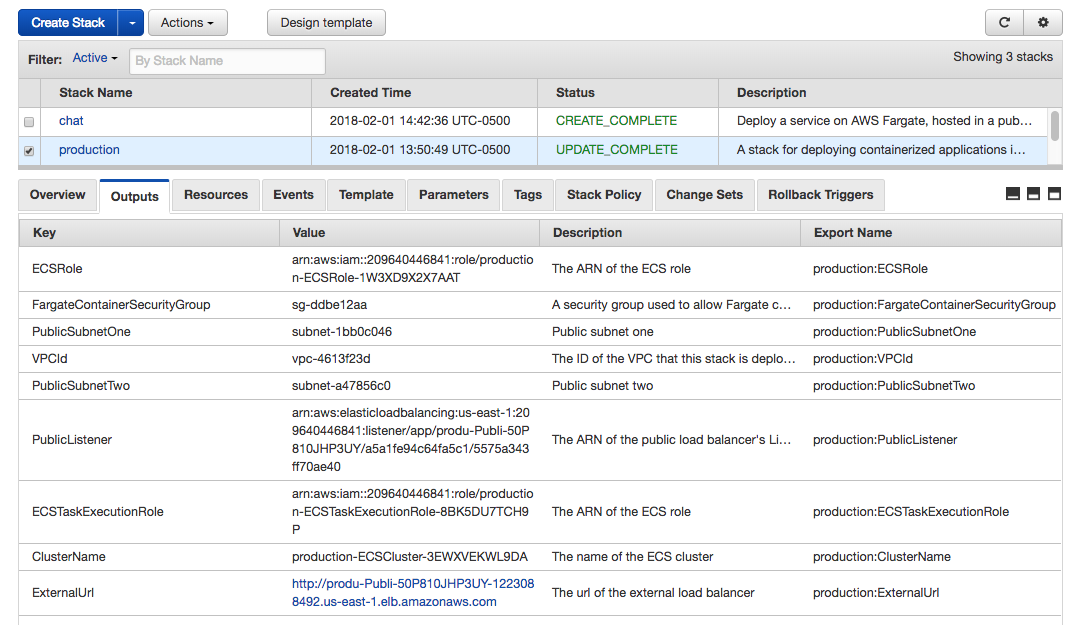
This is the public facing URL of the application. Click the link to load the web application in your browser:
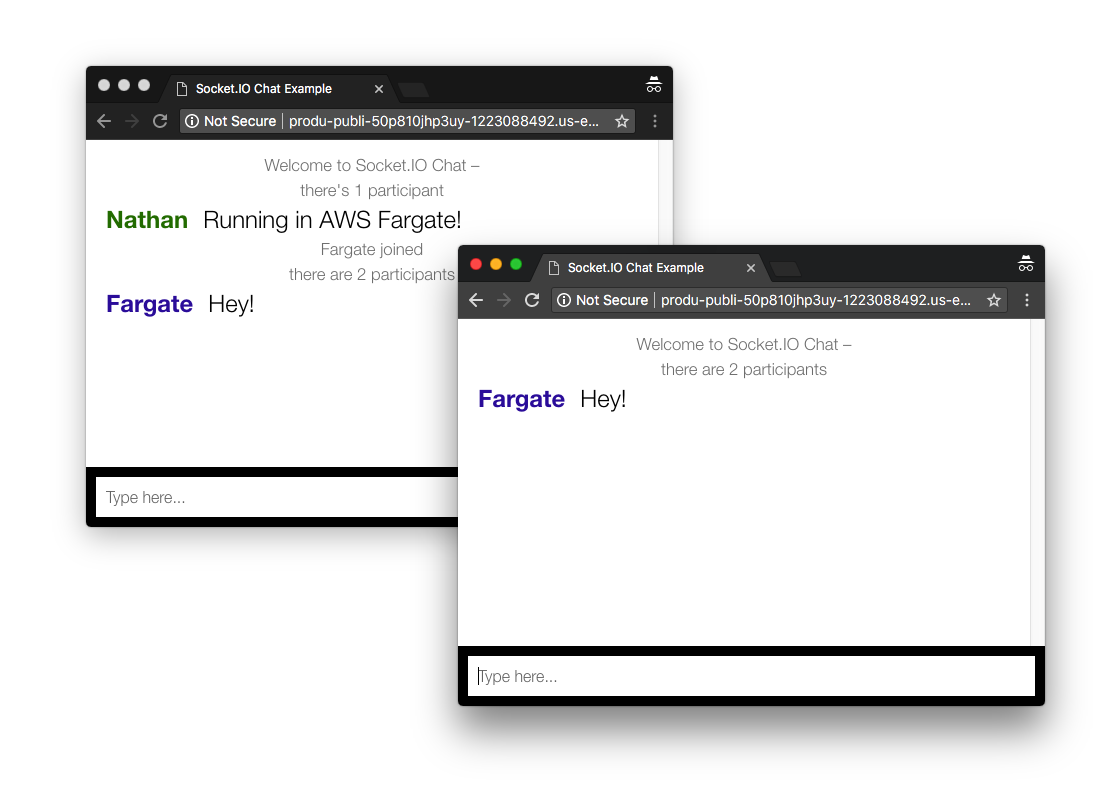
Once again there is a socket.io chat application running in your browser, but this time instead of running locally on your own machine, it is now running inside a docker container in AWS Fargate, and it has a public facing address on the internet that you can give to your friends so they can chat with you from their own computer.
And best of all if you navigate to the EC2 Dashboard on your AWS account you will see this:
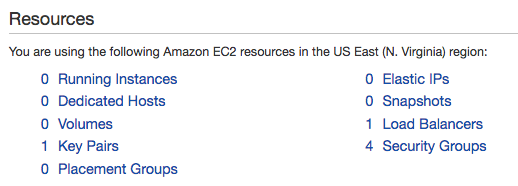
That’s right! There are zero running instances. The containerized application is being run by AWS Fargate, so there are no EC2 instances that you need to manage or worry about.
Conclusion
This article showed how to take a Node.js application, build a docker container for it, upload the container to a registry hosted by AWS, and then run the container using AWS Fargate. This is only the beginning though. In the next installment of this series we will modify the application to be horizontally scalable, and configure autoscaling for our containerized deployment. This will allow the app to automatically scale up as demand increases, with no admin intervention required, even if thousands of users hit our application.
