
Ingress to ECS Anywhere, from anywhere, using Inlets
Amazon ECS Anywhere lets you register your own compute devices as AWS managed instances that can be controlled from the AWS API and console. Managed instances can be added to an Elastic Container Service cluster. You can then use Elastic Container Service to launch application containers onto your own devices.
One common question about ECS Anywhere is how to solve networking and ingress to your managed instances in a home network or other on-premise installation. With a traditional EC2 instance or Fargate task you could add a public facing Application Load Balancer to your VPC and use it to send traffic directly to your compute capacity that lives inside that same VPC. But with self managed compute hardware there are a few problems that need to be solved if you want to have networking ingress.
Networking challenges
To explain the background behind networking challenges that need to be solved, let’s start with a typical home network, like you might have when setting up your own home lab.
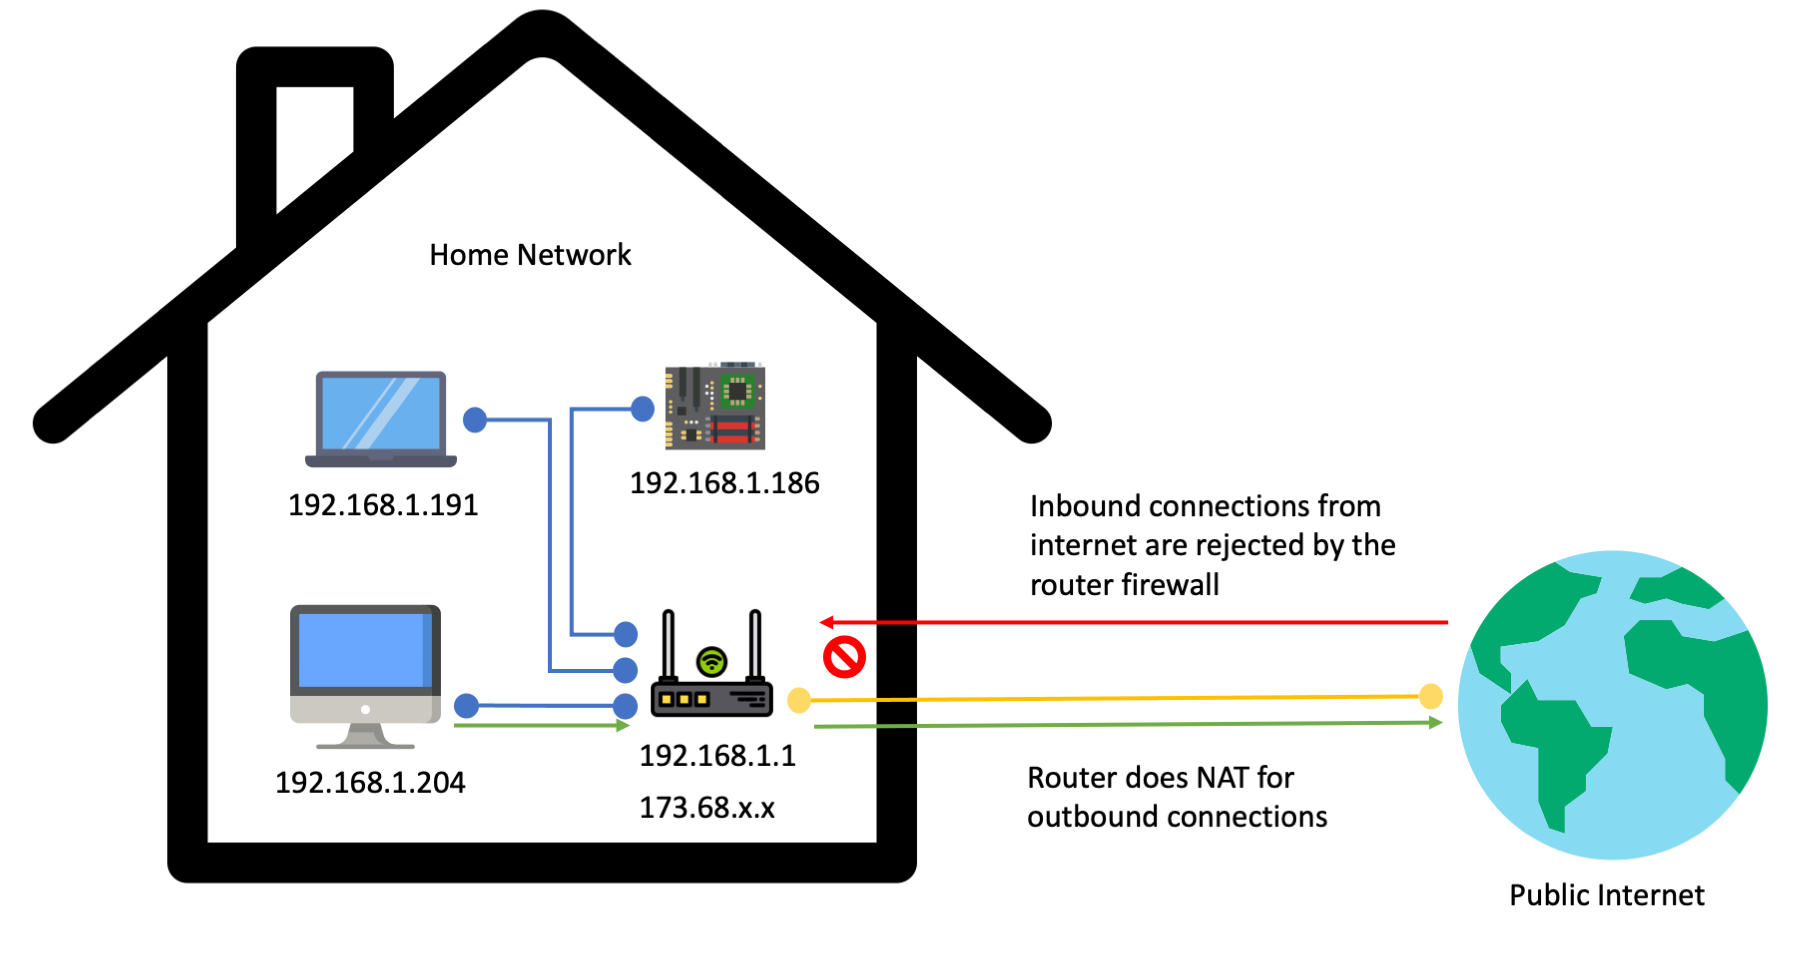
It is common to have a single home IP address from your internet service provider (ISP). All devices in your home network are behind Network Address Translation (NAT). This means they get a private IP address inside your home network, typically in the 192.168.1.x range. A device’s private address is not addressable from the public internet. It can only be used from inside of your home network.
The single device in your home network that has a publicly addressable IP address is your router. In the diagram above that IP address is represented by 173.168.x.x, which is an IP range used by Verizon Fios when covering the NYC area where I live. Your router device serves as a gateway that communicates to the public internet on behalf of devices in your private network. In a typical home networking setup this protects devices in your private network from attackers. The router firewall only allows outbound communications. Anyone on the public internet who is attempting to initiate inbound connections to your router will be rejected.

If you want to expose a device in your network directly to the internet you can enable port forwarding in your router. In order to do this you have to open a port on your router firewall and tell the router to start accepting inbound connections on that port. When someone on the public internet connects to the router on that port, the inbound connection can then be directed to a specific device in your home network. This is a basic approach that works for network ingress, but it is not ideal.
Many ISP’s do not give static IP addresses to their customers. This means the public facing IP address of your home router often changes. You need a process to automatically manage public DNS records or some other way of telling folks on the internet which IP address and port to connect to in order to reach the device in your home network.
Additionally the open port on your router is now a potential vulnerability for attackers to take advantage of. The device that is receiving the port forwarded traffic may have a software vulnerability that can be exploited by attackers to get remote code execution inside your network. At that point your entire home network can be compromised, as attackers can horizontally attack the other devices in the network. If your goal is to host a publicly accessible website or service, then port forwarding is very dangerous. It will require constant updates and monitoring of the devices that will be receiving these inbound connections.
What about site-to-site VPN’s?
Site-to-site VPN’s are another approach often used for networking, especially when there is a need for bidirectional communication between two private networks.
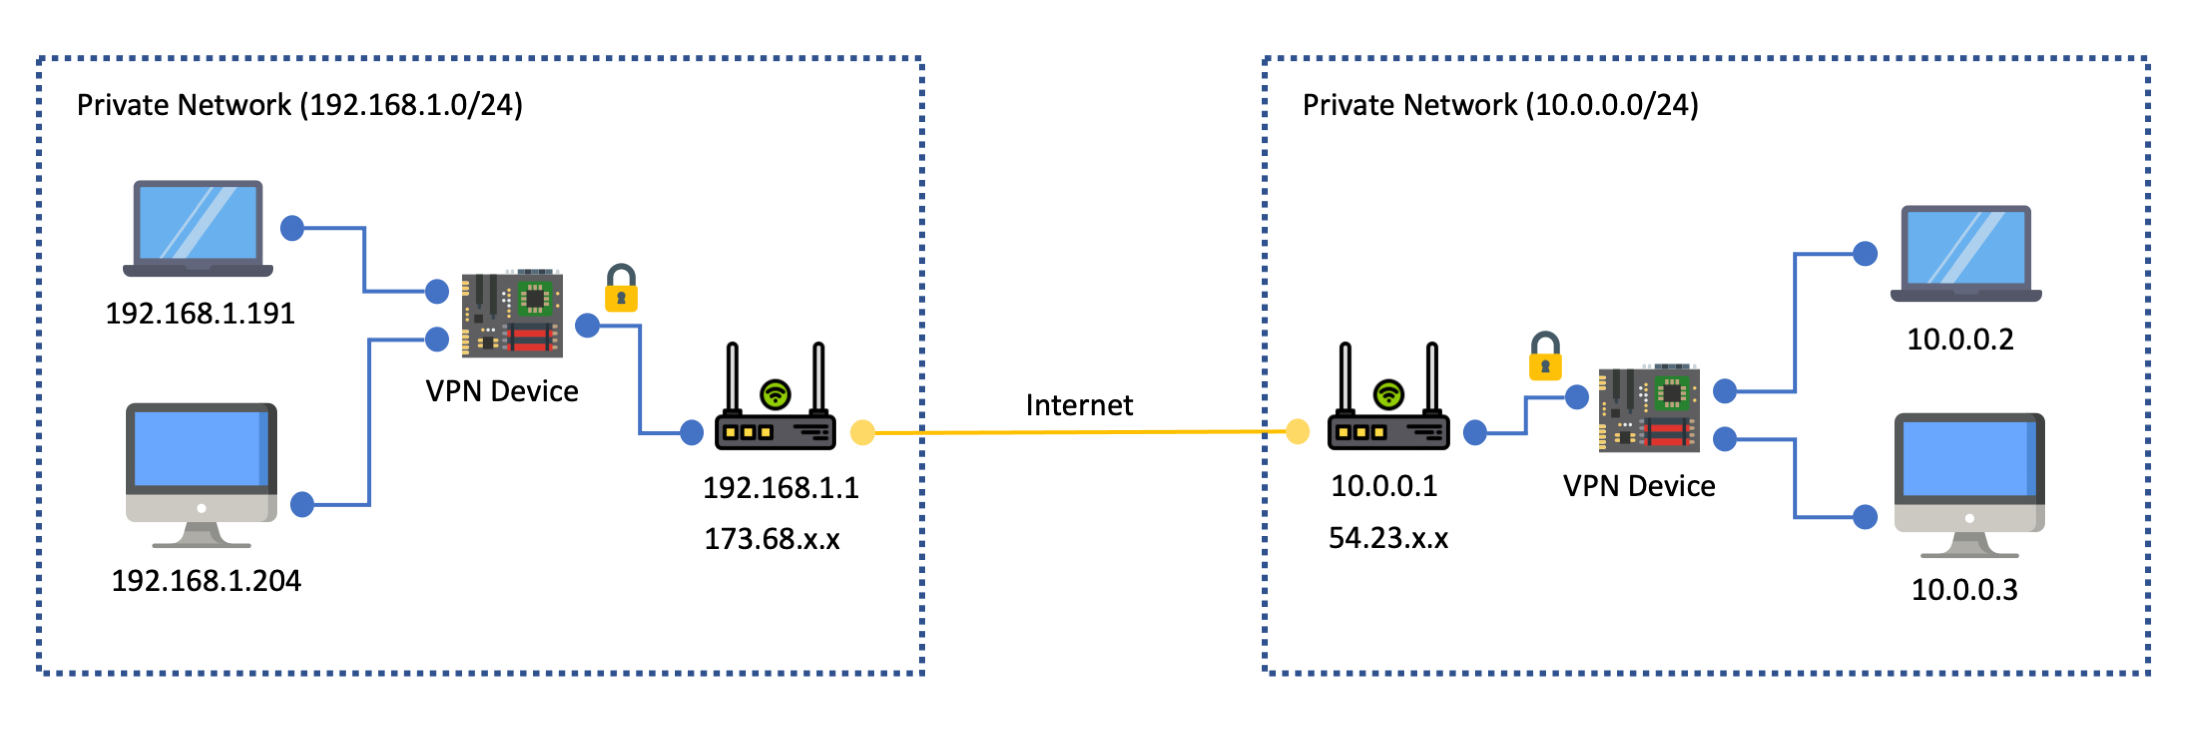
A site-to-site VPN is optimized for making two private networks fully addressable to each other. For example in the above diagram there are two networks, one with the 192.168.1.0/24 range, and one with the 10.0.0.0/24 range. With a VPN setup between the two networks a device 192.168.1.191 in the first network can use the 10.0.0.2 private IP address of a device in the other network. The connection gets routed to the VPN device in the first network, which then communicates over the internet with a VPN device in the second network. Finally the VPN device in the second network sends the network traffic to the destination address.
This approach works well if you need bi-directional network routing: you want devices in each network to be able to initiate connections to each other. However, if your goal is just to allow people on the public internet to communicate to one or two specific devices in your private network then a full site-to-site VPN setup will be overkill. You don’t actually want to expose your entire network to the public.
ECS Anywhere does not require port forwarding or site-to-site VPN
ECS Anywhere uses an architecture that does not require port forwarding or site-to-site VPN. All ECS Anywhere requires is that your devices have an outbound route to the public internet. This internet route can go through a fully firewalled NAT gateway such as your home internet router.
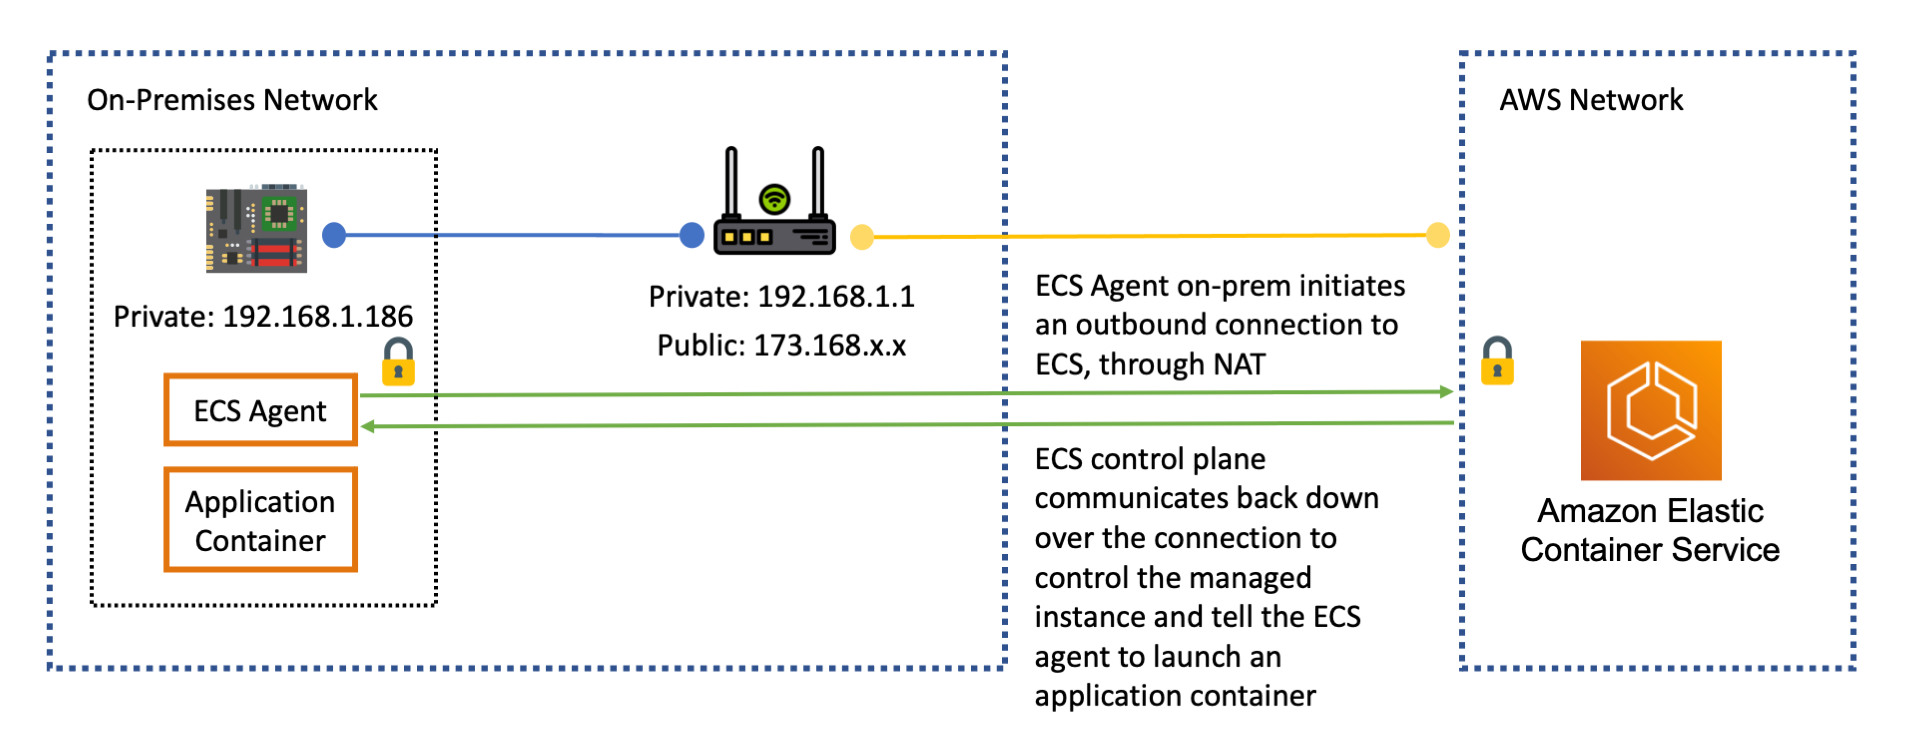
The ECS Anywhere agent process running on your device initiates an outbound connection over the internet to the ECS control plane endpoint in an AWS region. This connection is protected by TLS as well as by IAM authentication. Once the connection has been established the ECS control plane can communicate back down over the open connection to instruct the ECS Anywhere agent on your device to launch containers.
As a result the ECS control plane in an AWS region can communicate with your devices and control them even if these devices do not have a public IP address or router port forwarding rule. This also gives you tremendous flexibility in how you build out your ECS Anywhere cluster. The devices in the cluster could be widely distributed in different networks. I can have a device at home, at the office, or a device with a mobile internet connection. Each of these devices is behind NAT with a different public IP address, but ECS Anywhere can communicate to all of them, no matter where they are.
Introducing Inlets
Inlets is a piece of software that can give you networking ingress to devices in your private network in a similar way to how ECS Anywhere itself functions. You won’t need port forwarding, open firewall rules, or site-to-site VPN.
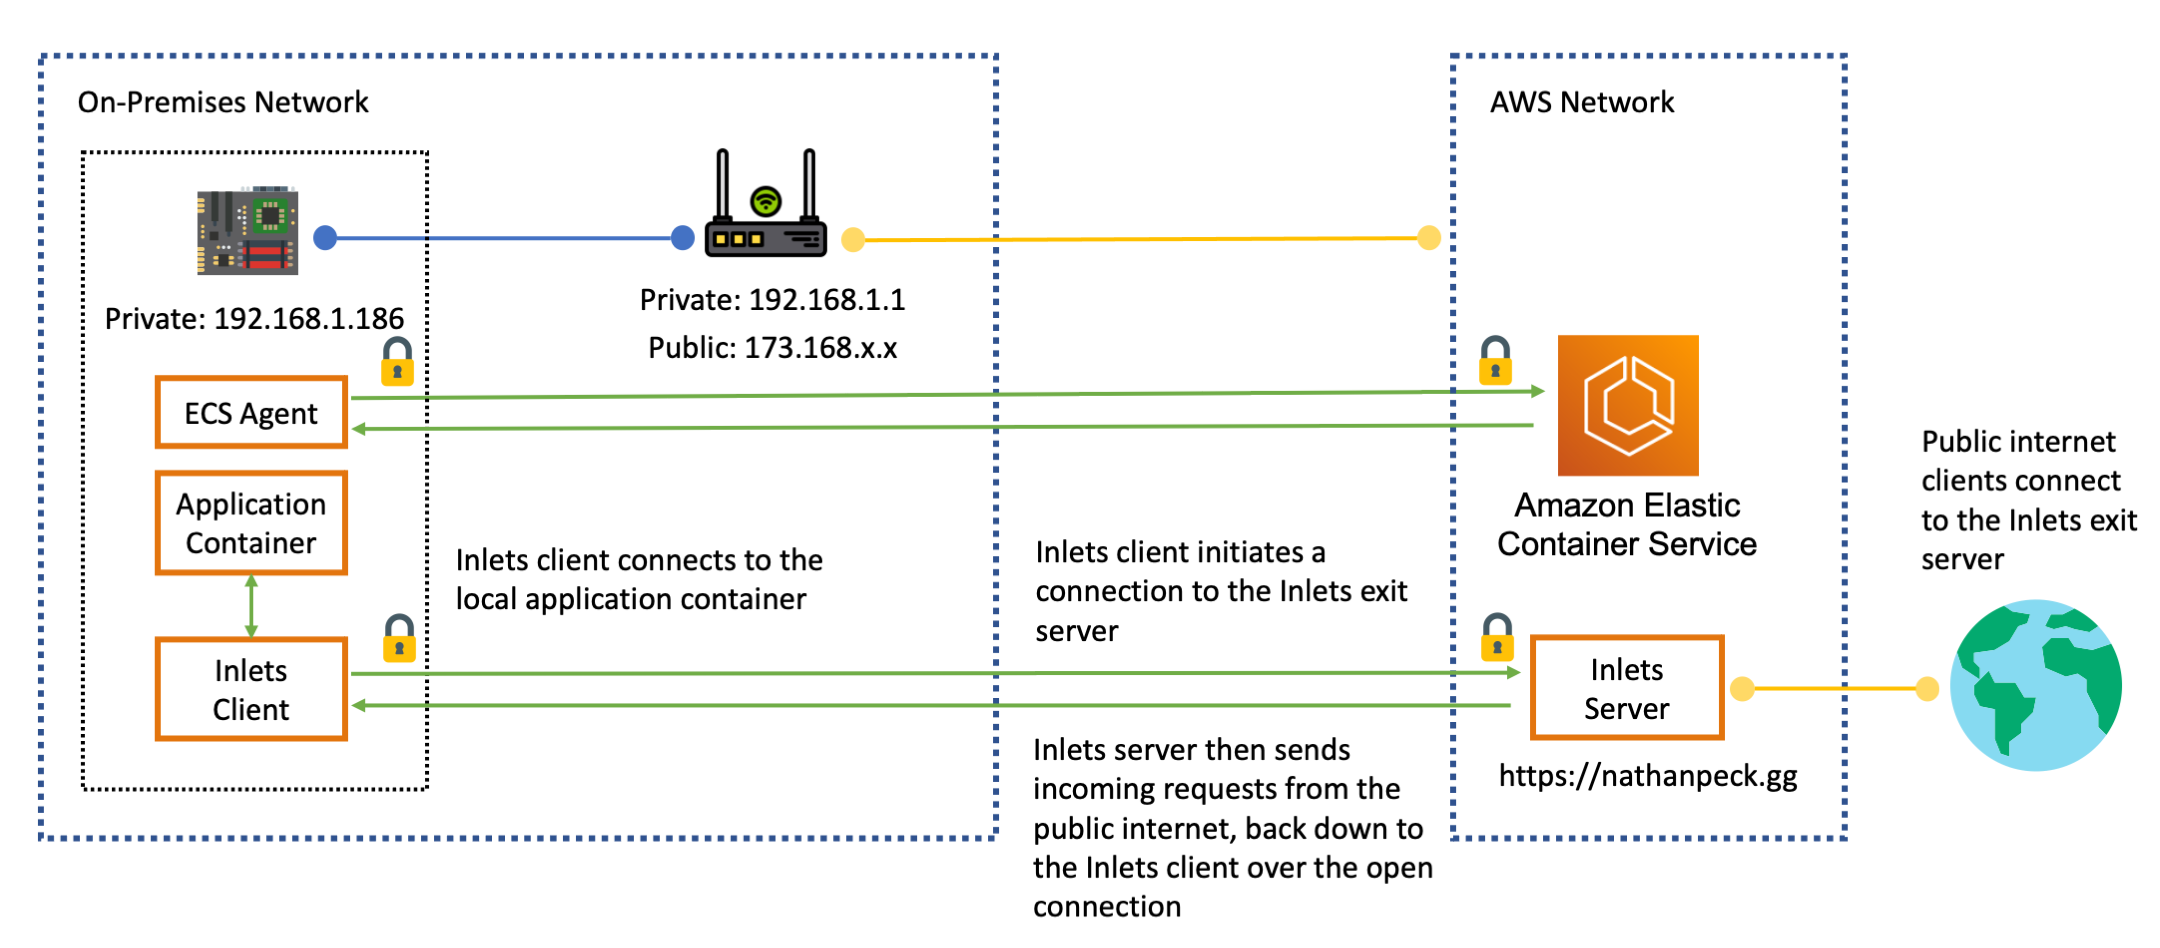
Inlets consists of two components: a client and a server. The client runs on your hardware device inside the private network. The server can be run anywhere, but in this case it is run inside of an AWS region. The client opens an outbound connection to the server. Similar to ECS Anywhere itself, this connection is protected by TLS as well as by an authentication token.
Once this connection has been opened the server can send TCP connections or HTTP requests back down to the client, and the client can direct this traffic to a local process running on your device.
There are a few key benefits of using Inlets:
- More secure: no need to open a firewall port on your router or configure port forwarding. This means that attackers can not connect directly to your device from the public internet. This greatly reduces the vulnerability surface area. Because all the incoming traffic is going through the exit server you can drop bad traffic at one central point.
- More private: You can host a public facing service from your home network without sharing your home IP address with the public. Clients connect via the IP address of the Inlets Server, so your home IP address is obscured.
- More flexible: With Inlets your devices can be fully portable, and move to different networks as needed, all without needing to change any configuration. I could take my Raspberry Pi homelab, break it apart, and put one device in my home, one device at the office, and have another device connecting from a wifi endpoint at the public library. The devices can use their individual internet connections to connect back to the Inlets exit server, and power my service from wherever they are. This makes Inlets much more flexible than a site-to-site VPN, or port forwarding setup, which relies on static IP addresses.
- More easily scaled: Each piece of Inlets can be horizontally scaled. You can horizontally scale the number of Inlets clients if you have more on-premise devices you want to tunnel traffic to. You can horizontally scale the number of exit servers if you have a lot of Inlets clients that need to receive traffic to the public internet, or if you have a lot of incoming requests from the public internet. This horizontal scaling can be achieved with traditional load balancing techniques. This is much easier than trying to scale VPN based solutions that can end up being a bottleneck on the bandwidth.
You can setup Inlets in a variety of different ways, including using the inletsctl CLI. It can automatically provision an exit server across different cloud providers, including AWS.
You can also use Inlets directly from the command line. Inlets has very simple commands for launching the client and server.
For the server:
inlets http server \
  --token-env=INLETS_TOKEN \
  --port=8000
And for the client:
inlets http client \
  --url=wss://${DOMAIN_NAME}:8123 \
  --upstream localhost:80 \
  --token-env=INLETS_TOKEN \
  --license-env=LICENSE_KEY
There are only a few configuration inputs needed. There is a preshared token, which can be passed in as an environment variable. This token is used to authenticate that it is a real client connecting to the exit server. The client just needs to know the address of where to connect to the exit server, the address of the local service to expose via the exit server, the preshared token, and a license key to use Inlets.
Later in this article we’ll look at how to use ECS Anywhere as the tool for automatically provisioning and launching the Inlets exit server, as well as the on-premise Inlets client, and application.
Using ECS Anywhere to deploy Inlets
A single Elastic Container Service cluster can orchestrate hybrid deployments of services across both on-premises hardware and cloud resources. This makes it an ideal control plane for deploying an architecture that makes use of Inlets. There are three components in the architecture:
- The application itself - ECS Anywhere launches the application container onto devices that have been registered with ECS as managed instances. For simplicity of deployment we can configure ECS to deploy a single application container per host. We can use bridge networking mode and static port mappings to give each application container a port number that can be used to access the application at
http://localhost:${PORT} - Inlets client - This can be deployed as a ECS external type service in DAEMON mode. This will tell ECS to deploy one copy of the inlets client on each hardware device that is registered into the inlets service. We deploy this service using host networking mode so that it can communicate to the application containers on each device over the localhost loopback interface.
- Inlets server - This service is deployed in the cloud, using AWS Fargate capacity. This makes managing the Inlets server hands off. The Inlets service is given a public facing load balancer, which lets us assign a domain name, and handle HTTPS encryption and certificate renewal. This load balancer also allows us to take advantage of AWS specific security features like AWS Web Application Firewall, to protect our system from malicious traffic.
To illustrate how these pieces work together consider the following diagram:
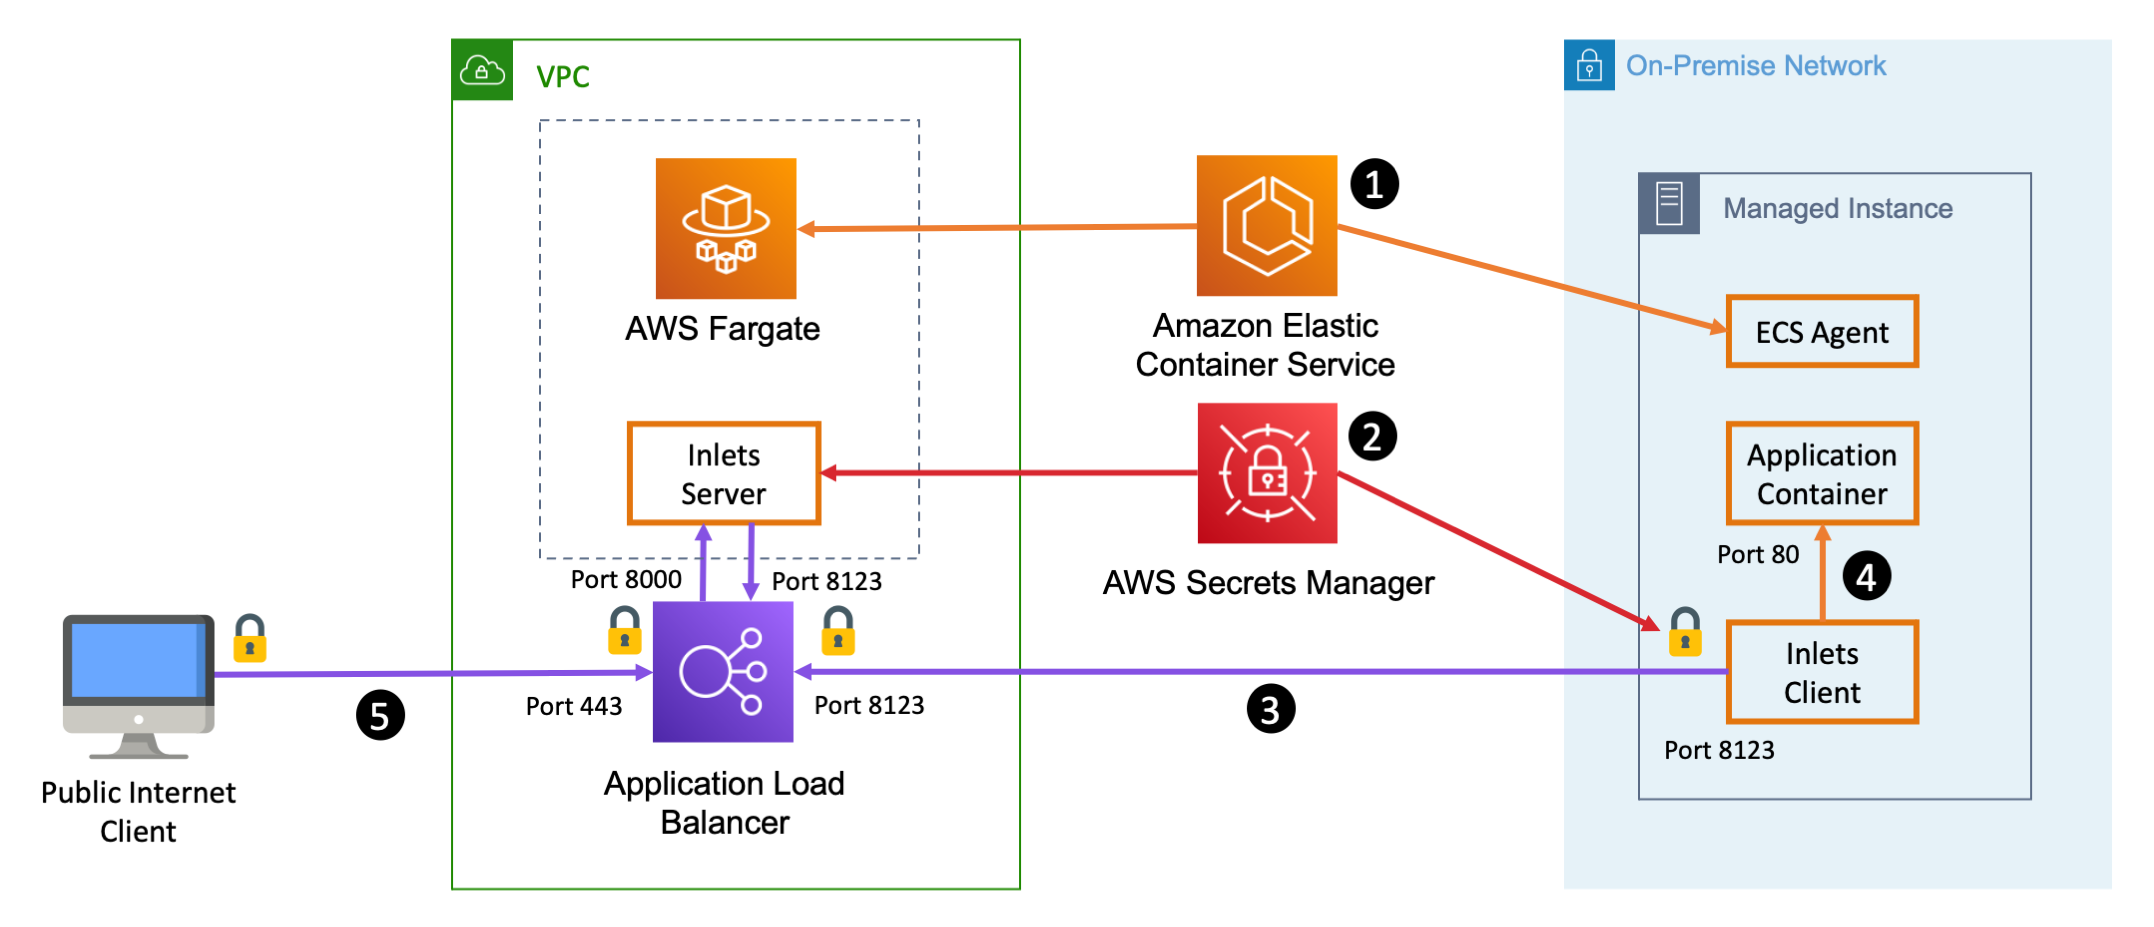
- Elastic Container Service is the orchestrator that launches all three components. It launches the application and the Inlets client on your hardware, managed by ECS Anywhere. It also launches the Inlets server as a Fargate task, and orchestrates the association between the Fargate tasks and a public facing Application Load Balancer.
- ECS also securely integrates with AWS Secrets Manger to manage the delivery of important Inlets secrets such as the Inlets license key, and the Inlets authentication token that Inlets client will use to authenticate with the Inlets server. ECS Anywhere delivers these secrets to the managed instance on-premises as well as the in-cloud AWS Fargate task.
- The inlets client running on your hardware connects to the Application Load Balancer on port
8123. This connection is protected by a TLS certificate, and by the Inlets token that was shard with both Inlets server and Inlets client by AWS Secrets Manager. The ALB sends the Inlets Client connection through to port8123on the Inlets Server. The Inlets Server validates an authentication token from the Inlets Client so that it knows that this is an actual client connecting. Once the connection is established and authenticated the Inlets server will add the Inlets client as an available destination for any incoming traffic. - The Inlets client maintains a connection to the local application process on the managed instance. The Inlets client serves as a reverse proxy for sending HTTP requests and TCP connections to the local application container.
- Clients from the public internet connect to the ALB on port
443, the standard HTTPS port. The connection is protected by a TLC cert that is handled by the ALB. Incoming connections are sent through to port8000on the Inlets server which is running in Fargate. When the Inlets server receives HTTP requests on port8000it does a round robin distribution of requests across each of the available Inlets clients that have connected to the Inlets server on port8123. When an Inlets client receives an incoming request over its connection to the Inlets server, it proxies the request to the local application, and responds back to the Inlets server. When the Inlets Server receives the response from the Inlets client, it sends the response back out through the ALB to the public internet client.
Inlets supports both HTTP load balancing mode and TCP load balancing mode. In this sample architecture we are using HTTP load balancing mode to evenly distribute HTTP requests across each Inlets client and destination application container, but the same architecture can work for TCP workloads as well. When using TCP workloads you would want to use a Network Load Balancer instead of an Application Load Balancer.
See Inlets + ECS Anywhere in action
If you’d like to test out this deployment you can do so right now by loading up https://nathanpeck.gg/ in your browser.
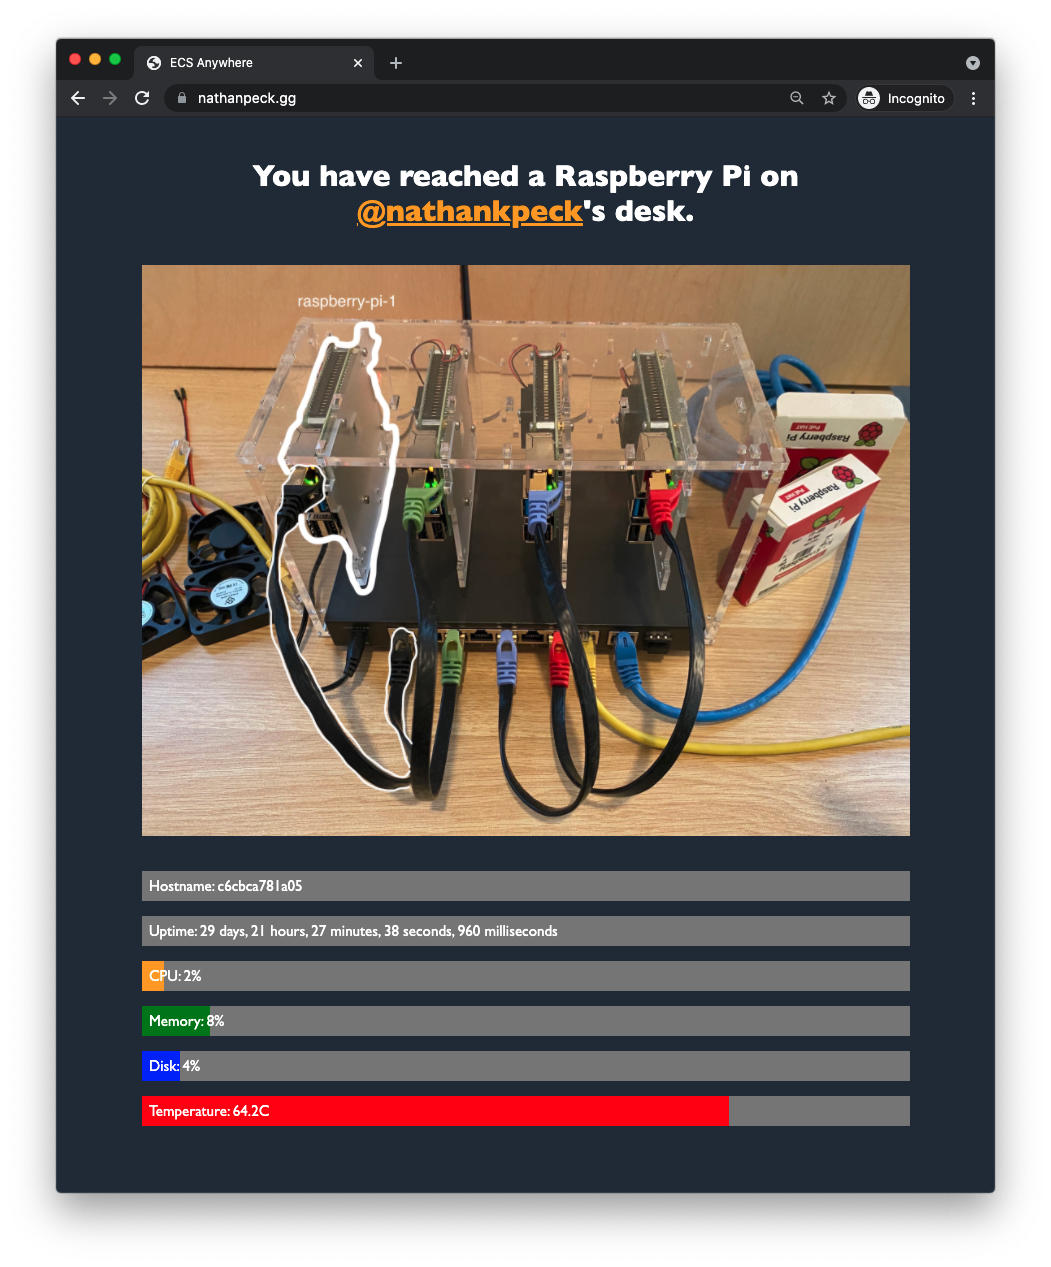
Your connection goes first to an ALB in front of an Inlets server in AWS Fargate. From there it goes an Inlets client running on a Raspberry Pi homelab on my desk. The Inlets client will then serve back a response from the local application running on my Raspberry Pi. That response will then traverse back up to the Inlets Server, back out through the ALB to your browser.
It’s important to consider performance in any architecture, so how does Inlets perform for network traffic? In my case my homelab cluster is using 4 x Raspberry Pi 4 Model B, with 1.5 GHz processors that are running in low power mode so that they can stay passively cooled by heatsinks only, with minimal fan noise. This isn’t the most high powered setup, yet we can still run a basic load test to validate that this architecture with Inlets has what it takes for serving decent amounts of traffic. I used rakyll/hey to generate some basic load:
./hey -n 100000 -c 100 https://nathanpeck.gg/

Summary:
  Total:        53.6317 secs
  Slowest:      0.7498 secs
  Fastest:      0.0323 secs
  Average:      0.0526 secs
  Requests/sec: 1864.5702


Response time histogram:
  0.032 [1]     |
  0.104 [96743] |■■■■■■■■■■■■■■■■■■■■■■■■■■■■■■■■■■■■■■■■
  0.176 [3060]  |■
  0.248 [95]    |
  0.319 [4]     |
  0.391 [3]     |
  0.463 [7]     |
  0.535 [23]    |
  0.606 [24]    |
  0.678 [23]    |
  0.750 [17]    |


Latency distribution:
  10% in 0.0357 secs
  25% in 0.0390 secs
  50% in 0.0460 secs
  75% in 0.0569 secs
  90% in 0.0772 secs
  95% in 0.0935 secs
  99% in 0.1353 secs

Details (average, fastest, slowest):
  DNS+dialup:   0.0001 secs, 0.0323 secs, 0.7498 secs
  DNS-lookup:   0.0000 secs, 0.0000 secs, 0.0201 secs
  req write:    0.0000 secs, 0.0000 secs, 0.0009 secs
  resp wait:    0.0524 secs, 0.0323 secs, 0.7497 secs
  resp read:    0.0000 secs, 0.0000 secs, 0.0017 secs

Status code distribution:
  [200] 100000 responses
From the results we can see that Inlets in front of my four Raspberry Pi’s is able to serve over 1800 requests per second, with a p99 latency of 135ms, and average response time of 52ms.
Check out the code and try it yourself!
If you are interested in trying out this architecture yourself, then you can also check out the AWS Cloud Development Kit reference code for this architecture at: https://github.com/nathanpeck/inlets-on-ecs-anywhere/blob/main/lib/inlets-stack.ts
Note that you will need to bring your own domain name, TLS certificate, and Inlets license key for this reference architecture to work. For the domain name and TLS certificate I bought a domain using Amazon Route 53, and I used AWS Certificate Manager for the certificate because it integrates seamlessly with Route 53 and the AWS hosted Application Load Balancer.
For the Inlets license key I highly recommend using the Inlets Gumroad subscription. It will give you a license key, which you can upload to AWS Secrets Manager. Once hosted in AWS Secrets Manager you can drop the Amazon Resource Name (ARN) for the secret into the template to have ECS automatically distribute the license key to your Inlets tunnels orchestrated by ECS Anywhere.
If you want to find out more check out the following resources:
You can also reach out to me on LinkedIn with any questions: @nathankpeck on LinkedIn
You can also download the source file for the diagrams in this post: