
Speeding up Amazon ECS container deployments
Container orchestration is a complex problem. There are many different components communicating with each other in support of your application container deployment. First the orchestrator starts your application. Then the orchestrator needs to make a decision about whether your application is ready for web traffic. Later the application might be scaled down or a new version needs to be rolled out, so the old version of the application needs to be stopped. The orchestrator must decide whether the application is safe to stop. The orchestrator wants to maintain your application’s availability while doing a rolling deployment.
As a result of this you can sometimes end up in situations where your container deployments seem to be taking longer than you expect. Have thought to yourself “Why is this new version of my container taking 15 minutes to roll out?” If so this is usually because parts of your container orchestration are configured to be excessively “safe”. Here are some tips and tricks for configuring slightly less safe, but considerably faster container deployments on Amazon ECS:
Load balancer healthchecks
There are two load balancer healthcheck settings that you will want to modify:
Default settings (Target group health check settings):
HealthCheckIntervalSeconds: 30 secondsHealthyThresholdCount: 5
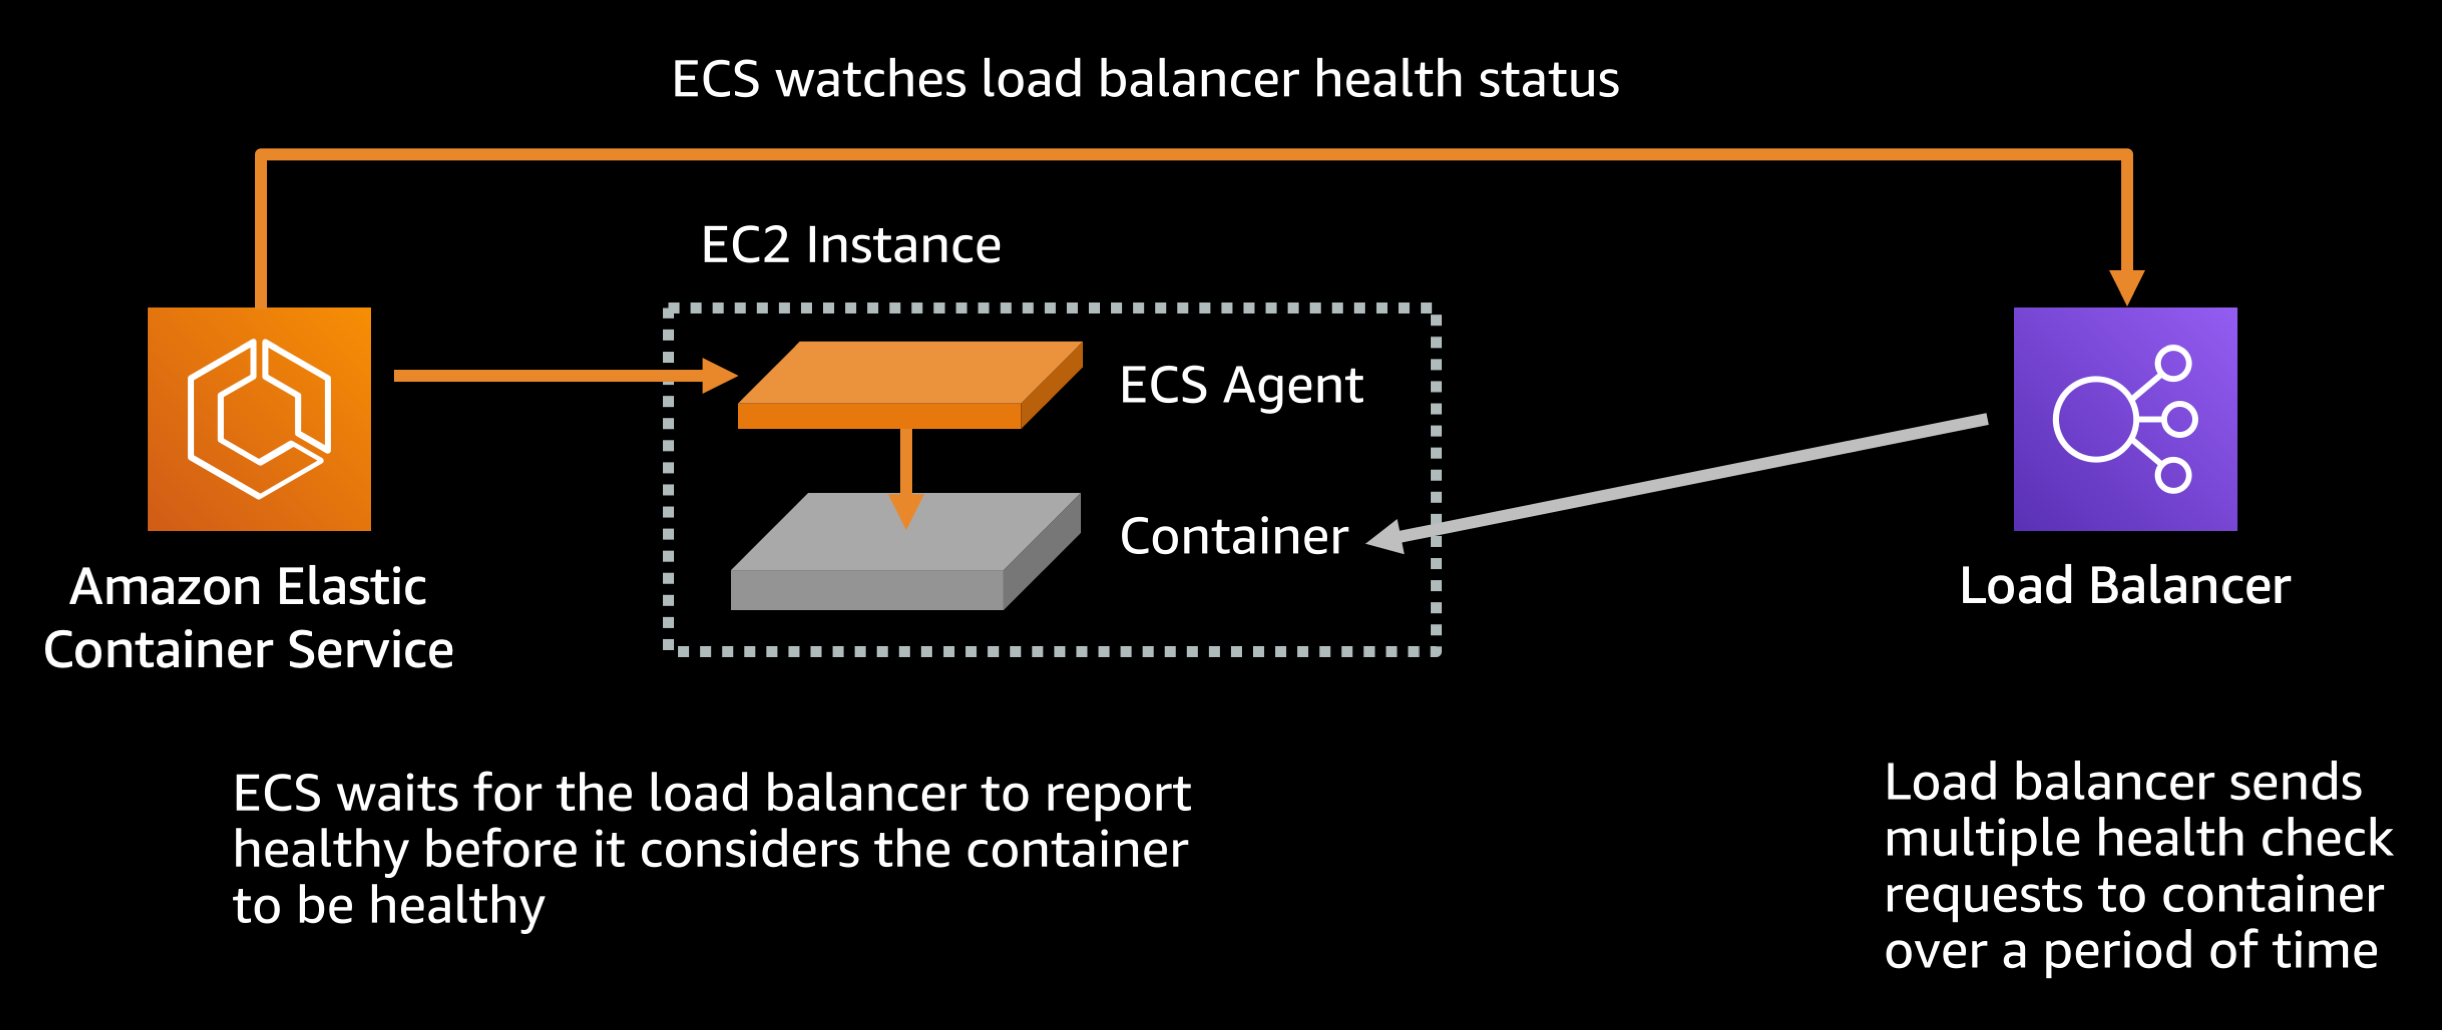
By default the load balancer requires 5 passing healthchecks, each of which is made 30 seconds apart, before the target container is considered healthy. With a little math (5 * 30 / 60 = 2.5) we can see that means 2 minutes and 30 seconds. Because Amazon ECS uses the load balancer healthcheck as part of determining container health, this means that by default it takes a minimum of 2 minutes and 30 seconds before ECS considers a freshly launched container to be healthy.
If your service starts up and stabilizes fast (as most modern runtimes should be able to) you can reduce this to the minimum:
Recommended settings (Target group health check settings):
HealthCheckIntervalSeconds: 5 secondsHealthyThresholdCount: 2
This configuration would mean it only takes 10 seconds before the the load balancer and subsequently ECS can consider the container healthy.
Load balancer connection draining
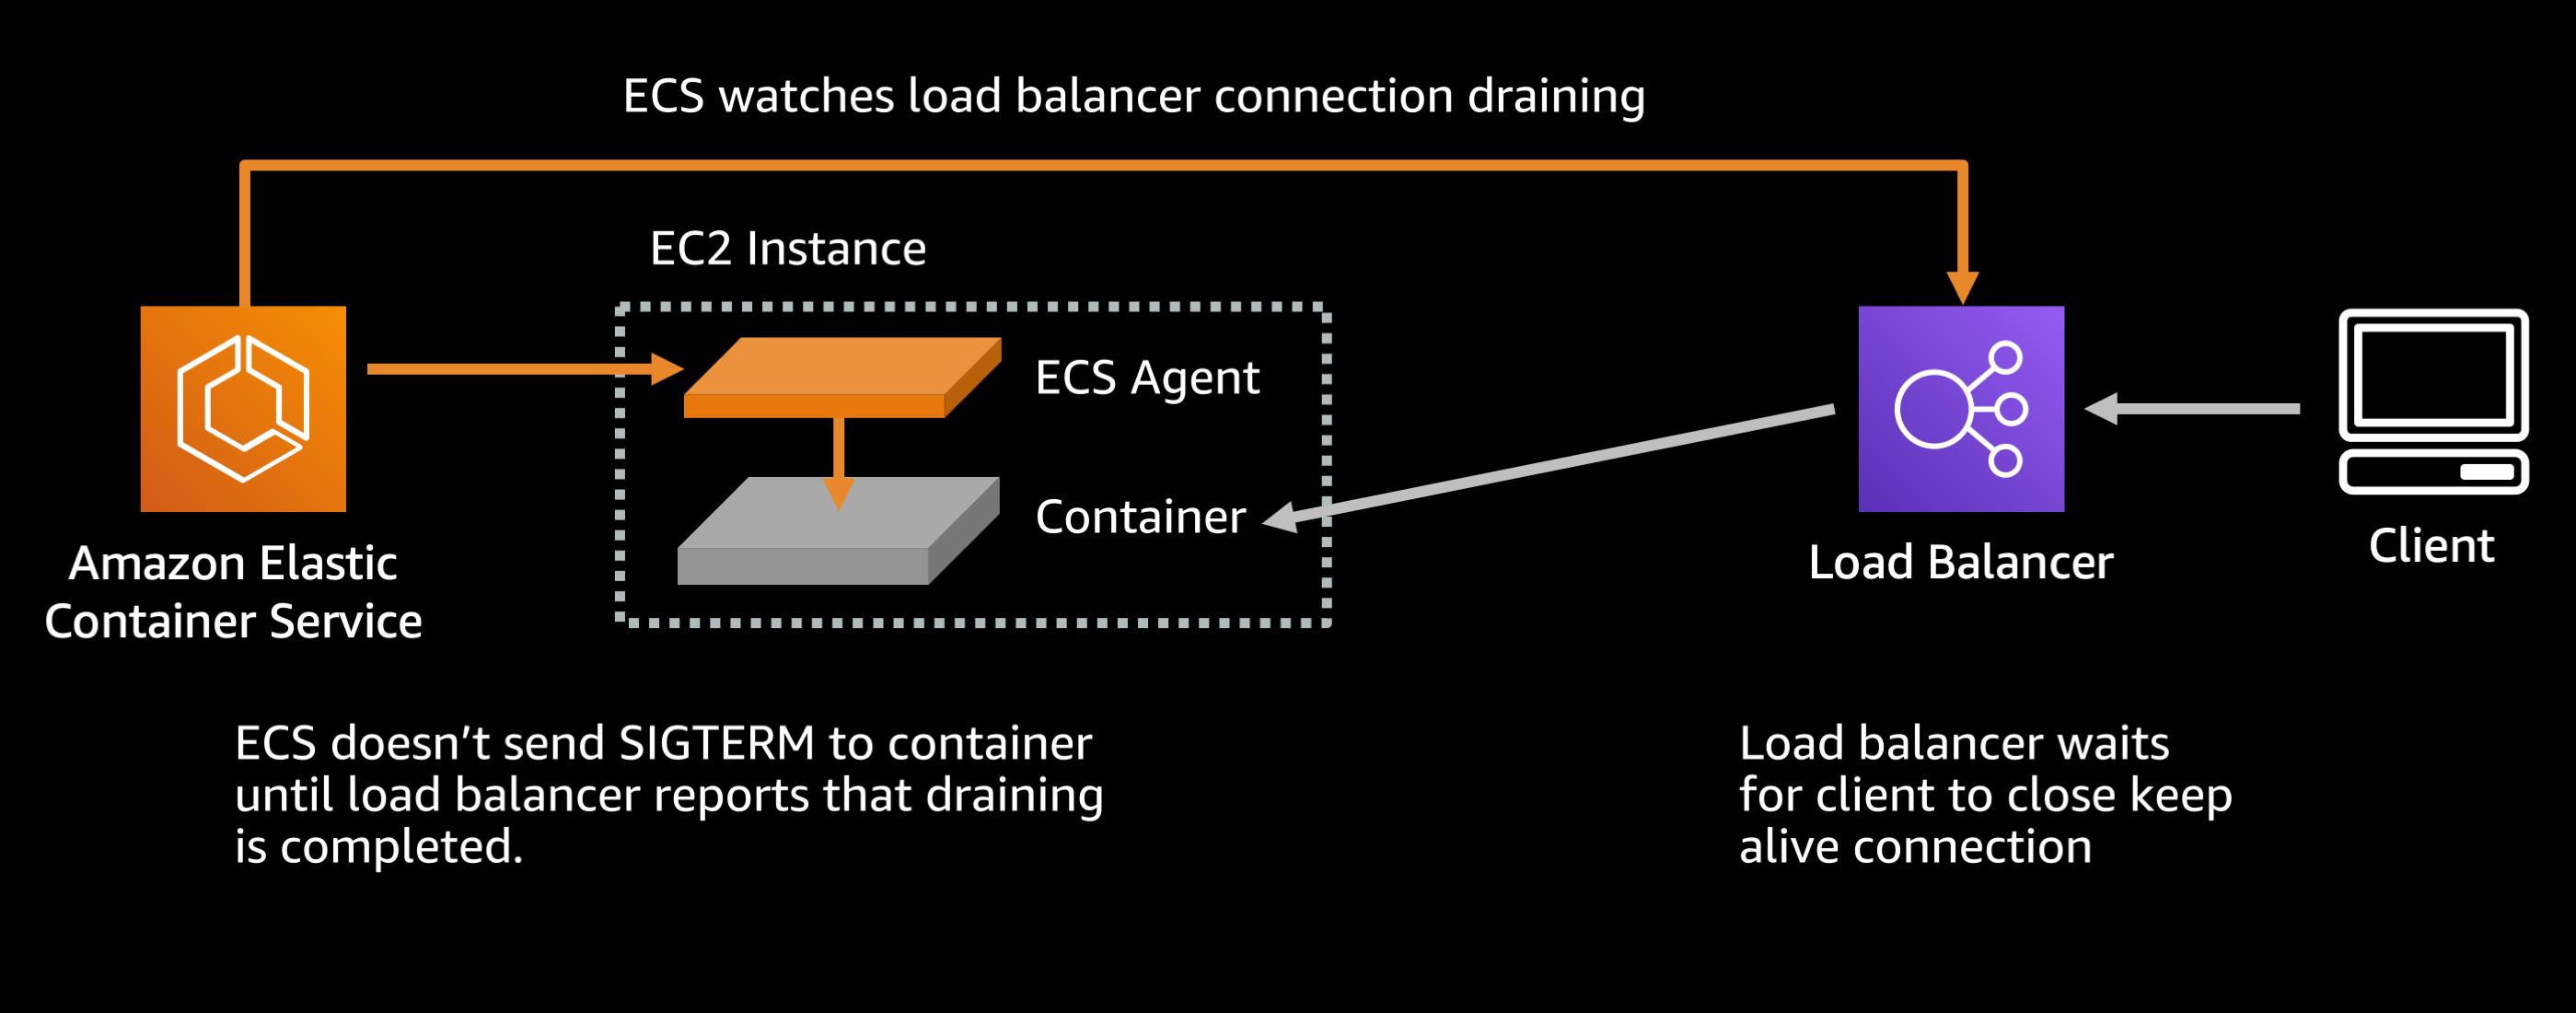
Browsers and mobile clients usually maintain a keep alive connection to the service running inside your container. This is an important optimization because it means that subsequent requests from that client can reuse a preexisting connection rather than needing to reestablish the connection from scratch each time they need to send a request.
When you tell the load balancer that you want to stop sending traffic to a container (probably because you want to shut it down) the load balancer will stop sending new connections to the downstream container, but it will wait for existing connections to close on their own. It will only break the keep alive connections forcefully after a period called the deregistration delay.
Default settings (Target group attributes):
deregistration_delay.timeout_seconds: 300 seconds
By default the load balancer will wait up to 300 seconds (or 5 minutes) for the existing keep alive connections to close on their own, before forcefully breaking them. ECS waits for this deregistration to complete before sending a SIGTERM signal to your container, so that any inflight requests do not get dropped.
If your service is something like a fast REST API where average response times are under a second there is no harm in reducing this delay or removing it entirely. Do not do this if you have a service with long lived requests like slow file uploads, streaming connections, etc:
Recommended settings (Target group attributes):
deregistration_delay.timeout_seconds: 5 seconds
This will cause the load balancer to wait only 5 seconds before breaking any keep alive connections between the client and your backend server, then it reports to ECS that draining is complete and ECS can stop the task.
SIGTERM responsiveness

After load balancer draining is done, when ECS stops a running task, one of the first things that happens is a SIGTERM signal is sent to the task. This is intended as a friendly warning that the containerized application needs to finish what it is doing and shut down. However many application frameworks ignore this signal. As a result there is a waiting period where ECS is giving the application a chance to close in a clean manner, and when that expires a SIGKILL signal is sent to force terminate the process. By default this waiting period is configured to be 30 seconds long.
Default setting (ECS agent setting):
ECS_CONTAINER_STOP_TIMEOUT: 30 seconds
You can speed up the waiting period by lowering the amount of time that the container is given to gracefully shut down.
Recommended setting (ECS agent setting):
ECS_CONTAINER_STOP_TIMEOUT: 2 seconds
Now ECS will only give the container 2 seconds to shut down, and if it does not complete its work and exit within that time period then the container will be force stopped with a SIGKILL signal. Ideally this waiting period should be set to at least twice as long as the slowest request or transaction response time. In this case I assume that your application serves requests within 1 second, so 2 seconds should be more than long enough for the process to finish all in-flight requests and exit.
If you have the ability to modify the application code you can also trap the SIGTERM signal and react to it in a responsive manner. For example in Node.js:
process.on('SIGTERM', function() {
  server.close();
})
This will cause the HTTP server to stop listening for any new requests, finish answering any in-flight requests, and then the Node.js process will terminate as its event loop will have nothing left to do. This way if it takes the process only 500ms to finish its in-flight requests it will terminate early on its own without having to wait out the stop timeout and get sent a SIGKILL.
Container image pull behavior
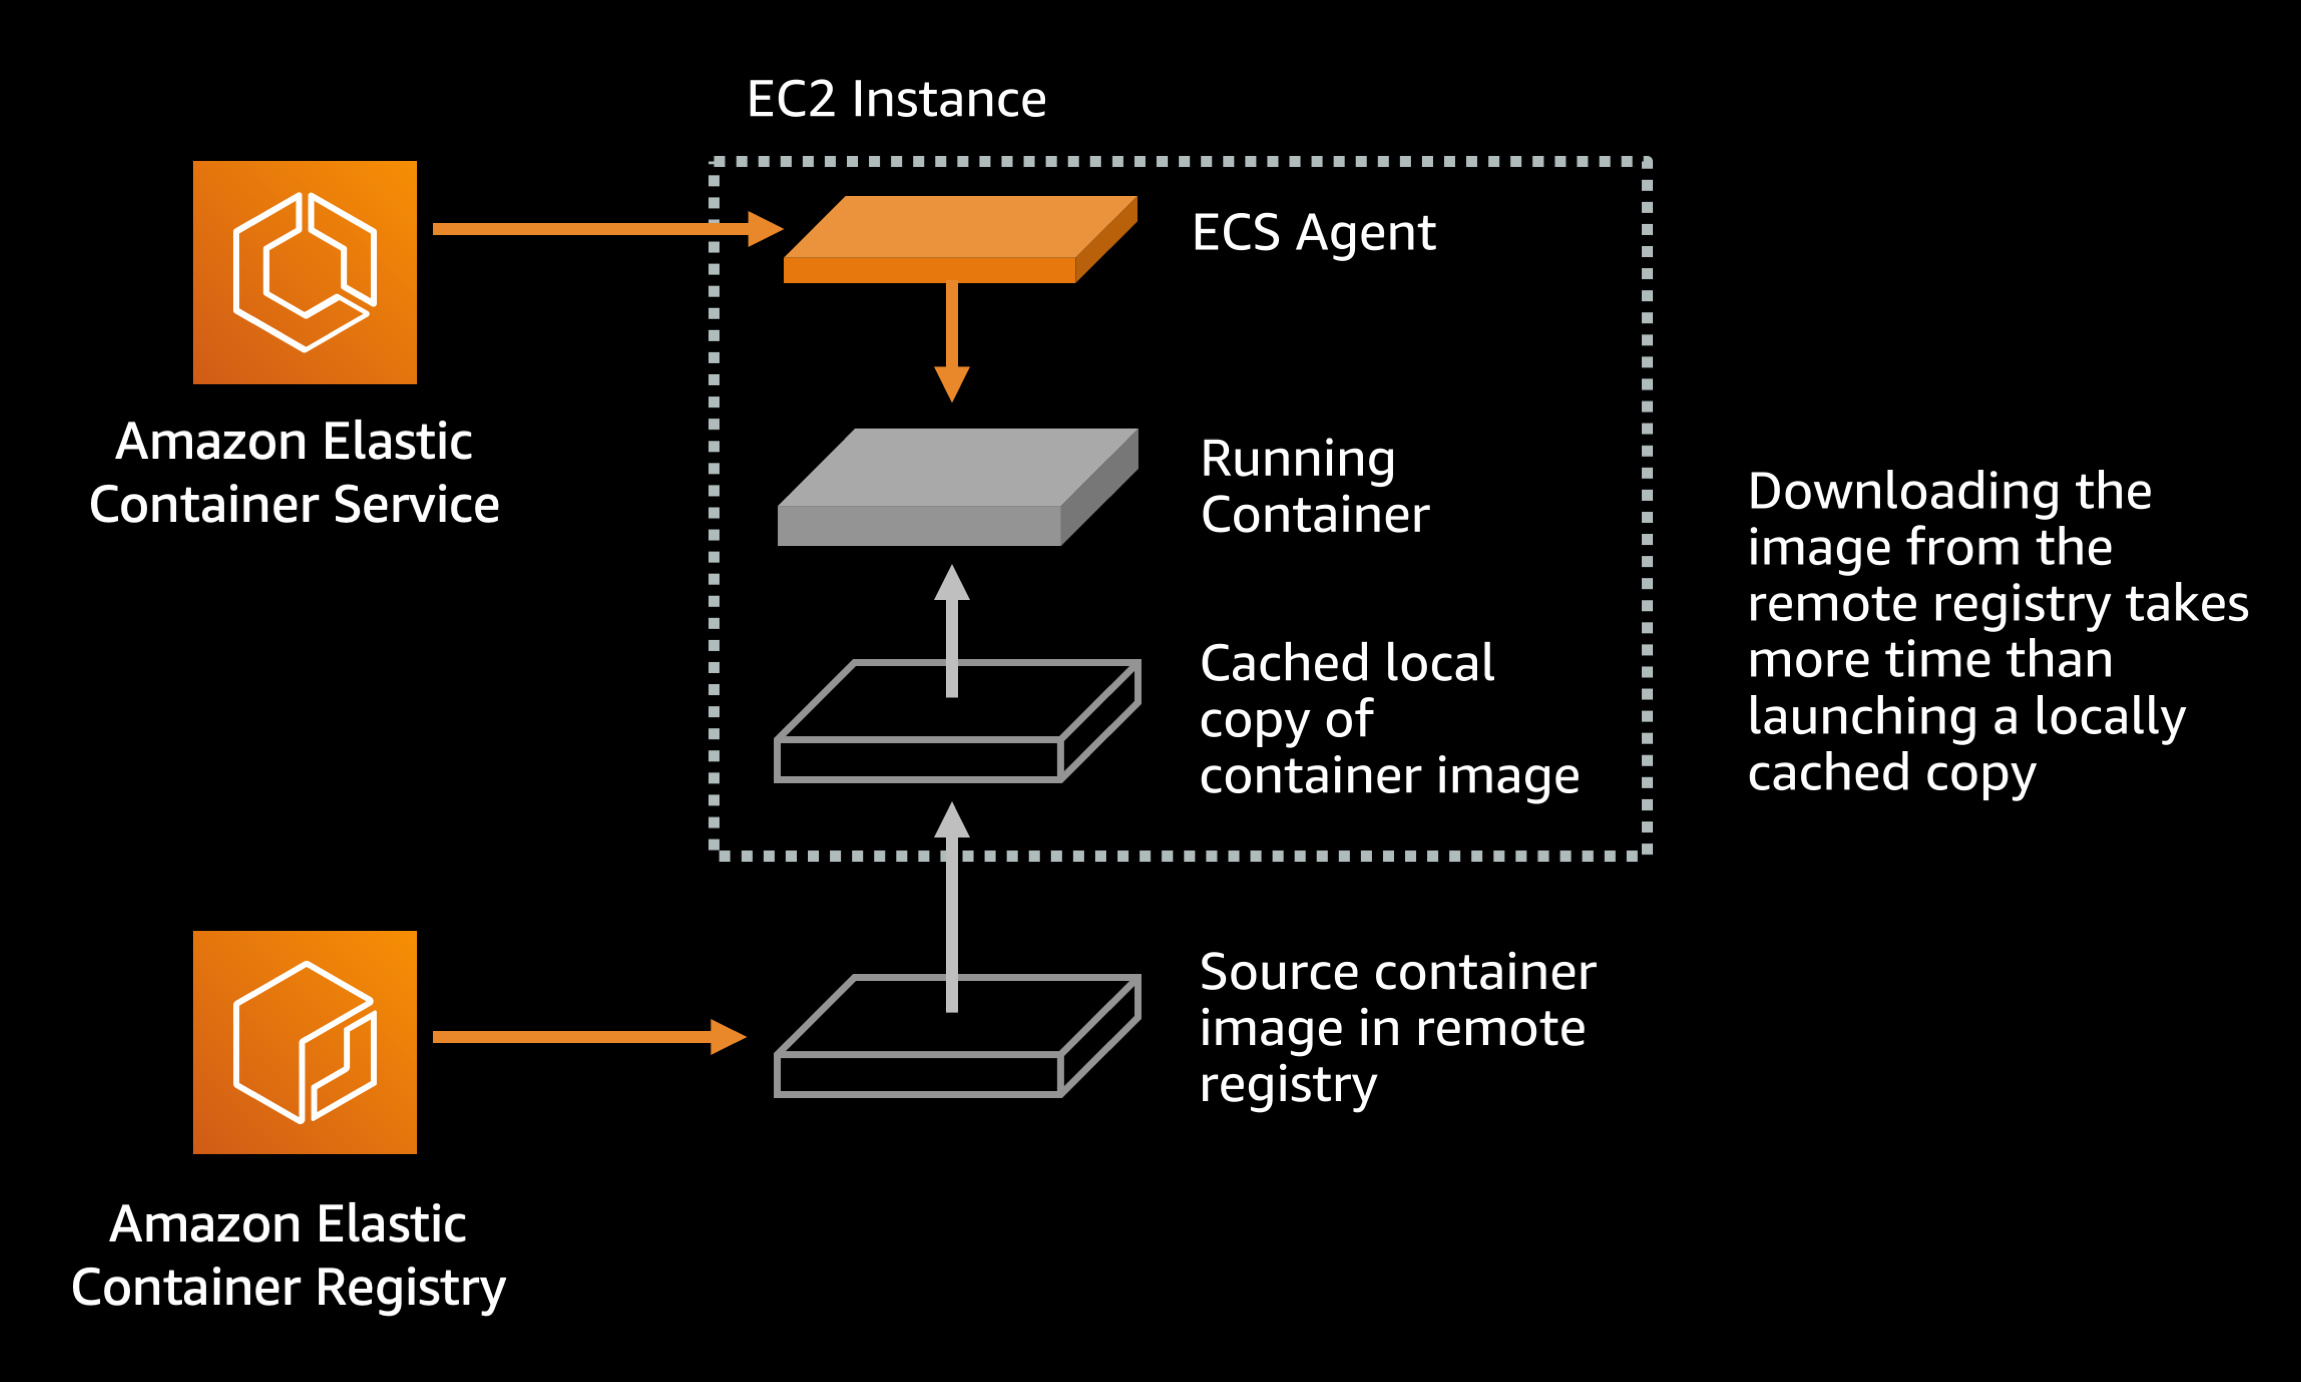
By default the ECS agent always pulls the Docker image from its remote registry when starting a task. If you are using a well designed image tagging scheme such as a new image tag for each release of your application this behavior is unnecessary. The default behavior only benefits you if you are doing something like overwriting your latest image tag with new content for each application release. Since using the latest tag is an anti-pattern anyway, you are likely using a unique image tag for each application release and can modify your image pull behavior.
Default setting (ECS agent setting):
ECS_IMAGE_PULL_BEHAVIOR: default
Recommended setting (ECS agent setting):
ECS_IMAGE_PULL_BEHAVIOR: once or alternatively prefer-cached
This causes ECS to use a preexisting, downloaded image in disk cache on the EC2 host instead of downloading from the remote registry. This can save task startup time, particularly for larger Docker images that may take 10-20 seconds to pull over the network.
Deploy “steps”
One important optimization to consider is how many steps the container orchestrator must go through in order to fully roll out a service update. One of the goals of a good container orchestrator is to maintain 100% uptime when rolling out a new version of your application. Imagine if the orchestrator did a two step process:
- Stop the old application containers
- Start new application containers
In this case there would be a brief window between step 1 and step 2 where there were no application containers and a user of the system would experience an error.
Instead the orchestrator ideally does the following process:
- Start new appliation containers alongside the old application containers
- Ensure that the new application containers are healthy
- Stop old containers
Depending on your deployment configuration and the amount of free, unreserved space in your cluster it may take multiple rounds of this to complete replace all old tasks with new tasks. For example:
Default settings (ECS Service Deployment setting):
minimumHealthyPercent: 100%maximumPercent: 200%
Imagine a service that has 6 orange tasks, deployed in a cluster that only has room for 8 tasks total. Additionally the deployment settings don’t allow the deployment to go below 100% of the 6 desired tasks:
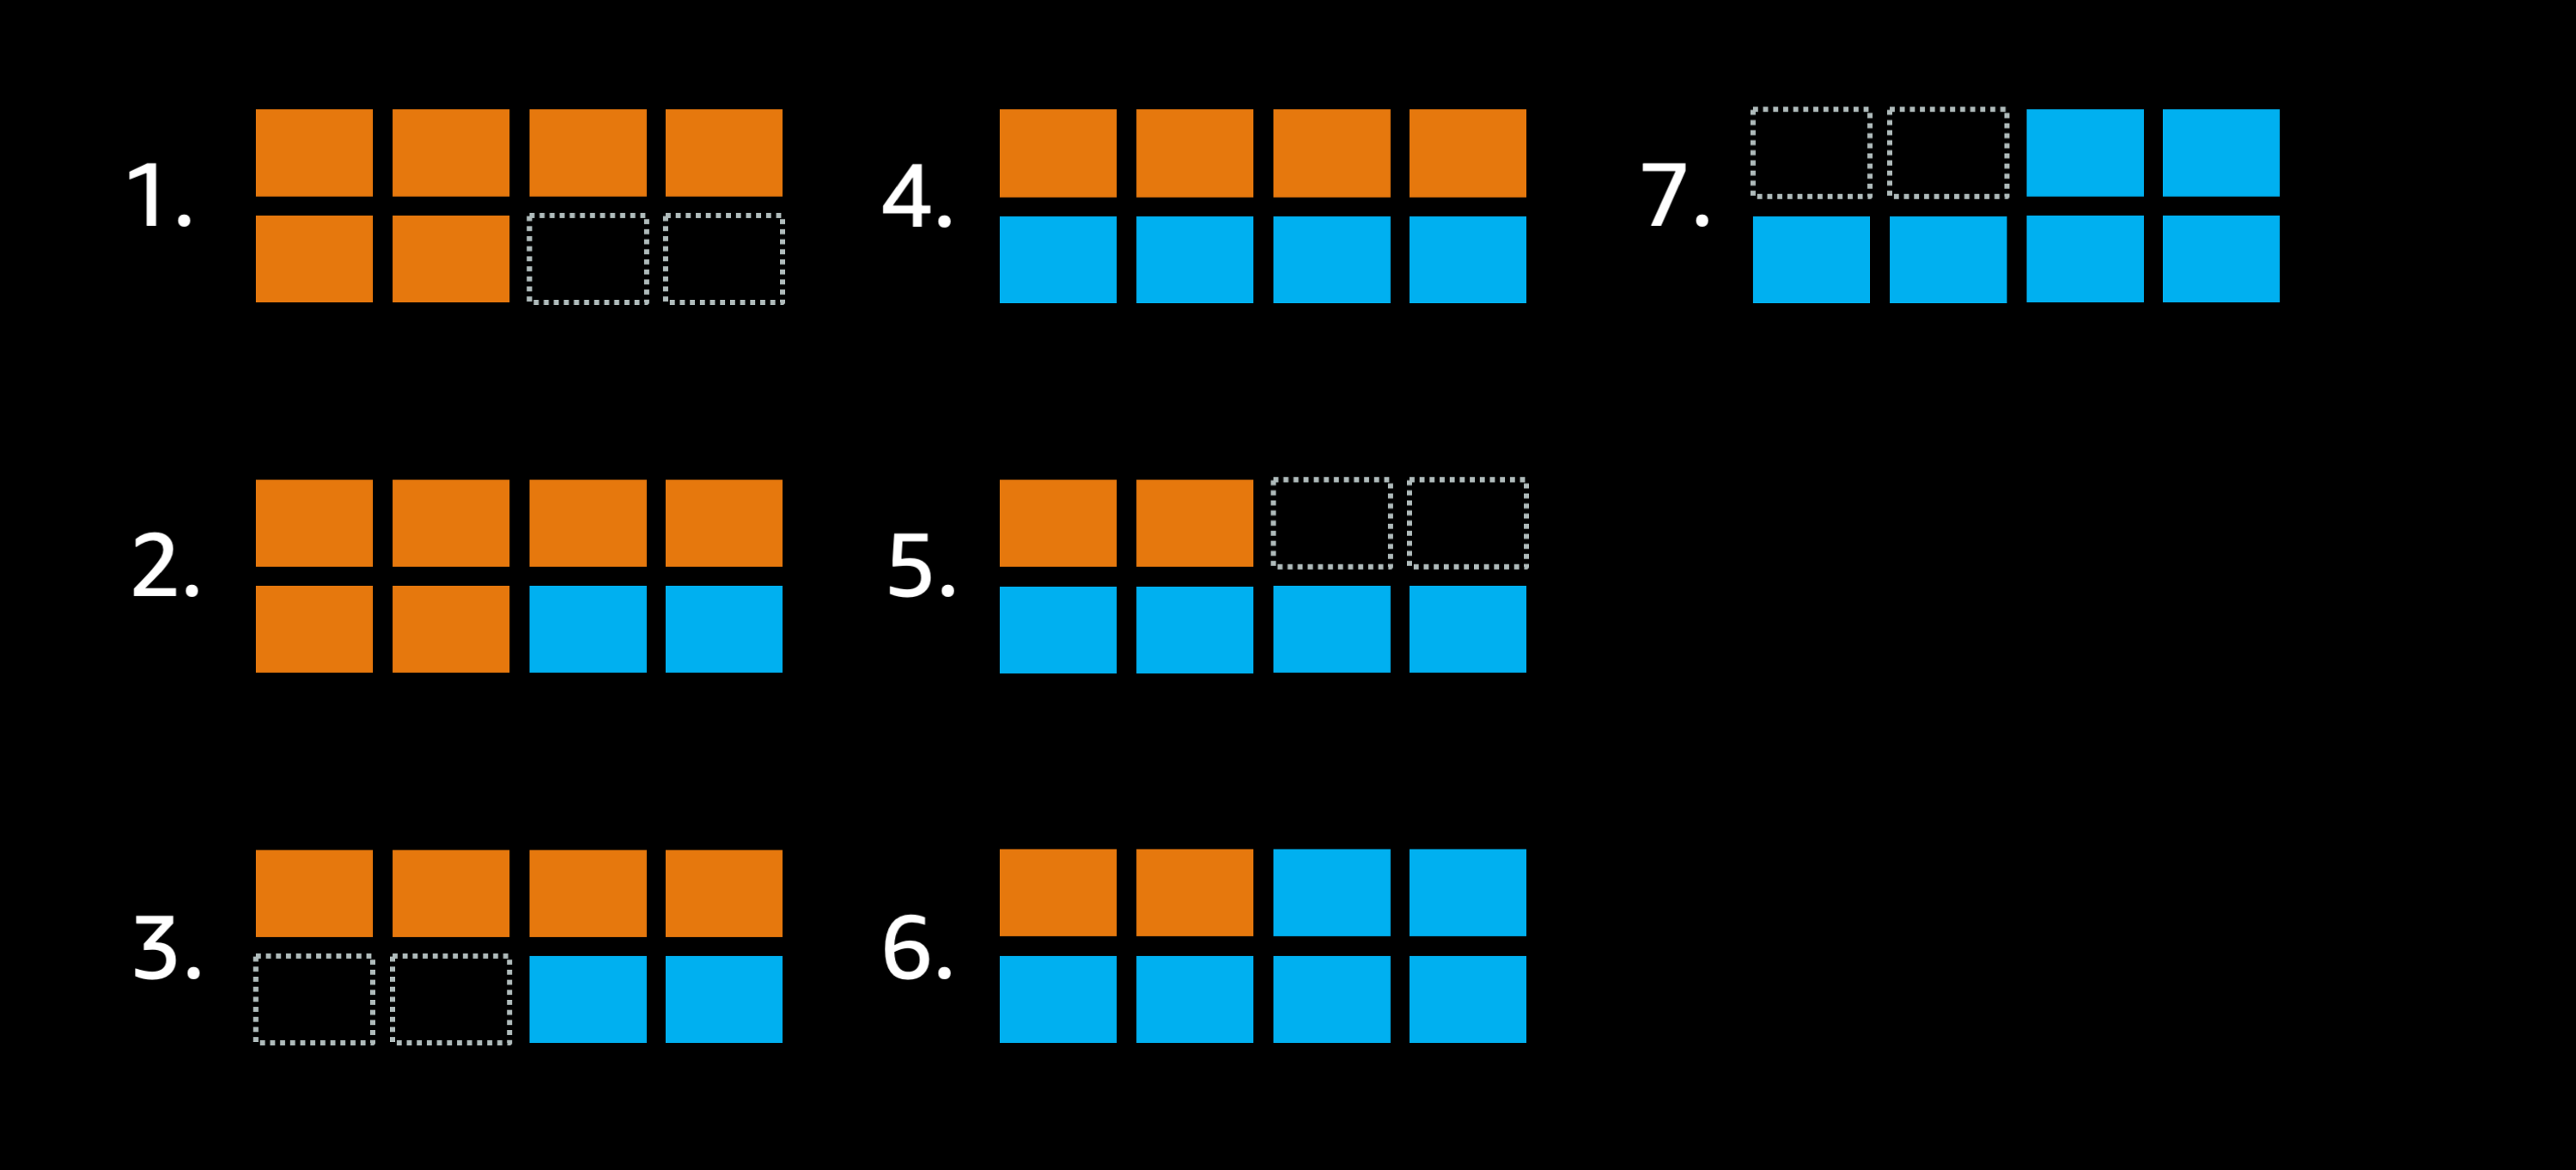
- The goal is to replace this orange deployment with a blue deployment instead.
- Because of the settings the scheduler can’t stop any existing tasks because that would go below 6 tasks so it starts two extra blue tasks.
- Now the scheduler is able to stop two of the old orange tasks, but only two tasks because the service can’t go below 6 tasks.
- ECS still needs to replace 4 of those old orange tasks with blue tasks, but the only action it can take at this time is to launch two new blue tasks.
- Once those new blue tasks are up and healthy it can stop two of the old orange tasks.
- Once again the only available action is to launch two more blue tasks.
- Finally the scheduler is able to stop the remaining two orange tasks, leaving 6 blue tasks.
The rolling deployment took 6 mutating steps to complete, and each time it launched a new task it had to wait for the new task to be come healthy (potentially 2.5 mins with the default settings). And each time it had to stop an old task it had to wait for the load balancer to drain connections (potentially up to 5 minutes with the default settings). And perhaps the application was not behaving properly with SIGTERM so that was an extra 30 seconds each time a container needed to be stopped. It’s easy to see how this simple rolling deploy could end up taking 30+ minutes to complete without finetuning the settings.
Now let’s modify the minimumHealthPercent to 50%, which allows up to 50% of the running tasks to be stopped before there are new replacement tasks running:

- The goal is to replace this orange deployment with a blue deployment instead.
- Because of the settings the scheduler can stop 50% of the old orange tasks, opening three empty slots.
- Now the scheduler can launch 5 new blue tasks.
- ECS still needs to replace the remaining three old orange tasks with blue tasks so it can stop all three at once.
- Finally it can launch a blue task to get back to 6 blue tasks.
This time the deployment job was finished in 4 steps instead of 6.
Imagine adding a little bit more free space to the cluster, so that it can instead run 10 tasks at once:

- The goal is to replace this orange deployment with a blue deployment instead.
- Because of the settings the scheduler can stop 50% of the old orange tasks, opening three empty slots.
- Now the scheduler can launch all 6 new blue tasks.
- Last but not least scheduler shuts down the old orange tasks.
The deployment job was finished in 3 steps.
If your tasks spend a fair amount of time idle, and you aren’t hitting high utilization then you might be able to significantly speed up your deployments using the following settings to allow ECS to stop running tasks before starting replacements.
Recommended setting (ECS Service Deployment setting):
minimumHealthyPercent: 50%maximumPercent: 200%
Of course if your services are heavily utilized you would want to keep the default setting of minimumHealthyPercent = 100 because otherwise you might impact availability or latency in the period before the new application tasks come online.
In this case if you are forced to keep the minimum healthy percentage at 100% you should consider running your EC2 clusters with more empty room for starting replacement tasks in parallel with old tasks, in order to reduce the number of steps that a rolling deployment takes.
Conclusion
Hopefully these tips and tricks help you to have faster rolling deployments in Amazon ECS. With a few easy configuration changes you can speed things up dramatically.
You can download the source files for the diagrams in this article here: