Streamline Building and Deploying Containerized Applications - AWS Innovate
 Nathan Peck
30 min watch
Nathan Peck
30 min watch
I gave this talk and demo for AWS Innovate. I introduce the basics of infrastructure automation with infrastructure as code, and then introduce and demo to different abstraction tools for working with infrastructure: AWS Cloud Development Kit (AWS CDK), and AWS Copilot
Transcript
Hello, everyone. My name is Nathan Peck, and today, I’m going to be talking about how you can streamline, building and deploying containerized applications on AWS.
So, to start out with this, I wanna talk about the different levels of infrastructure deployment. Different companies start out at different places in their infrastructure journey.
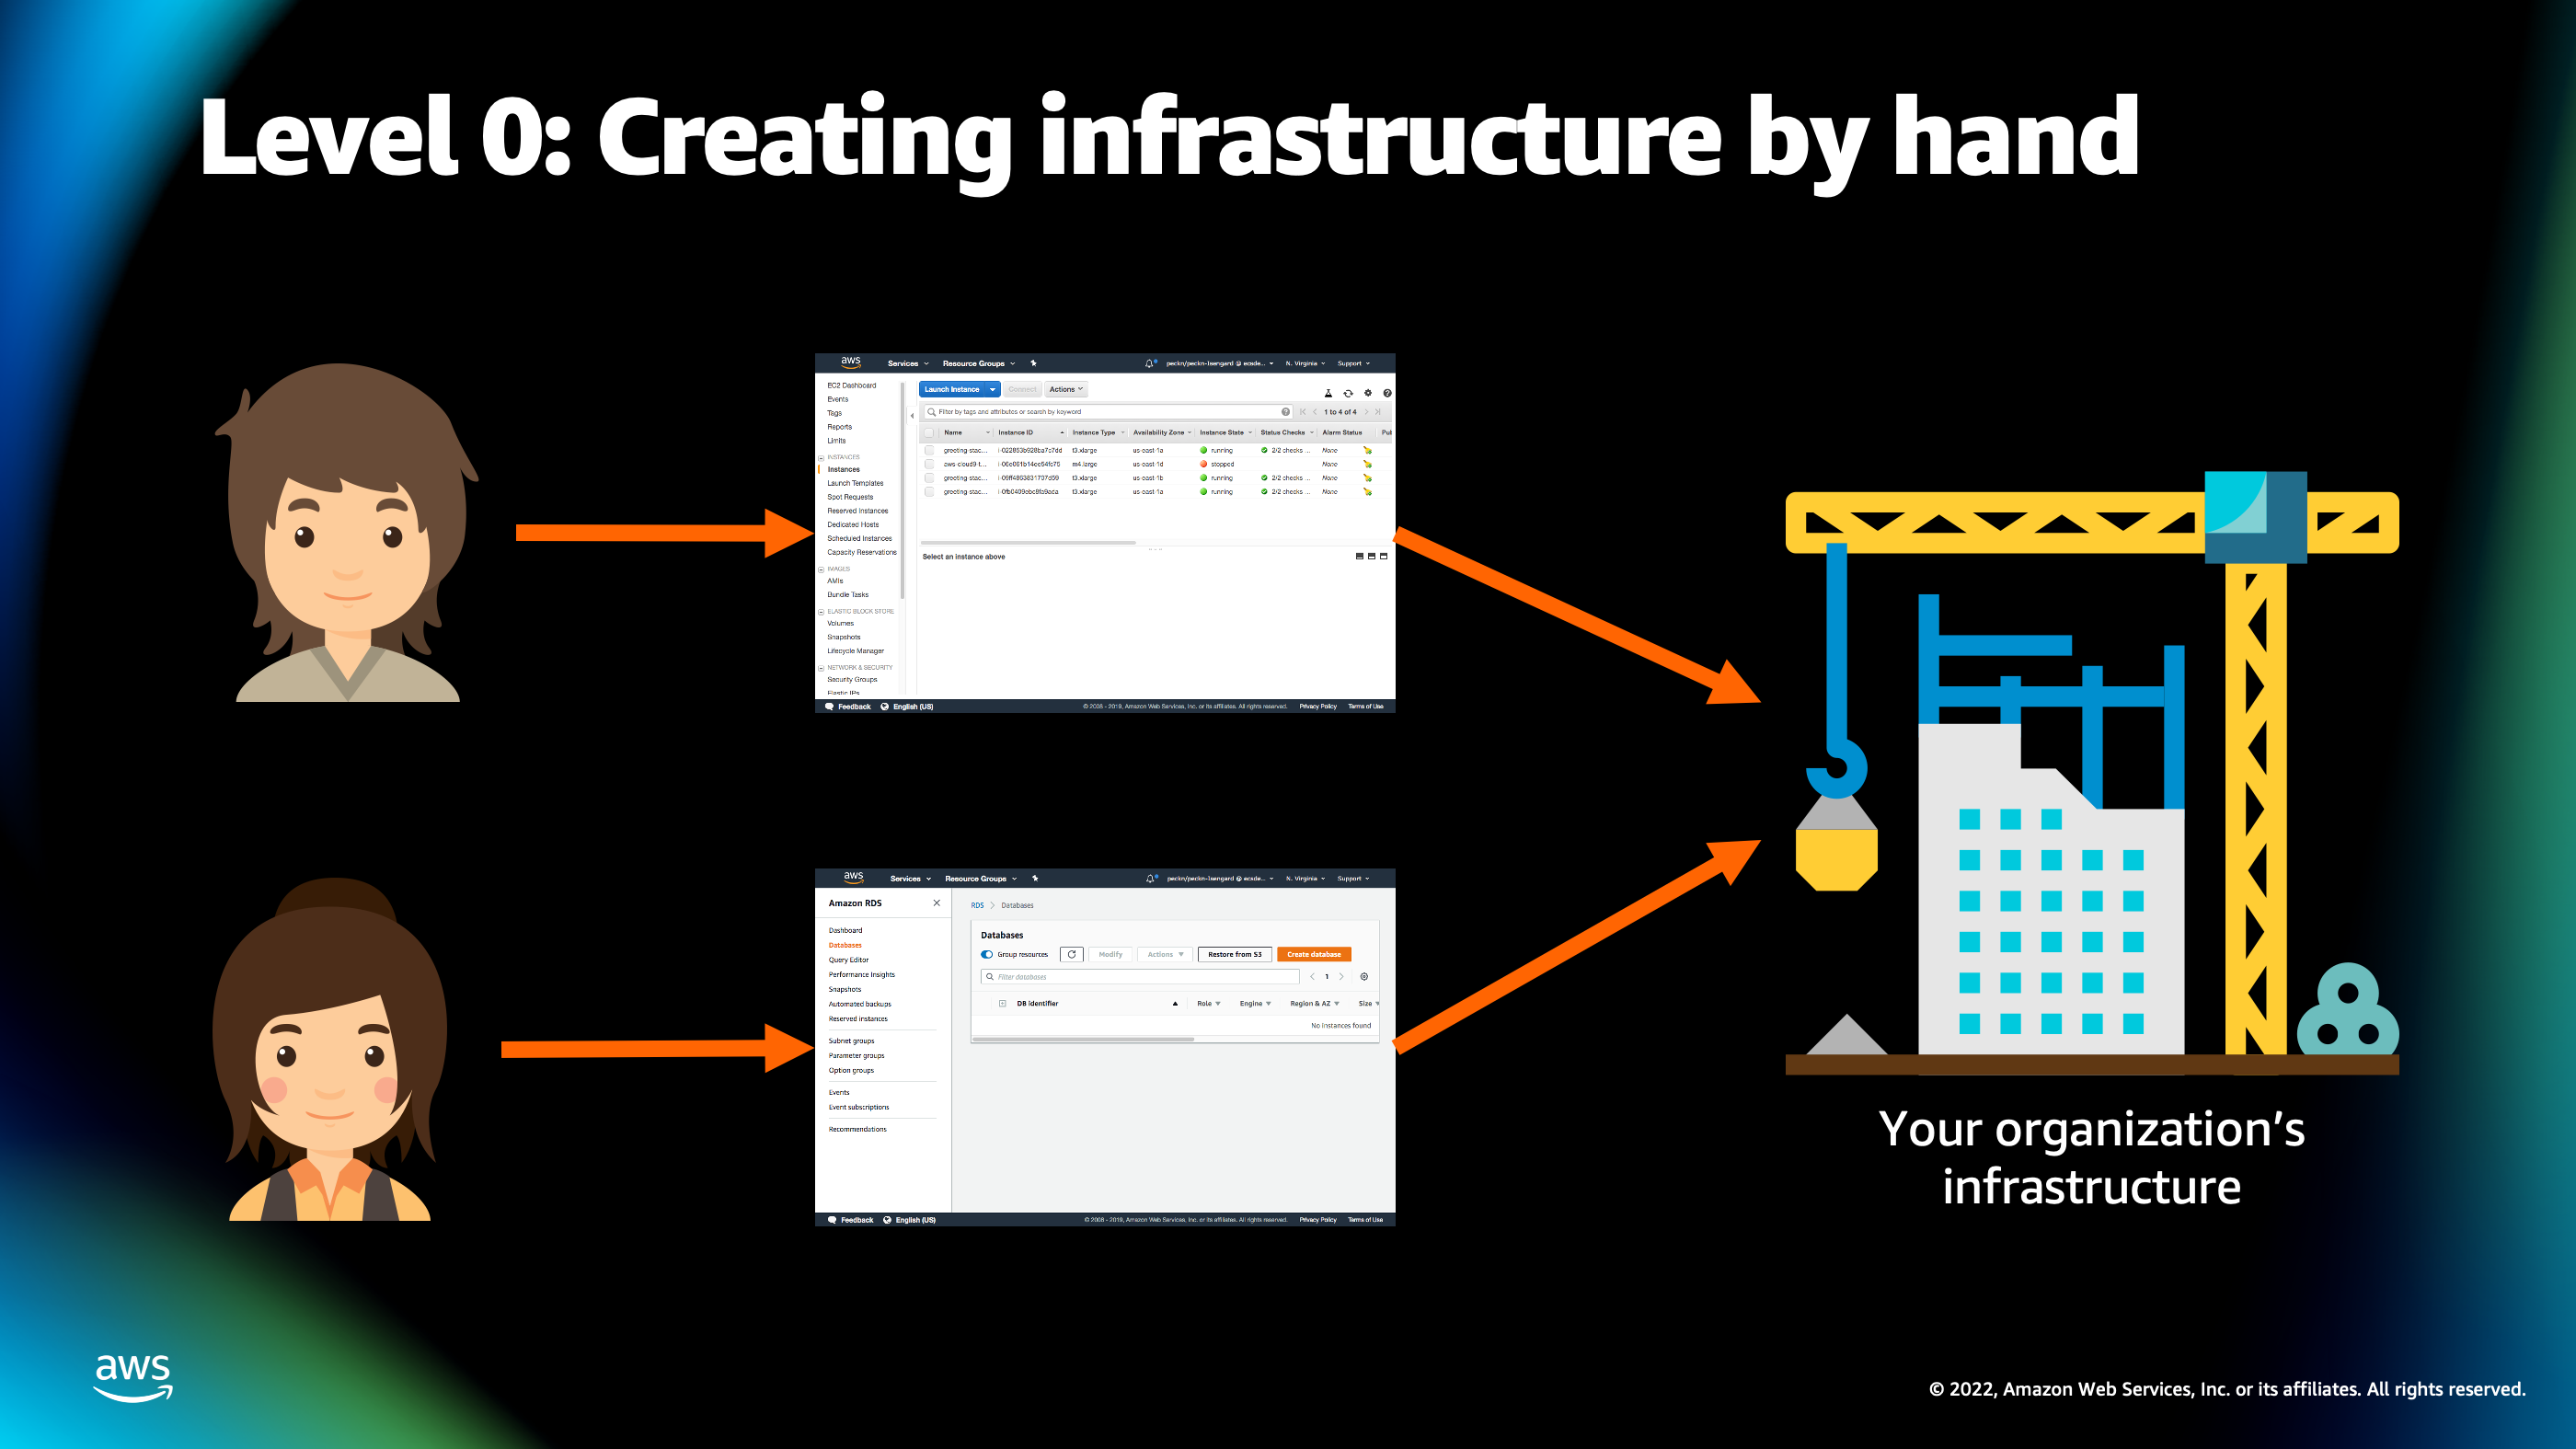
I remember when I was working at a startup, before I joined AWS, we started out at where I’d like to call Level 0 or creating infrastructure by hand. And this is how a lot of folks start out with deploying applications on AWS. Different engineers are clicking around in the AWS console dashboard. They’re clicking all those buttons, entering, typing information on the AWS console to create different resources on the AWS account.
This works out fantastically when you’re first learning AWS. But there are a few downsides to this, mainly because it becomes hard to make sure that you’re doing the same thing every time. You might have one engineer who’s clicking this button, while another engineer is actually clicking an entirely different button which is interfering and creating differences in the infrastructure.
So as organizations grow they tend to move on from that manual clicking around in the console to imperative infrastructure as code.
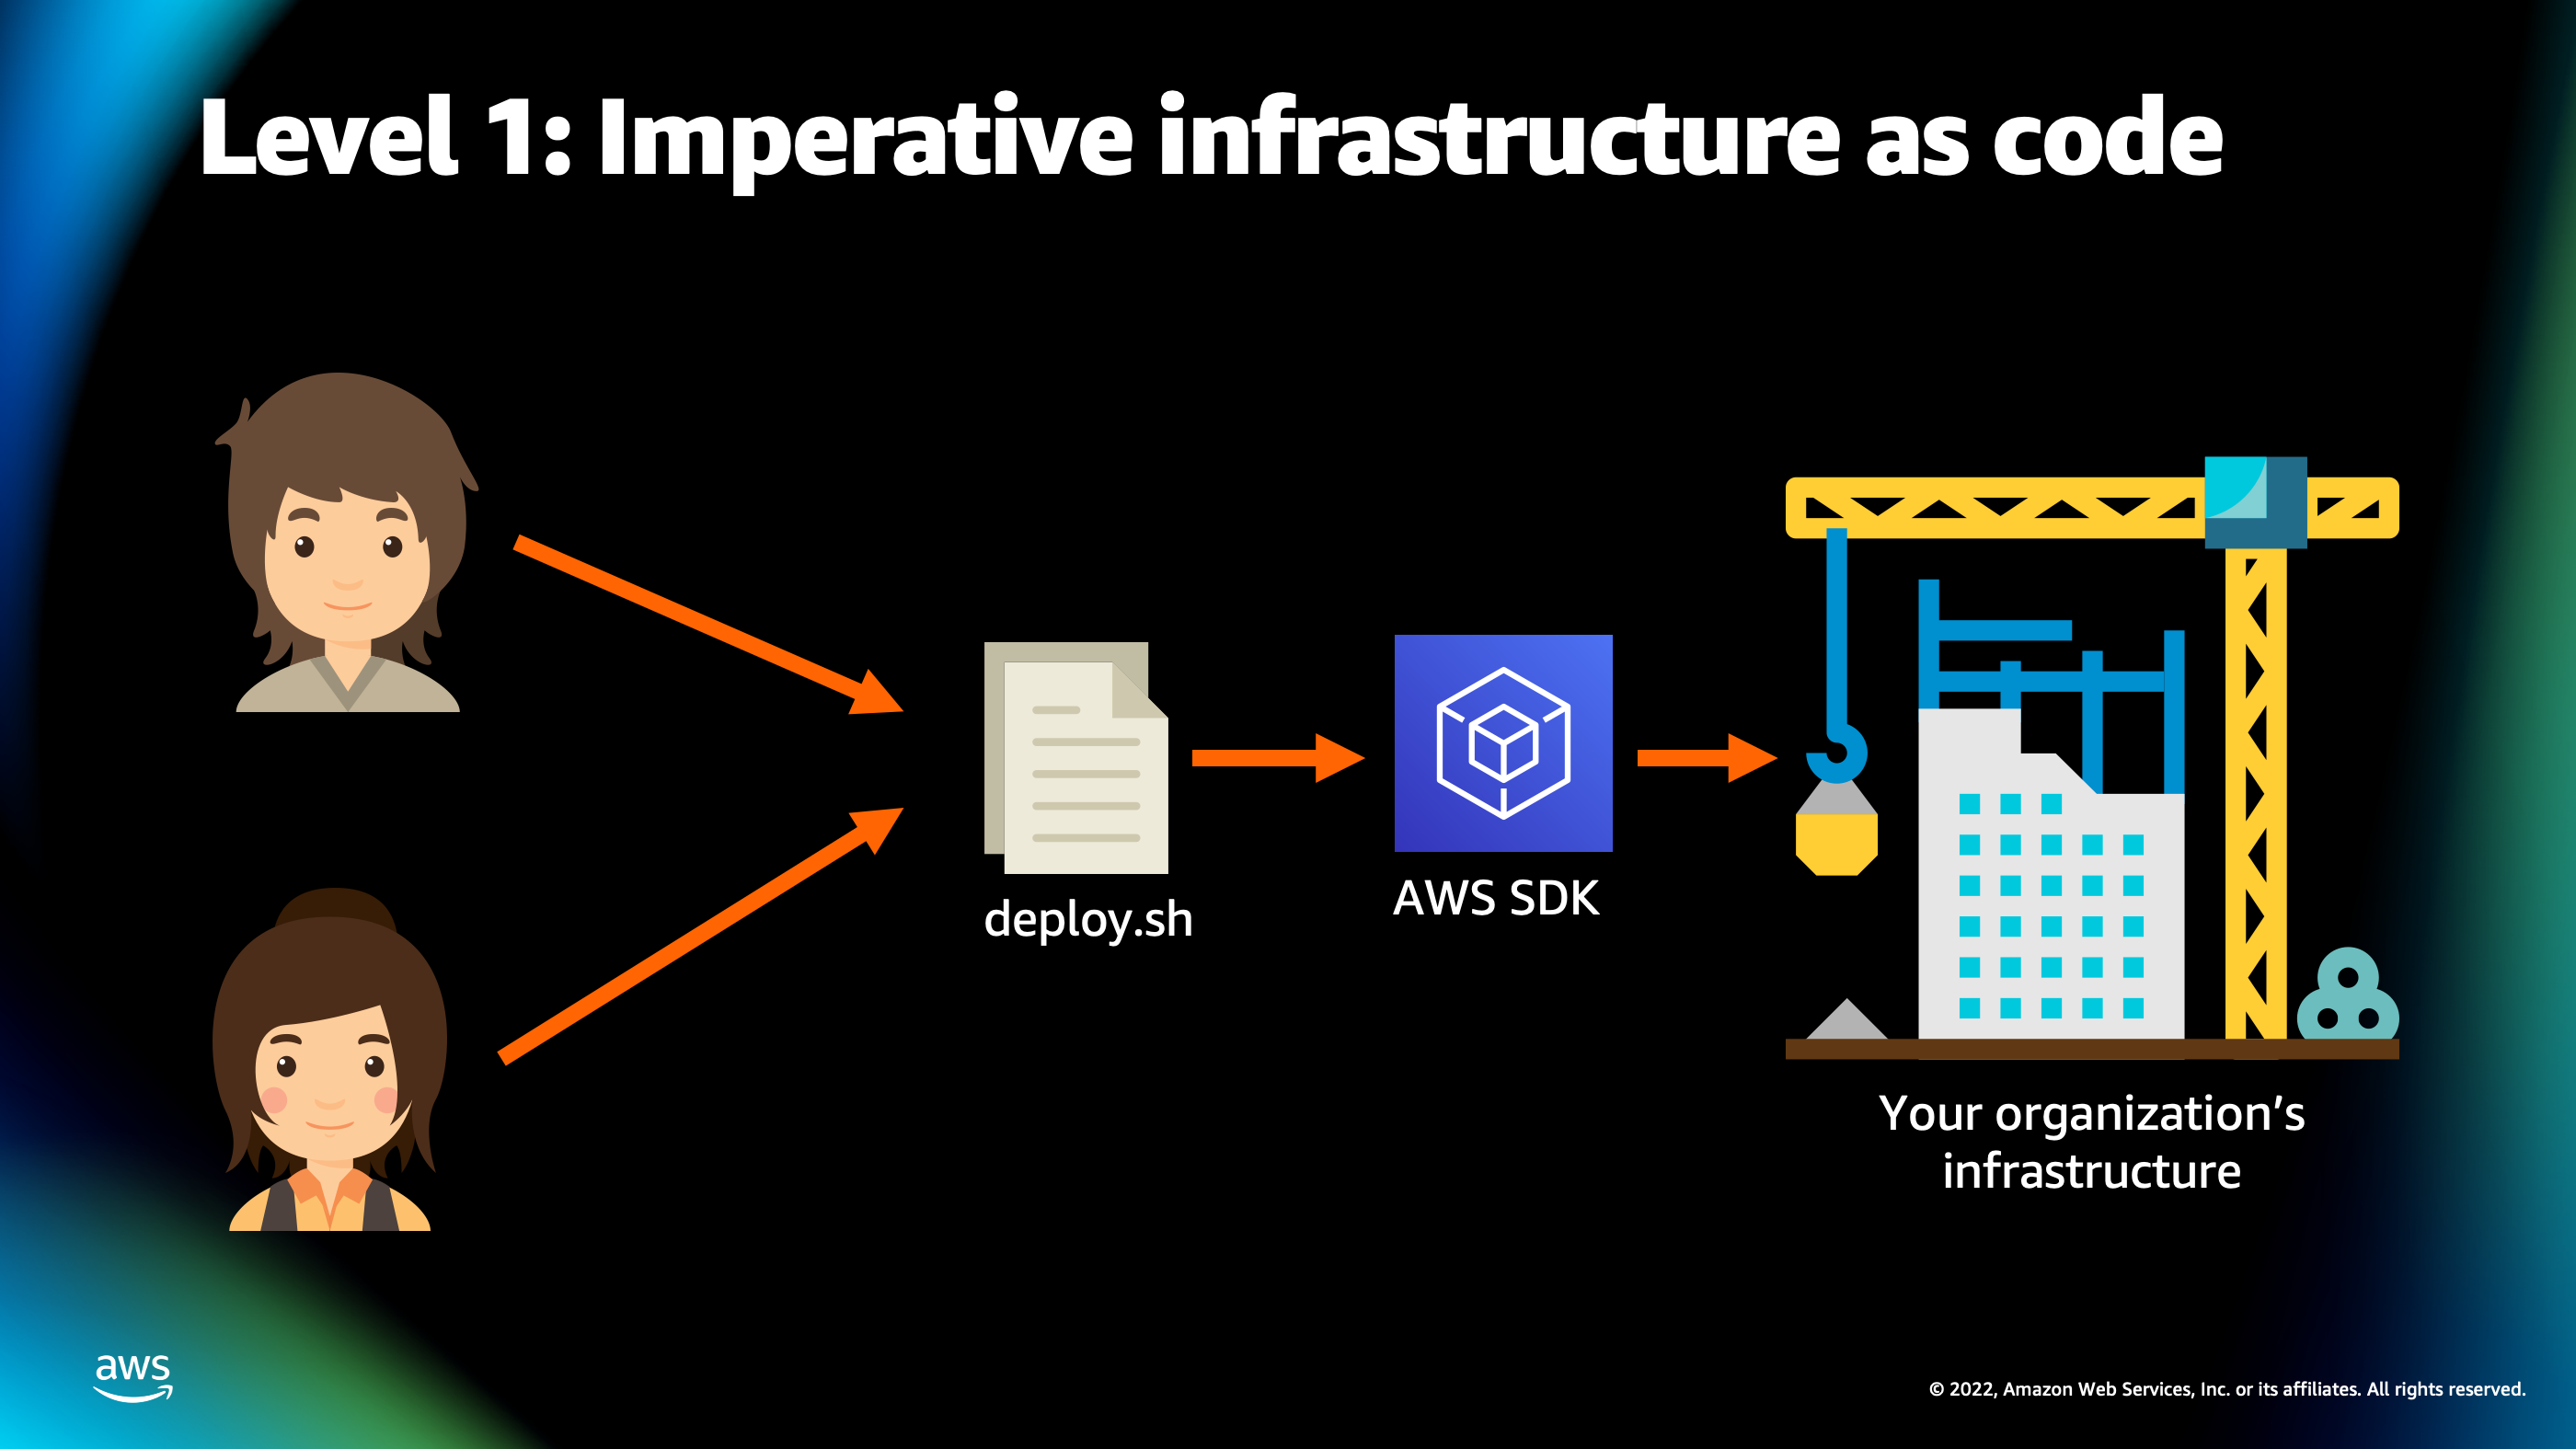
This is where you create a code file which contains the commands necessary to call the AWS API usually using software development kit for AWS, and create infrastructure on the AWS account automatically, using this deploy script. This is a little bit better because now, you can have different engineers working on the same deploy script that actually modifies infrastructure as code.
But it’s a little bit challenging. Writing that code is a difficult process because deploy scripts have to account for a lot of different things that could happen. Maybe a deployment fails, maybe a resource fails to create, or there’s a rate limit on how many times and how fast you can actually create different resources on AWS accounts. So, you have to deal with all these different sort of scenarios that pop up as part of creating an infrastructure.
So, the next level beyond that is declarative infrastructure as code.
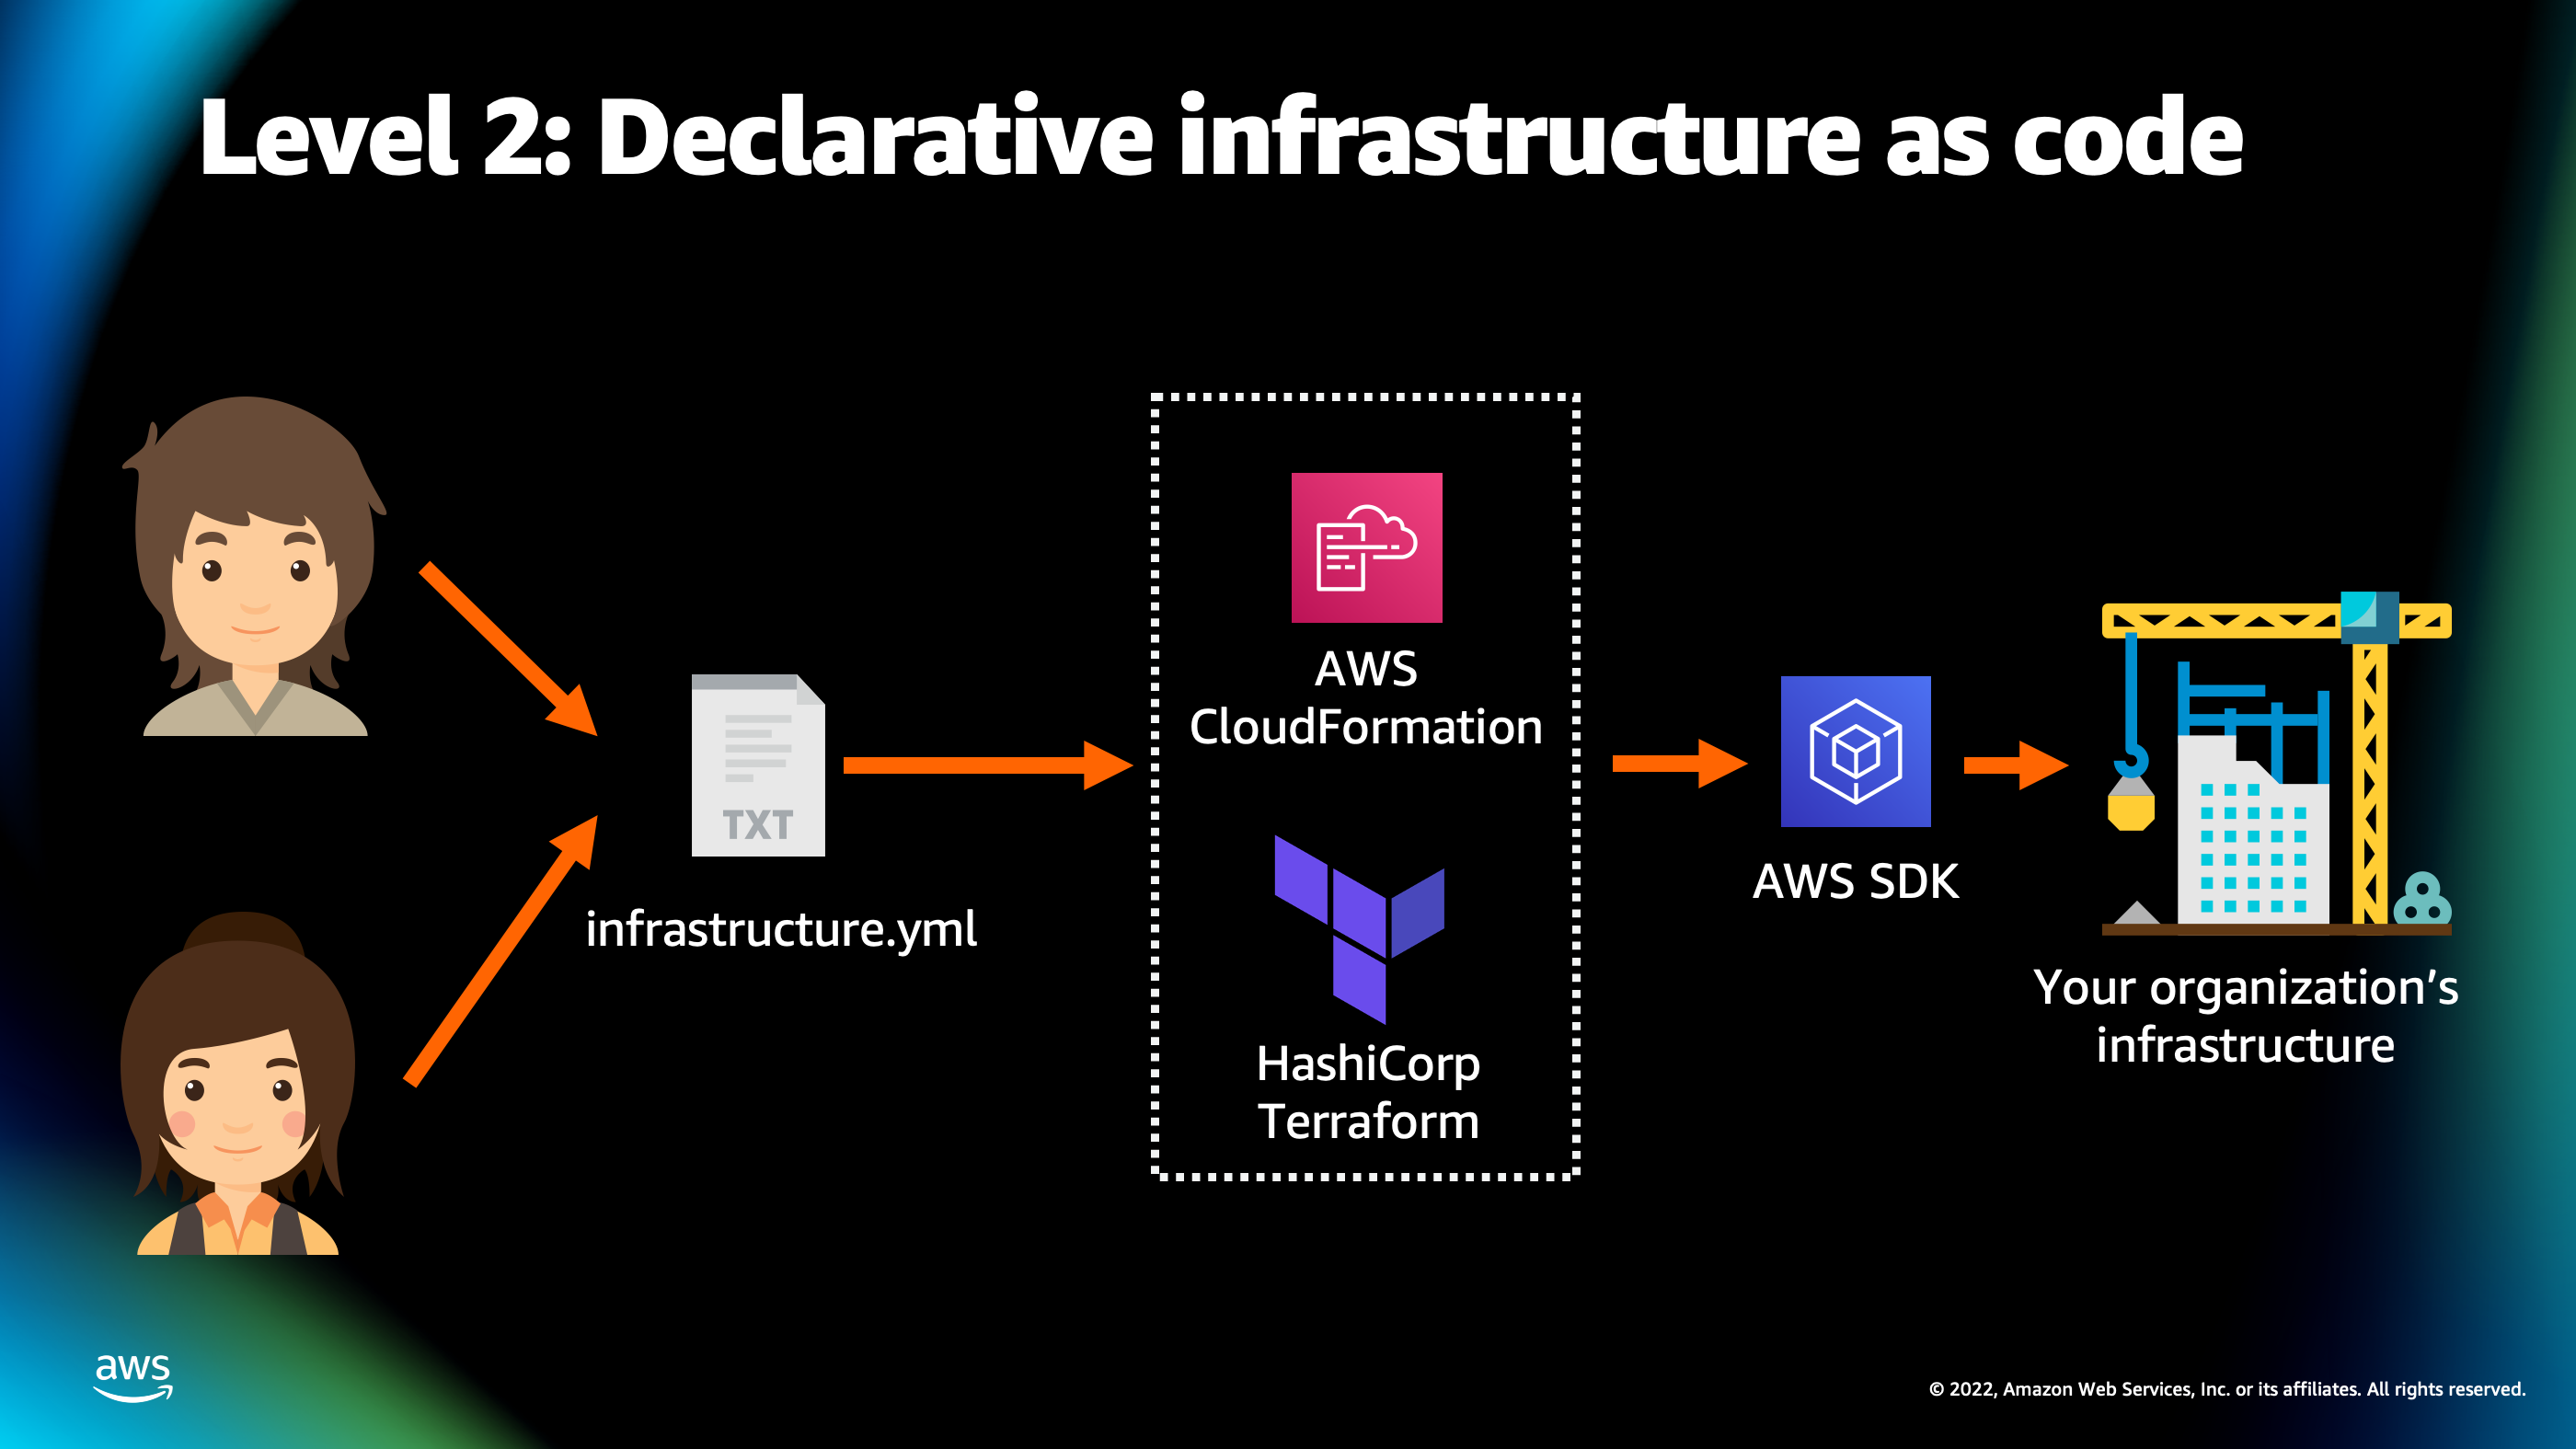
And so this is where the true magic of streamlining your infrastructure deployment begins. The idea behind declarative infrastructure as code, is you can create a description of the infrastructure that you would like to have created. Typically, it’s a yml file or some type of text document, and you pass that off to a intermediary tool, such as AWS CloudFormation or HashiCorp Terraform, which then calls the AWS SDK on your behalf in order to create infrastructure on your AWS account.
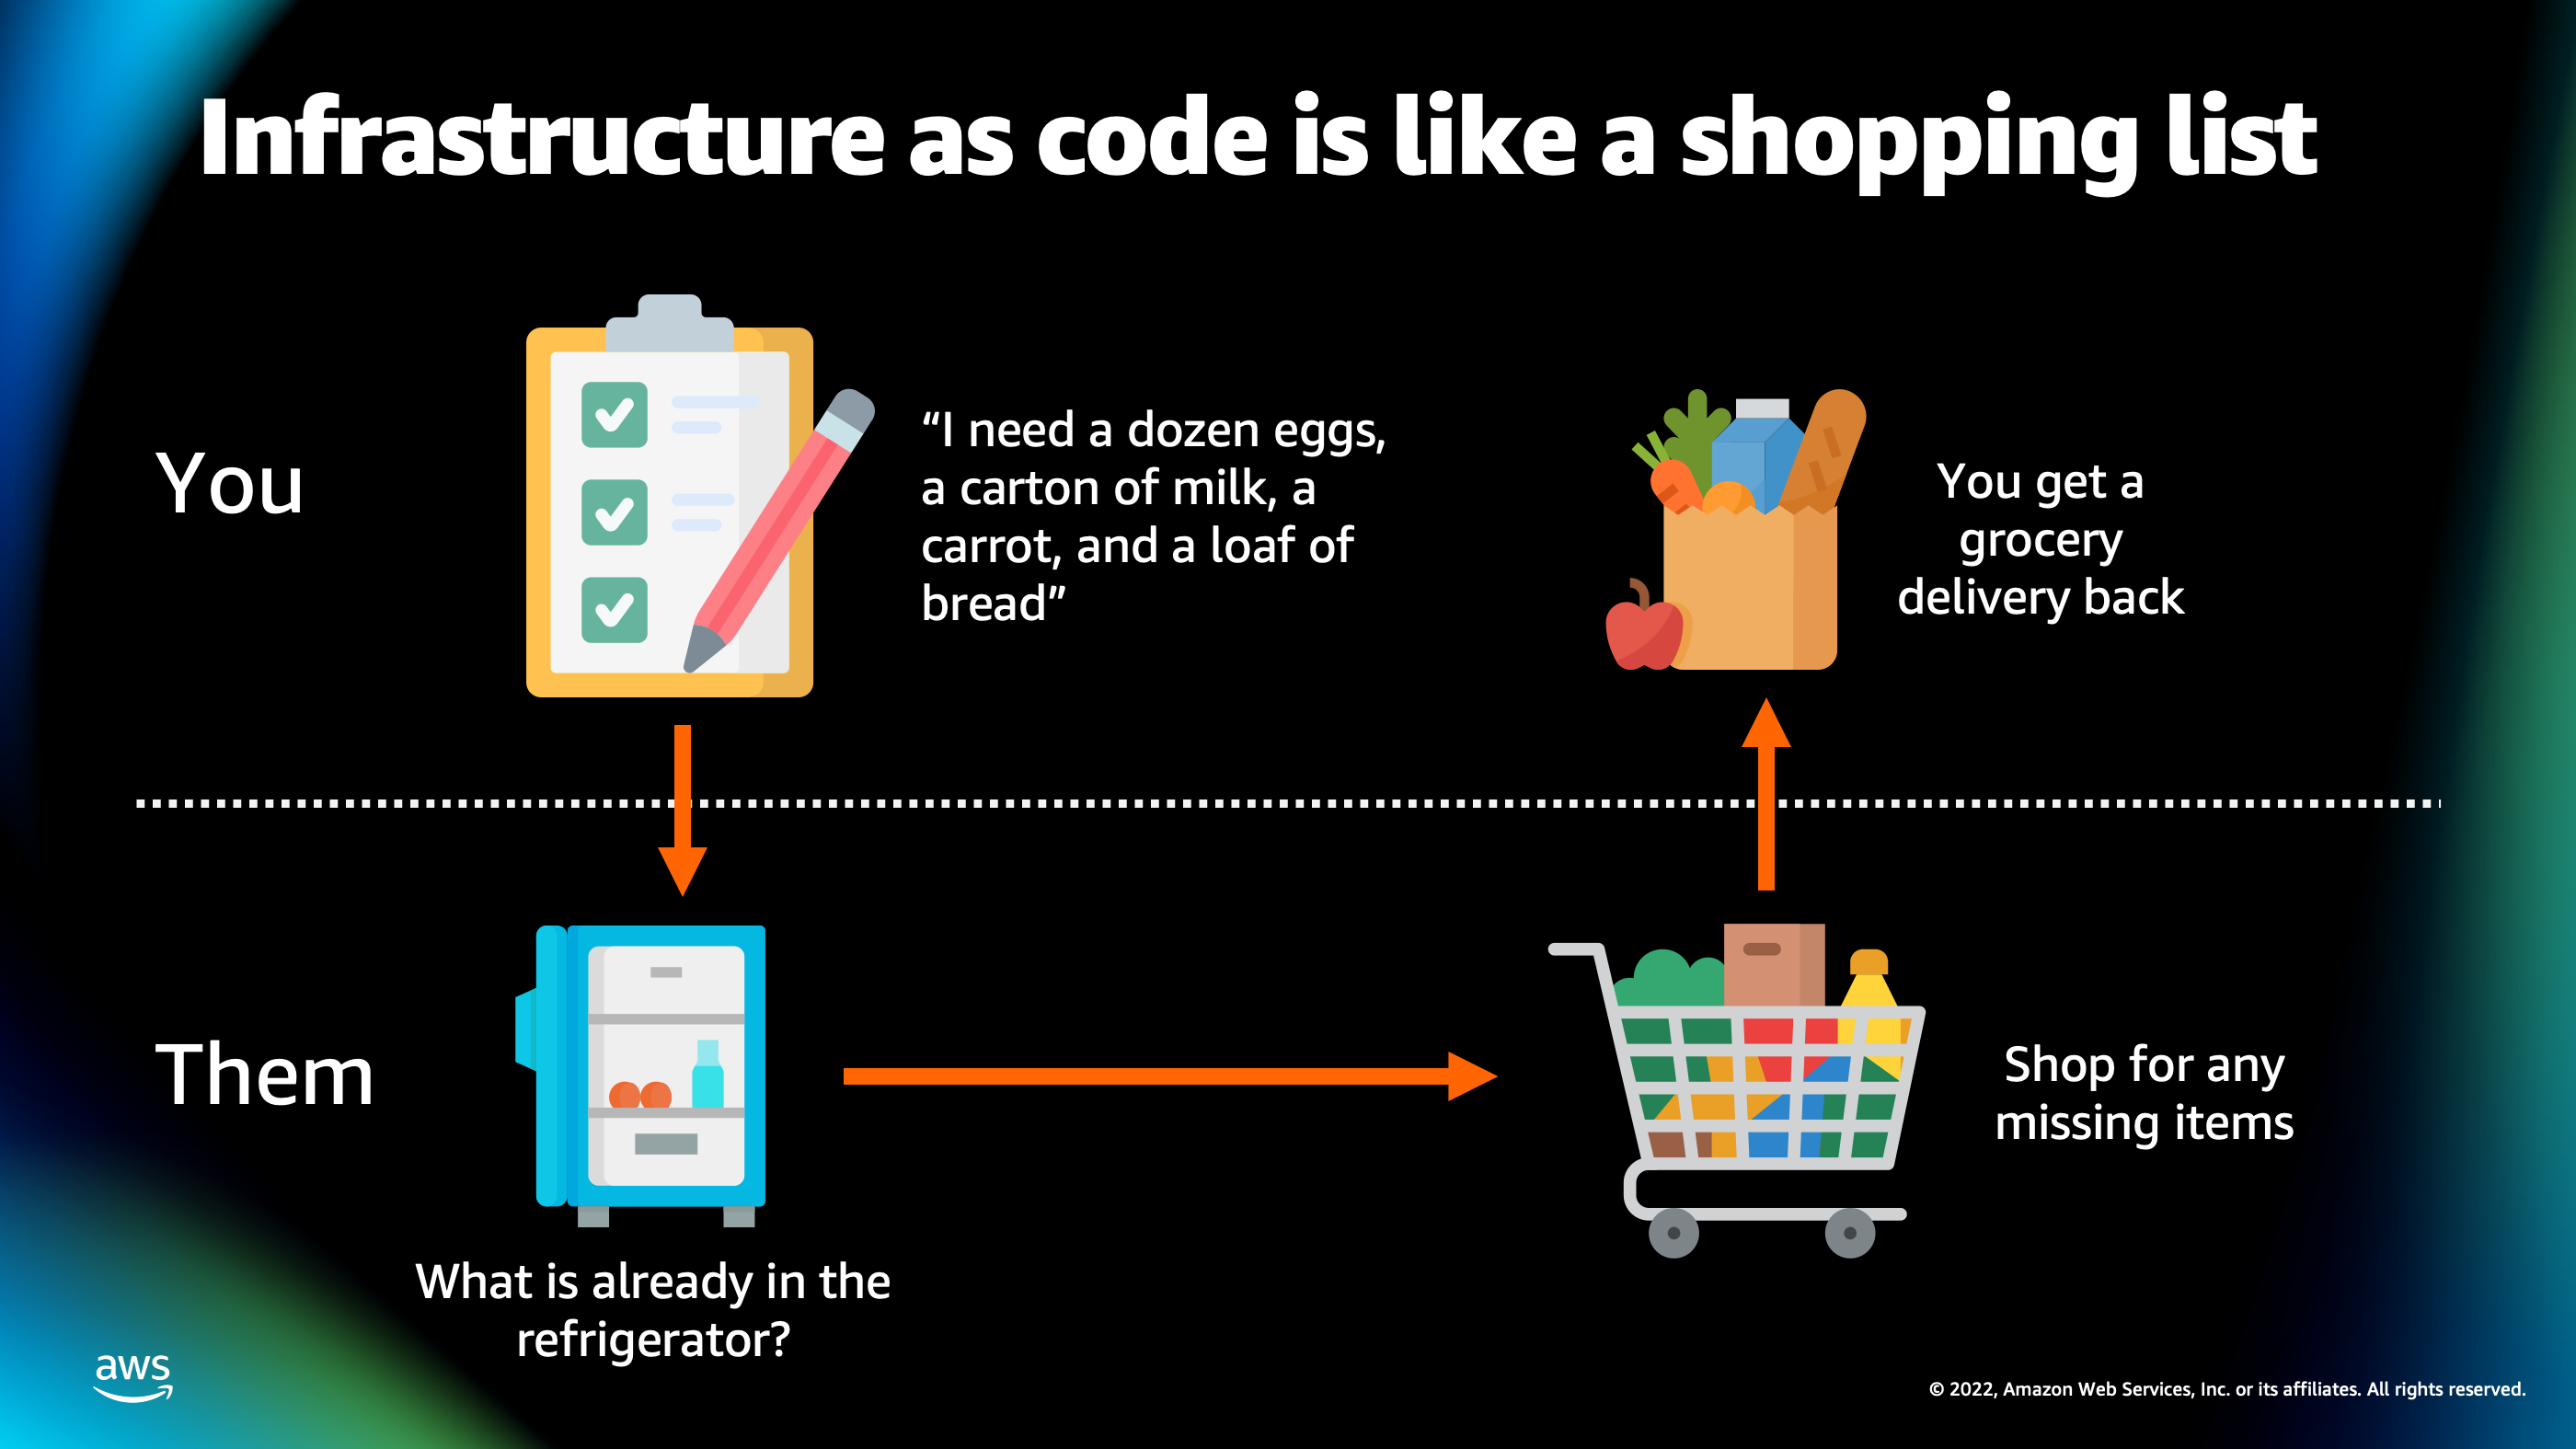
So…to better explain how this works and what that means, I like to compare infrastructure as code and declarative infrastructure to a shopping list. So, imagine if you had a professional shopper and you’re able to tell them, “I need a dozen eggs, I need a carton of milk, I need a carrot, I need a loaf of bread.”
They’re going to do the job of looking inside your refrigerator, seeing that you already have dozen of eggs, but you do need that carton of milk, a carrot, and bread. They’re gonna go out and they’re gonna shop for those missing items. And as a result, then you’re finally gonna get your grocery delivery back.
But you didn’t have to do any of that work of like actually checking inside your refrigerator, or going to the store and buying things. So, the idea behind infrastructure as code is that you start off that shopping list, you pass it off to the infrastructure as code provider, and then you get your AWS resources back.
So, here’s how that ends up looking.
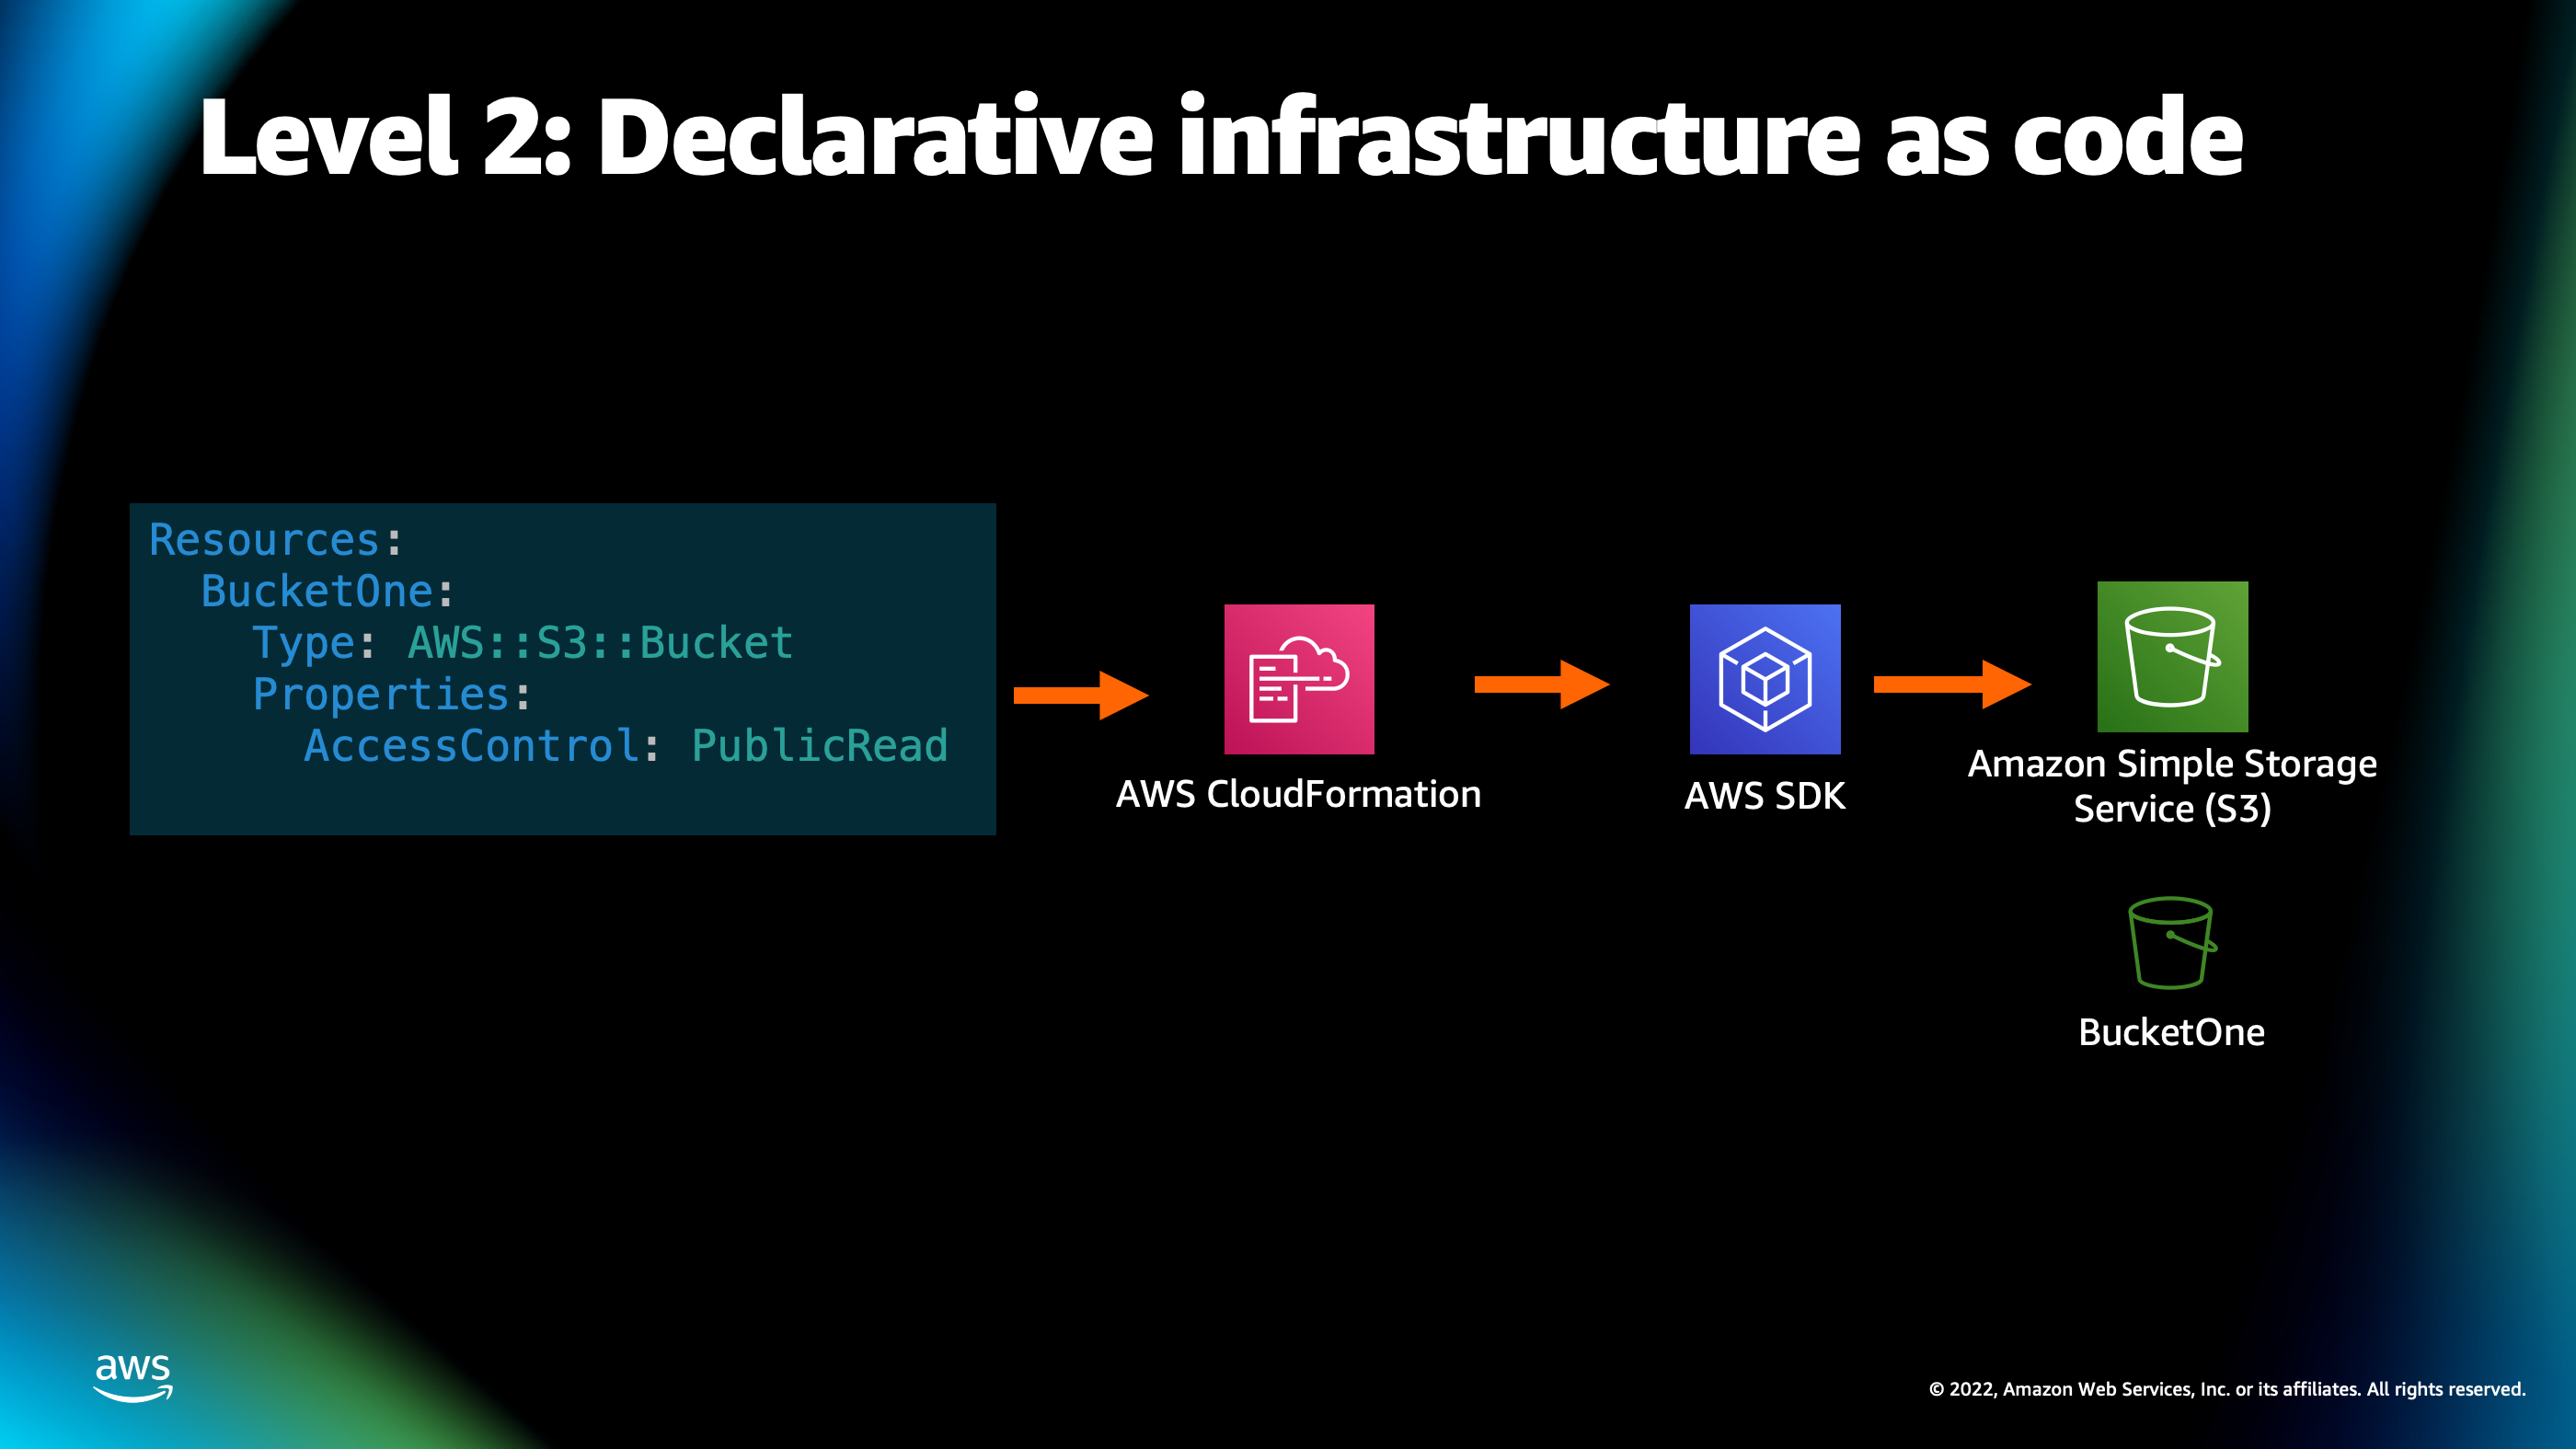
I’m going to show a snippet of AWS CloudFormation yml here because that’s one of the ones that is AWS native. And so here you see we have a list of resources to find. And inside of that list, there is an S3 bucket. And we’ve defined some properties, such as saying that the public is able to read from this bucket.
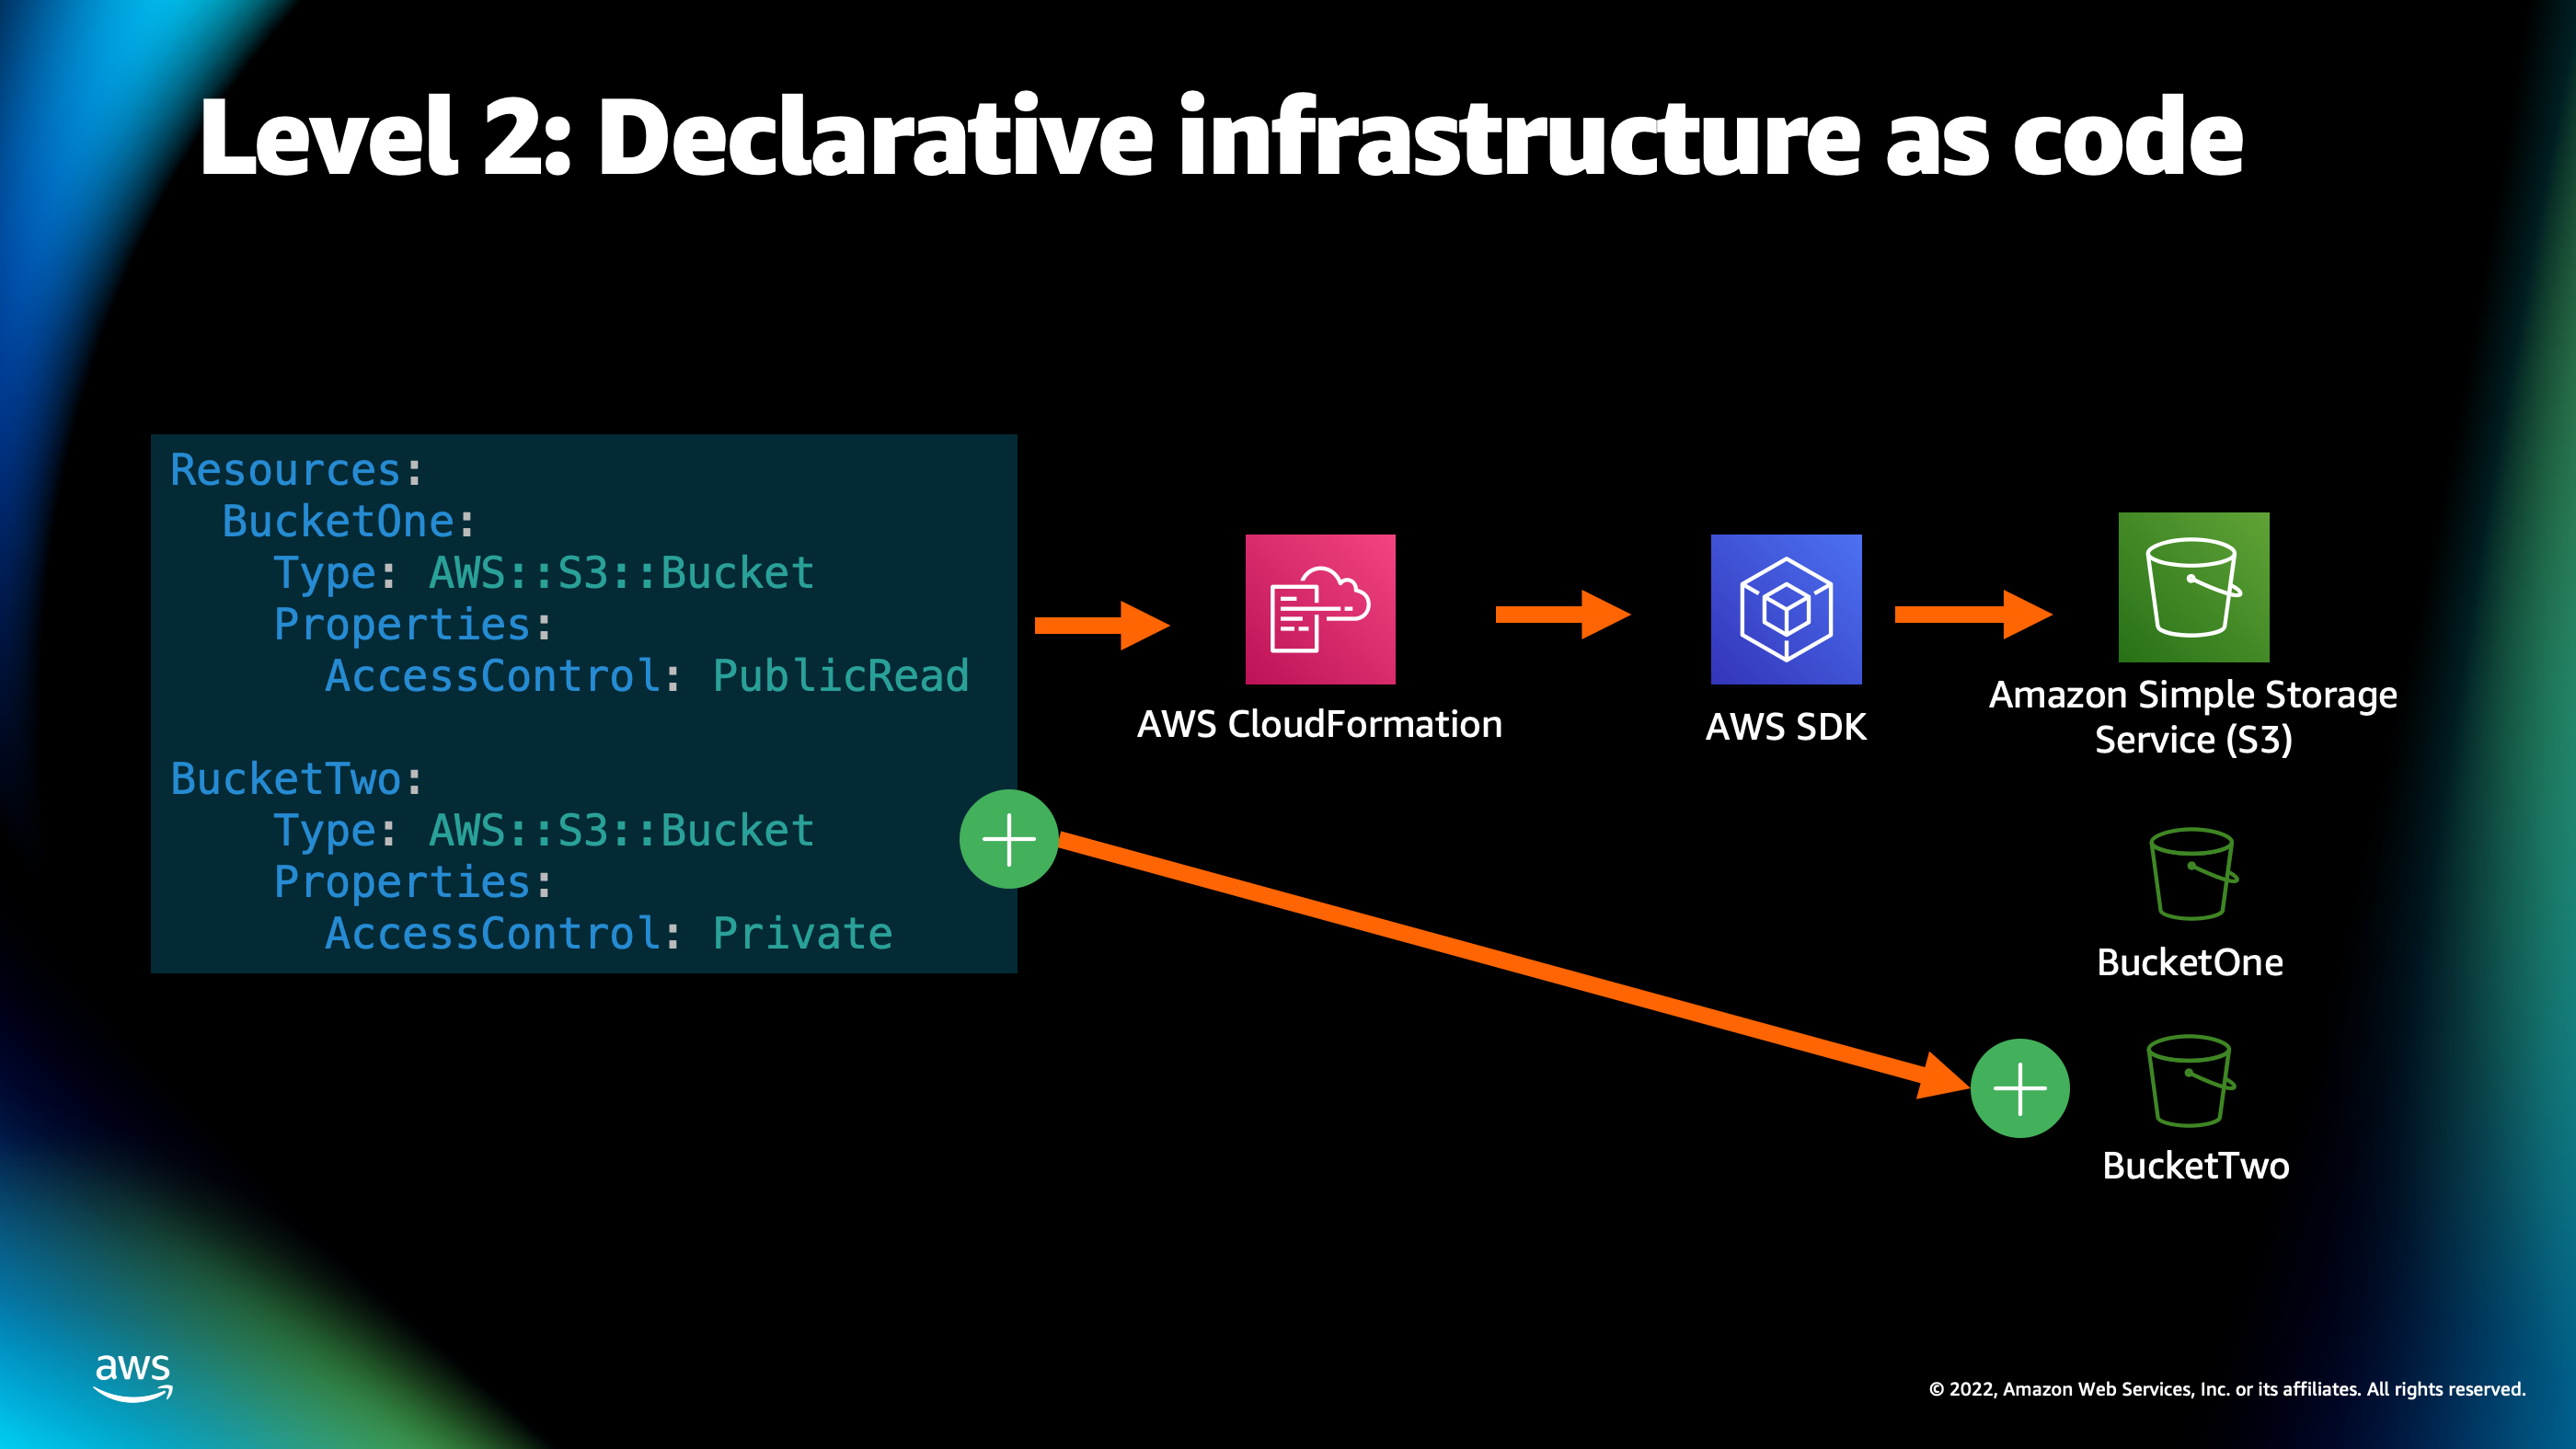
Now, if I modify this grocery list, so to speak, by adding another bucket to the list, then what’s going to happen is CloudFormation is gonna notice that there is a new item on the shopping list and it’s going to go out and it’s going to create that extra S3 bucket for me. As you can see, it becomes very easy for me to list out all the resources on my application needs and then rely on CloudFormation to call the SDK on my behalf and create- and make sure that everything in my shopping list is actually there. Now, this does get a little bit challenging though as you get to larger and larger and more complicated applications, particularly, containerized applications.
And so this is why I want to introduce the level 3, which is infrastructure as code abstraction.
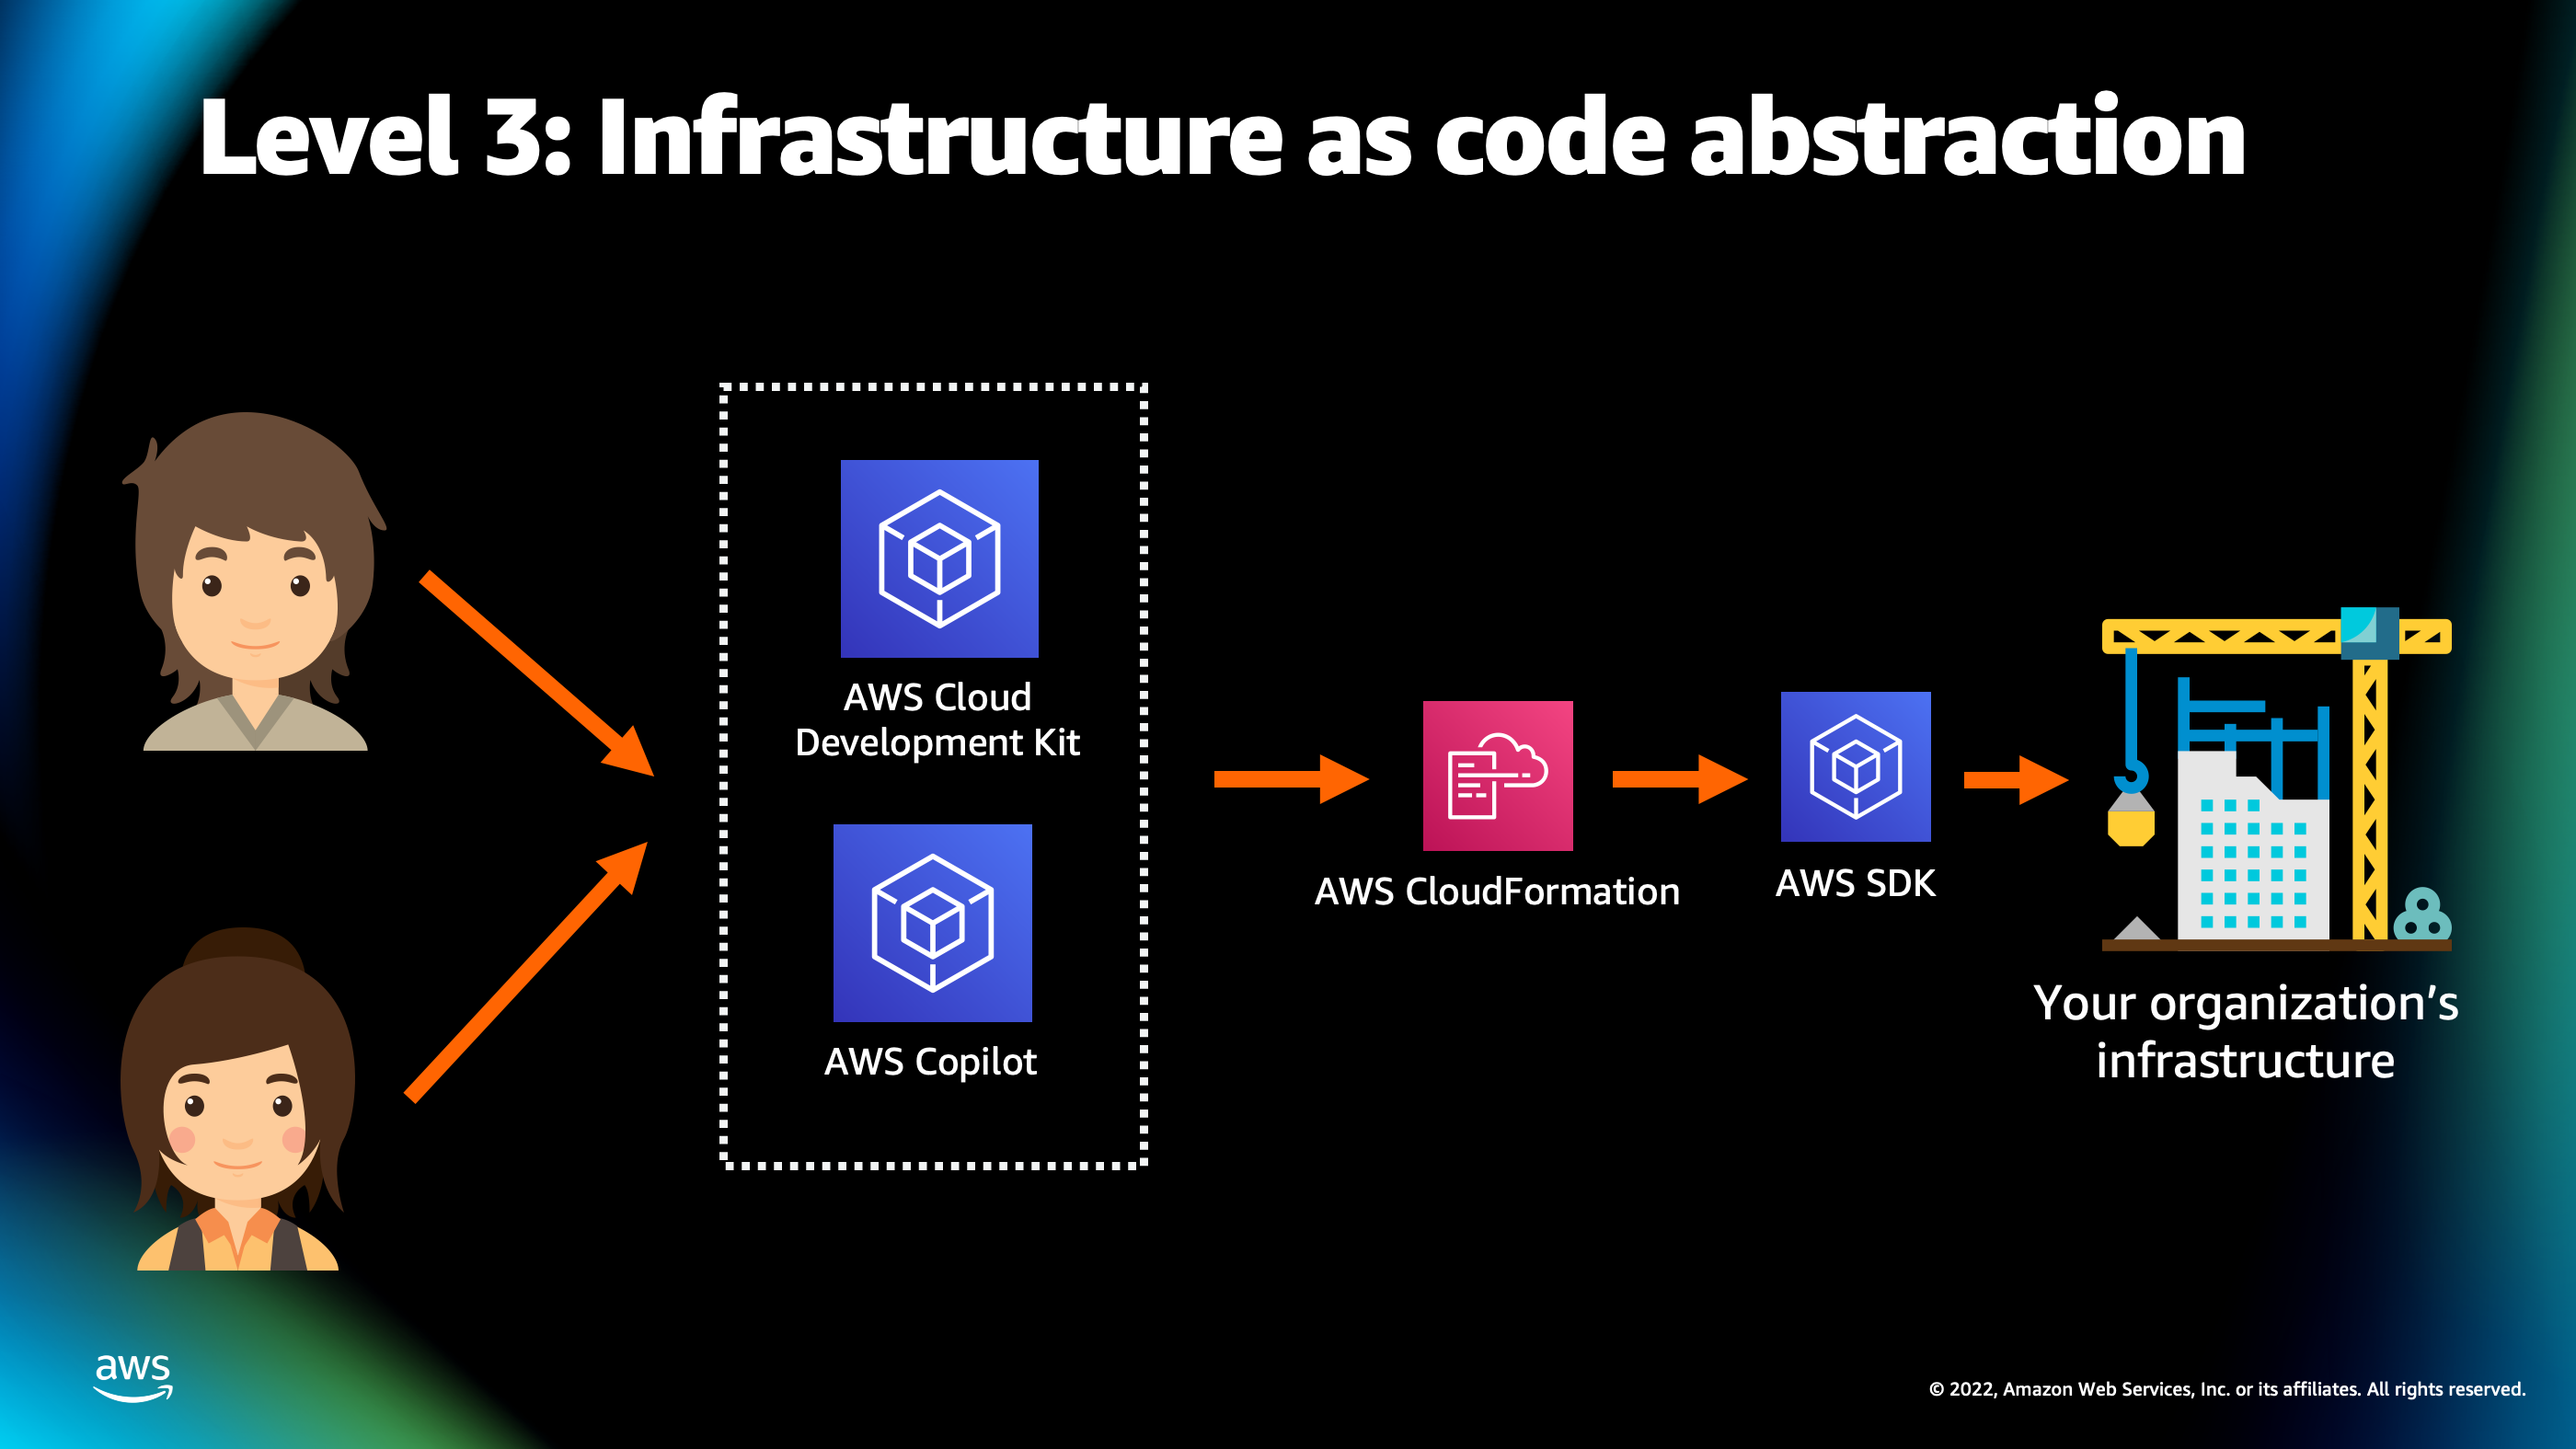
The idea behind infrastructure as code abstraction is that you have another layer between you and your infrastructure as code. So, developers, rather than writing that grocery list manually, they can talk to AWS Cloud Development Kit, they could talk to AWS Copilot, or another abstraction tool, which then creates the grocery list, so to speak, for AWS CloudFormation. And then CloudFormation goes out and creates those resources, using AWS API and SDK. And the end result is you have your organization’s infrastructure.
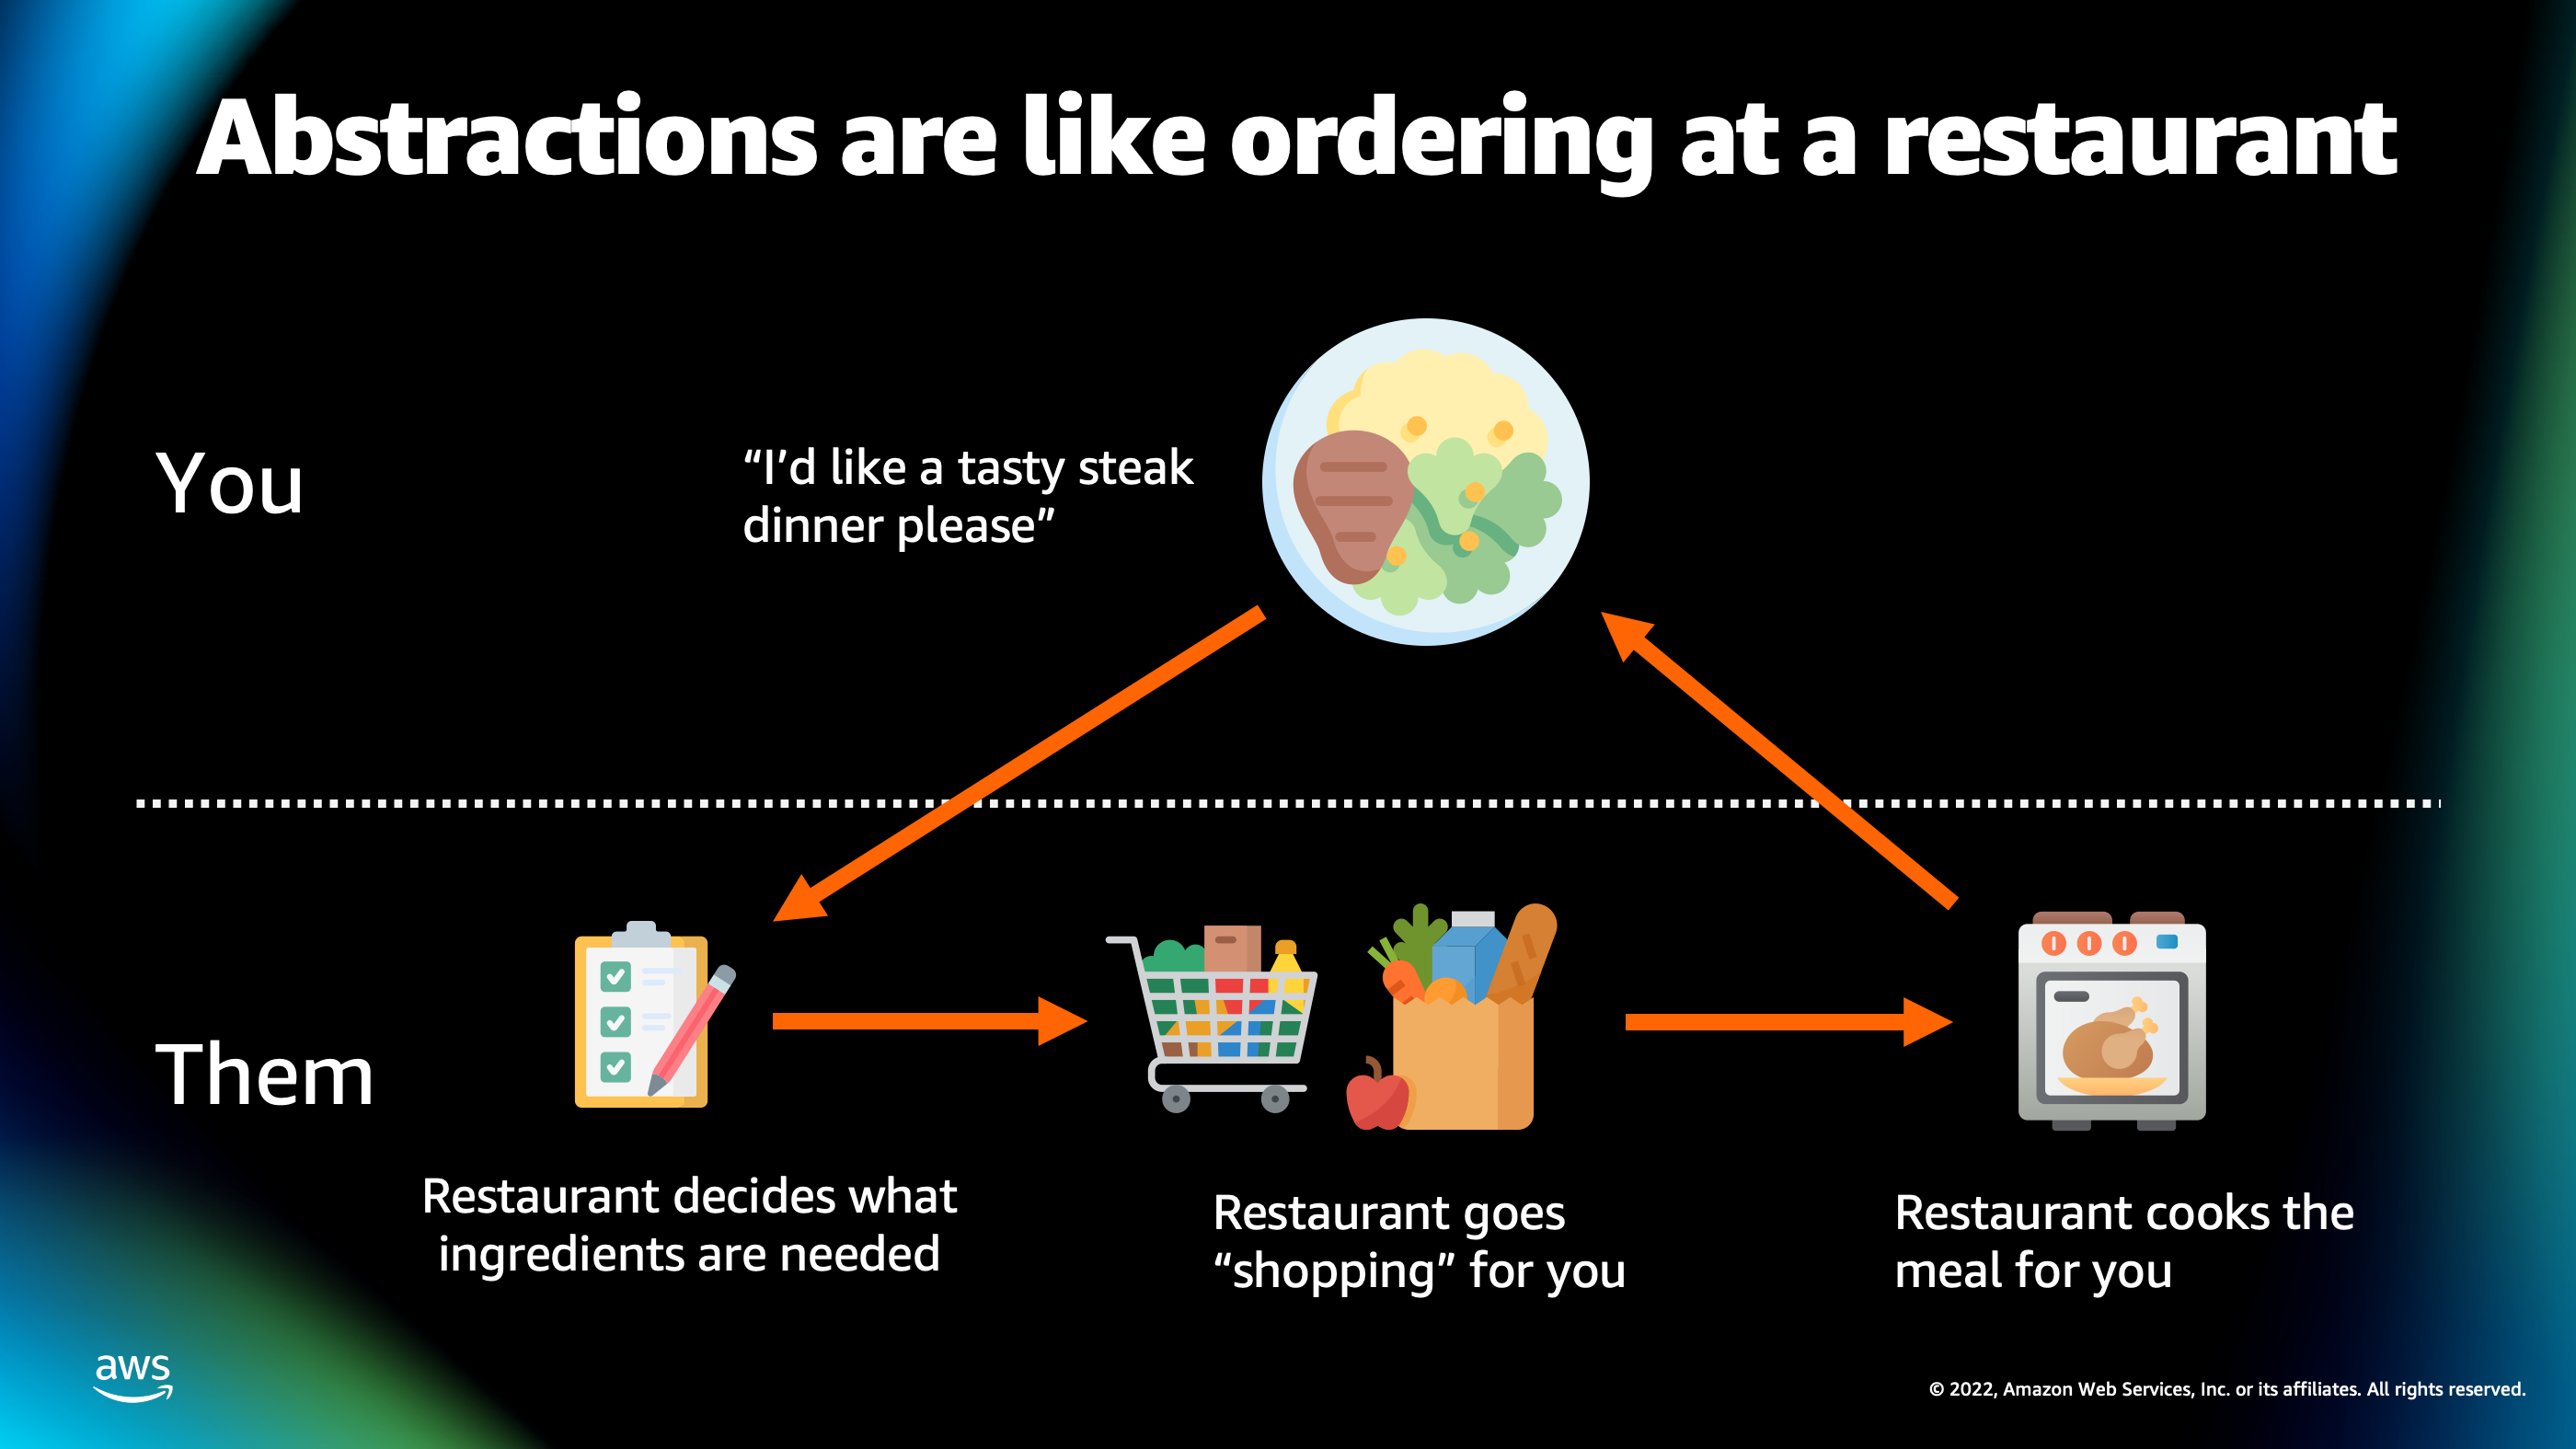
So, to put this once again into simple terms, I like to compare these abstraction tools to ordering food at a restaurant. So imagine, if you go to the restaurant, you don’t expect to give the restaurant a grocery list of things to shop for, you’re going to give them a higher level goal like, “I like to eat this tasty steak dinner.”
And they’re gonna out and decide what ingredients are necessary to actually cook that steak dinner for you. They’re gonna do a shopping for you and they’re even going to cook that meal for you and give you back that meal that you asked for.
So the idea behind these infrastructures as code abstractions is that they are like this restaurant that goes out there, figures out which AWS resources are necessary to create what you’re trying to deploy, goes out, creates them on your AWS account, and then even can help you set them up and configure them so they’re production ready.
So I wanna introduce two different tools for doing that, and you saw them on a previous slide when I showed AWS Cloud Development Kit, AWS Copilot. I want to talk about AWS Cloud Development Kit first. So, one of the typical and most common things inside of a Cloud infrastructure deployment is a Virtual Private Cloud or VPC.
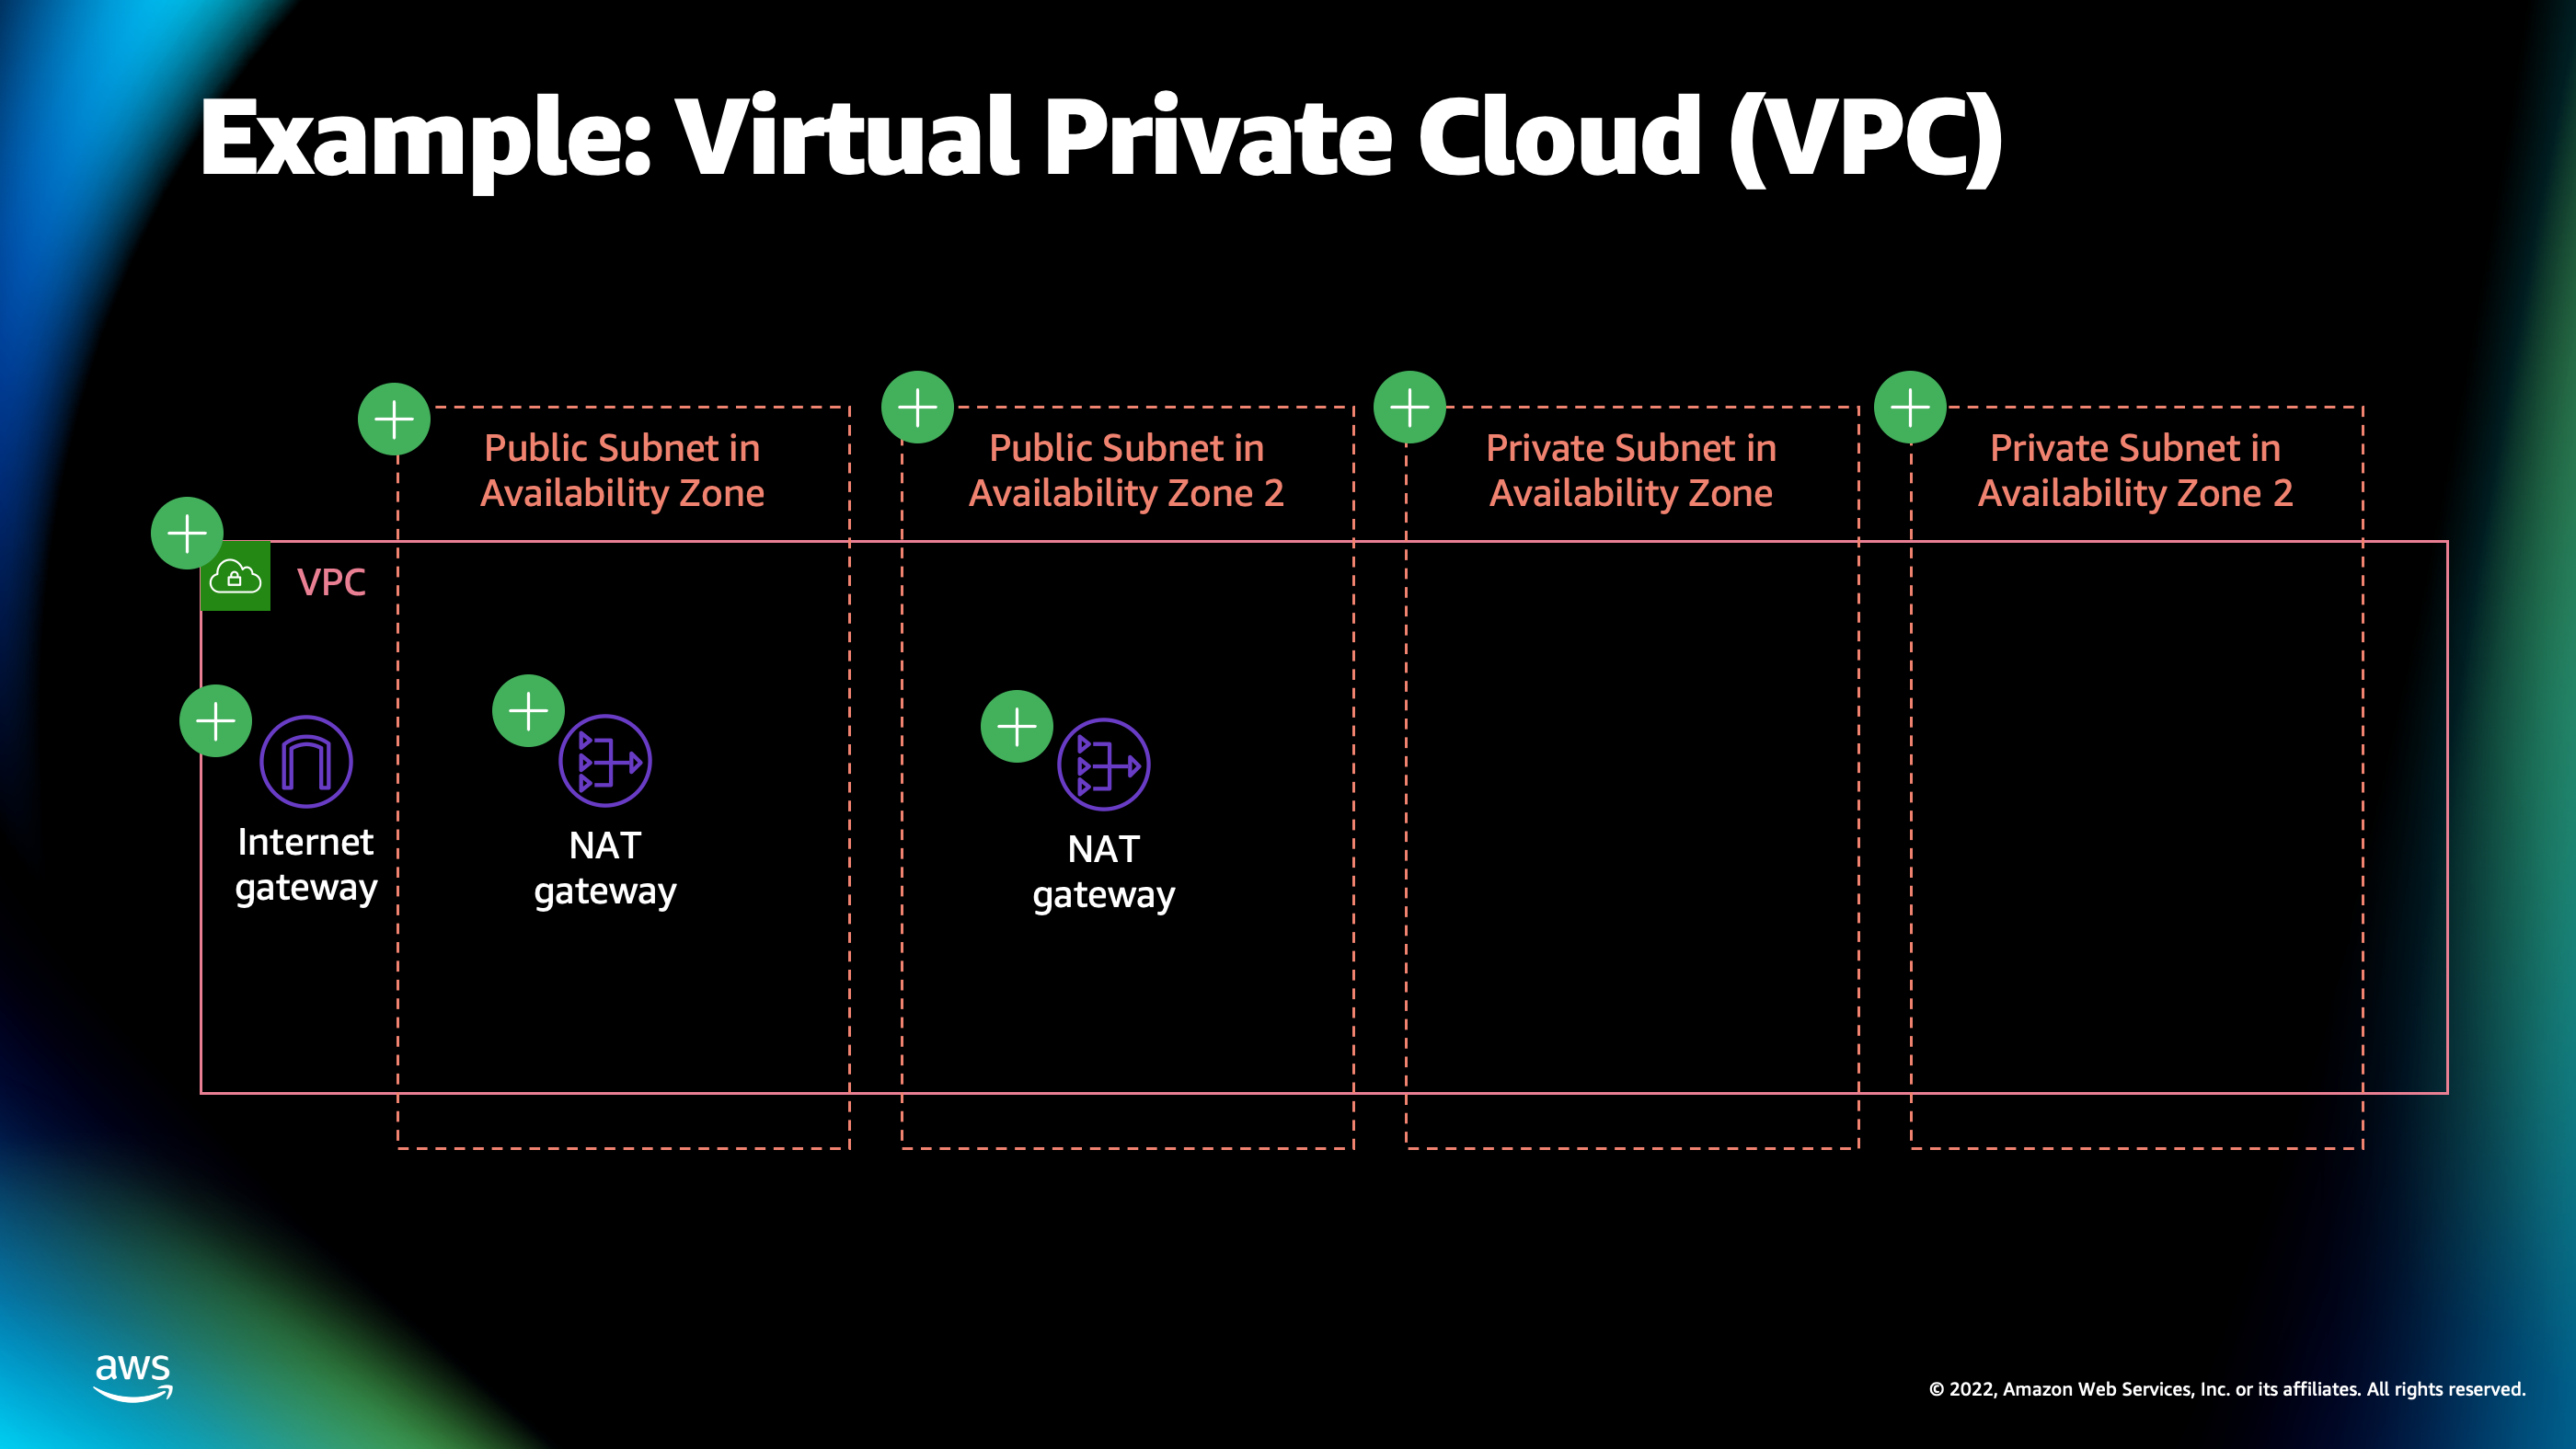
And if you’re familiar with Cloud concepts, this is a very basic underlying networking fabric which allows all the different resources you’re deploying to talk to each other. But it’s a little bit challenging to configure, especially if you want high availability and you want to have a resilient network. So here, you can see there’s a lot of different resources that are part of this VPC.
There’s internet gateway. There’s NAT gateways. There’s different subnets and different availability zones. There’s the VPC itself.
And there’s also, not shown on this diagram, but if you’ve set up one of these before, you know that there’s a lot of route tables that define the configuration by which traffic goes from one subnet to another, and it can actually be routed around inside of that network.
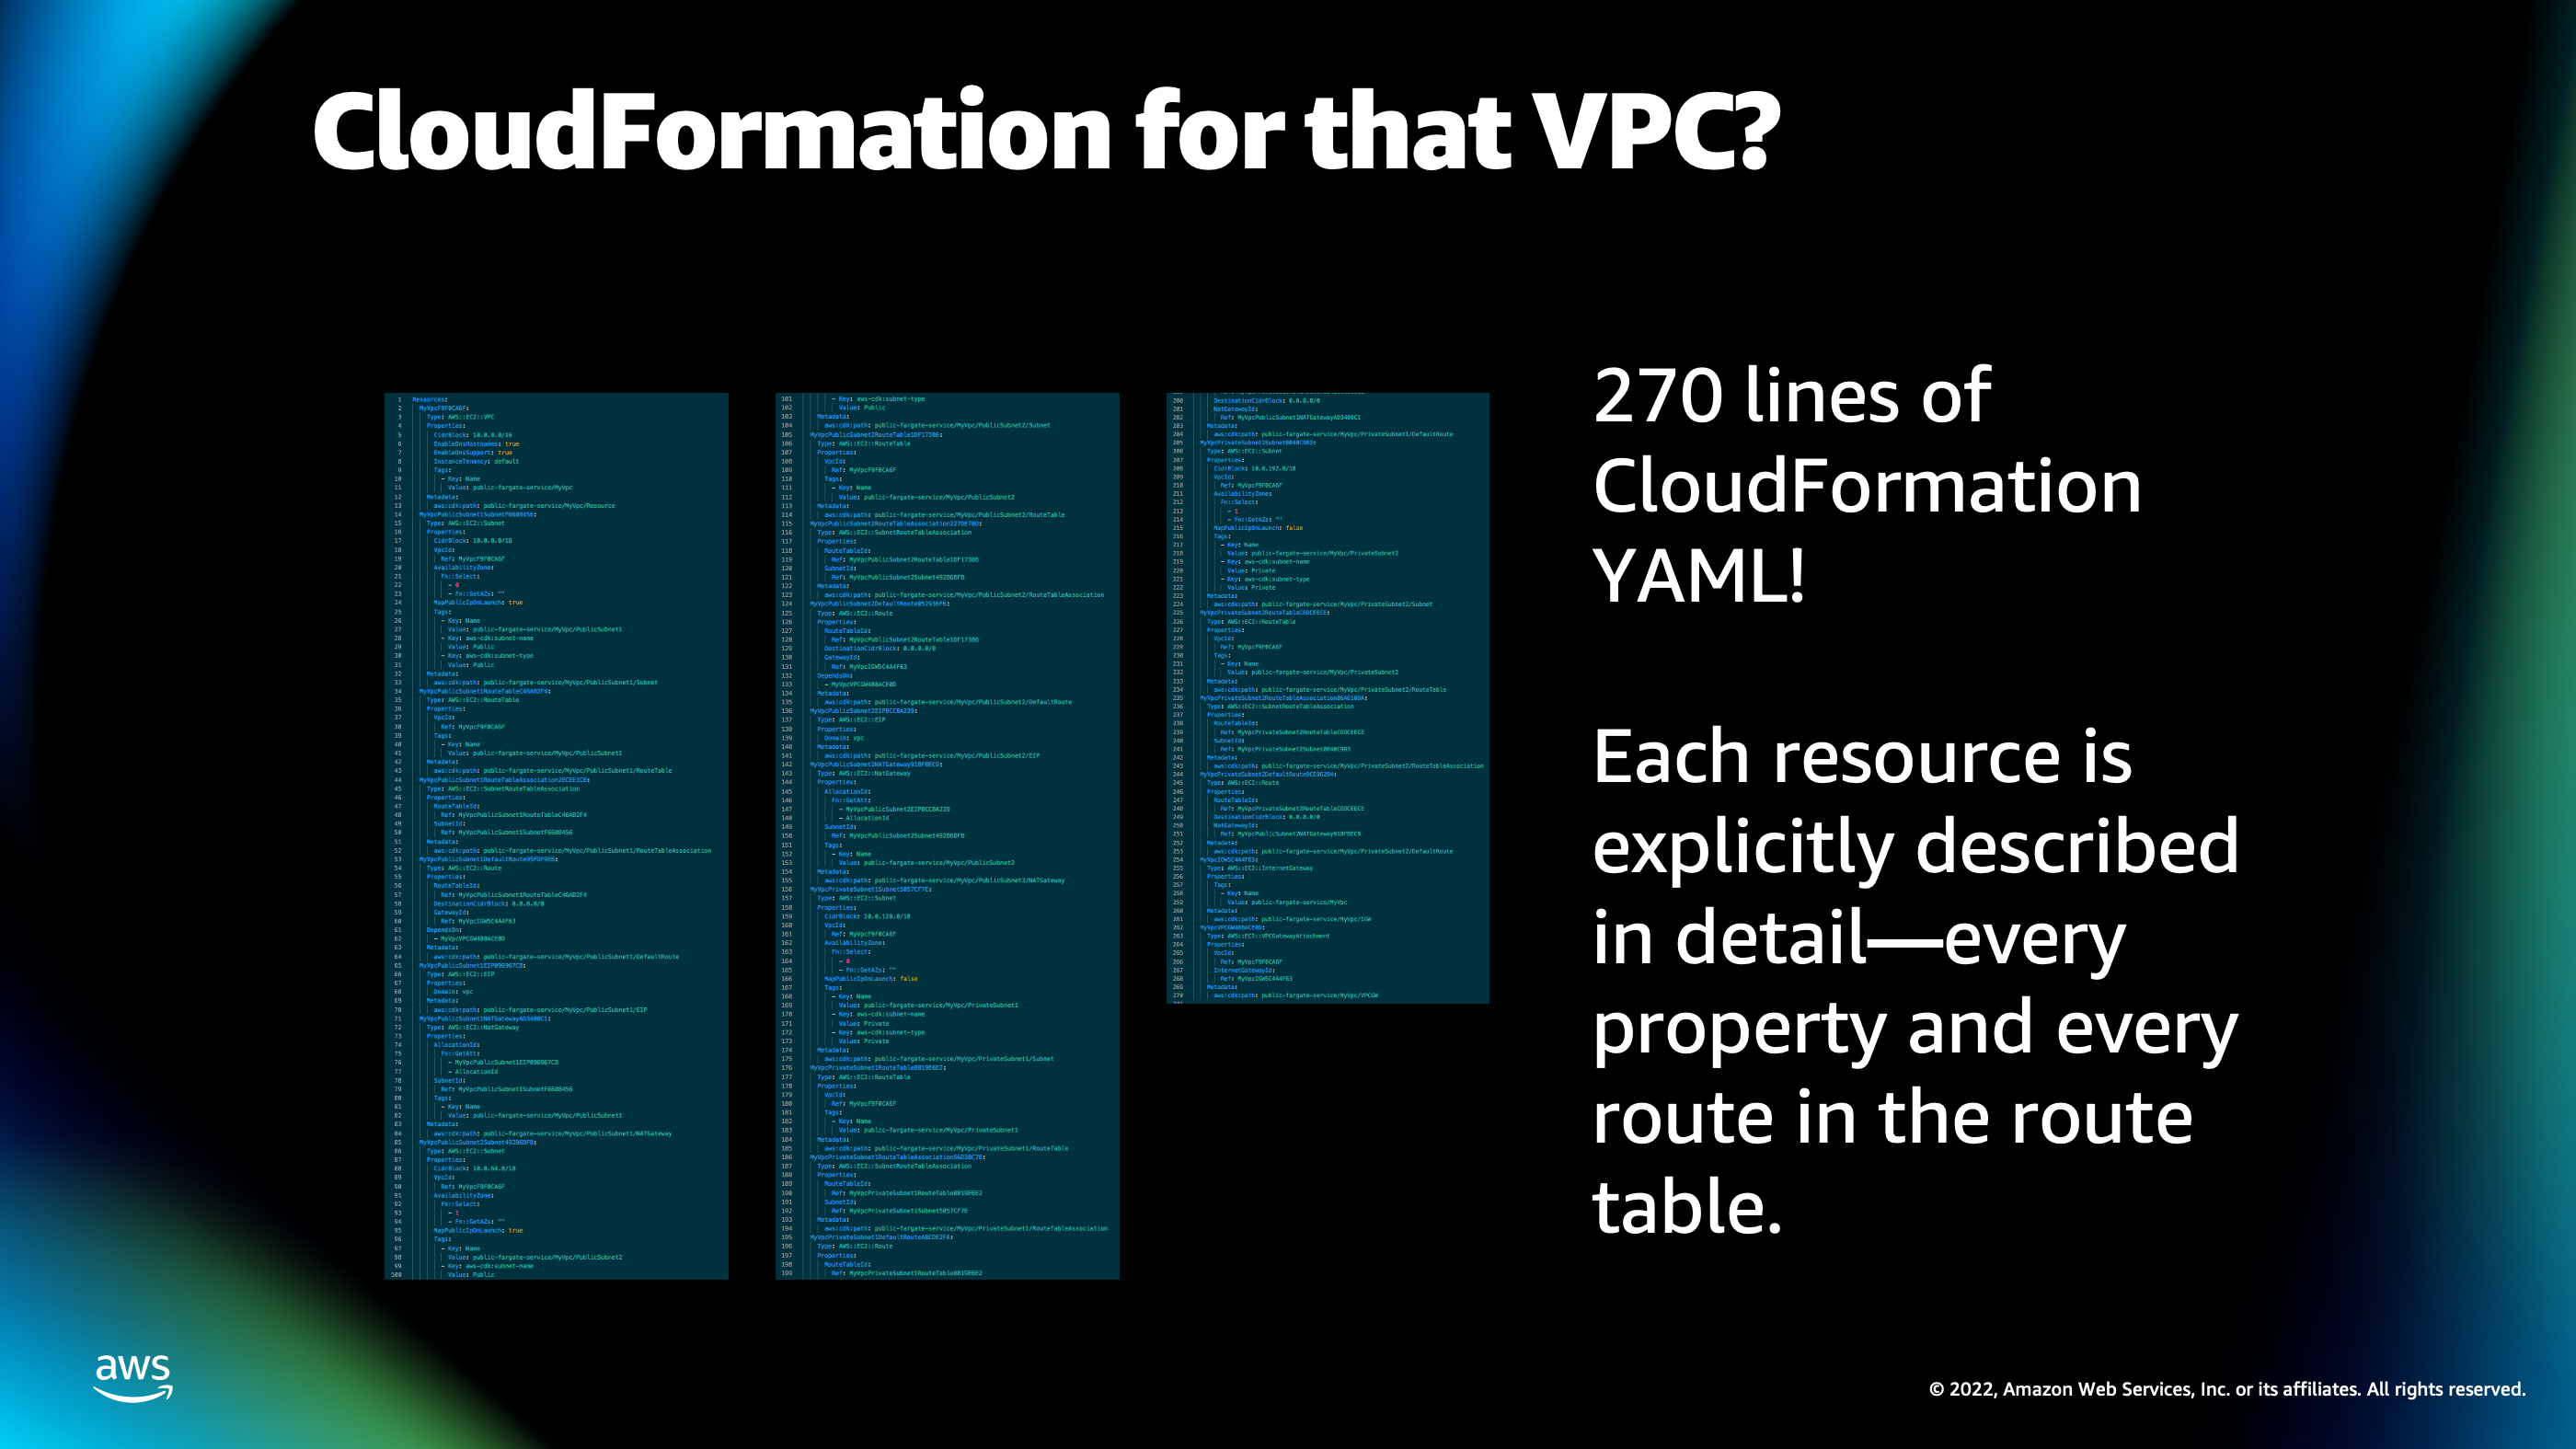
So, if I was to define this VPC by hand, in infrastructure as code, it actually takes me 270 lines of CloudFormation in which I’ve shown here. It is too small to read, but [chuckles] there’s 270 lines there of configuration to define all the different resources and the specific subnet, IP ranges, and everything necessary to make that particular VPC work.
And that’s a little bit challenging to create by hand, especially if you need to create that multiple times because it’s explicitly describing every single aspect of VPC in detail. And I don’t necessarily care about all those details once I’ve set up 1, 10, 100 different VPCs.
So, the idea behind AWS Cloud Development Kit is it gives you a higher level API that you can use to define all these underlying settings because it has smart defaults. They understand your higher level of intent for what you’re trying to create.
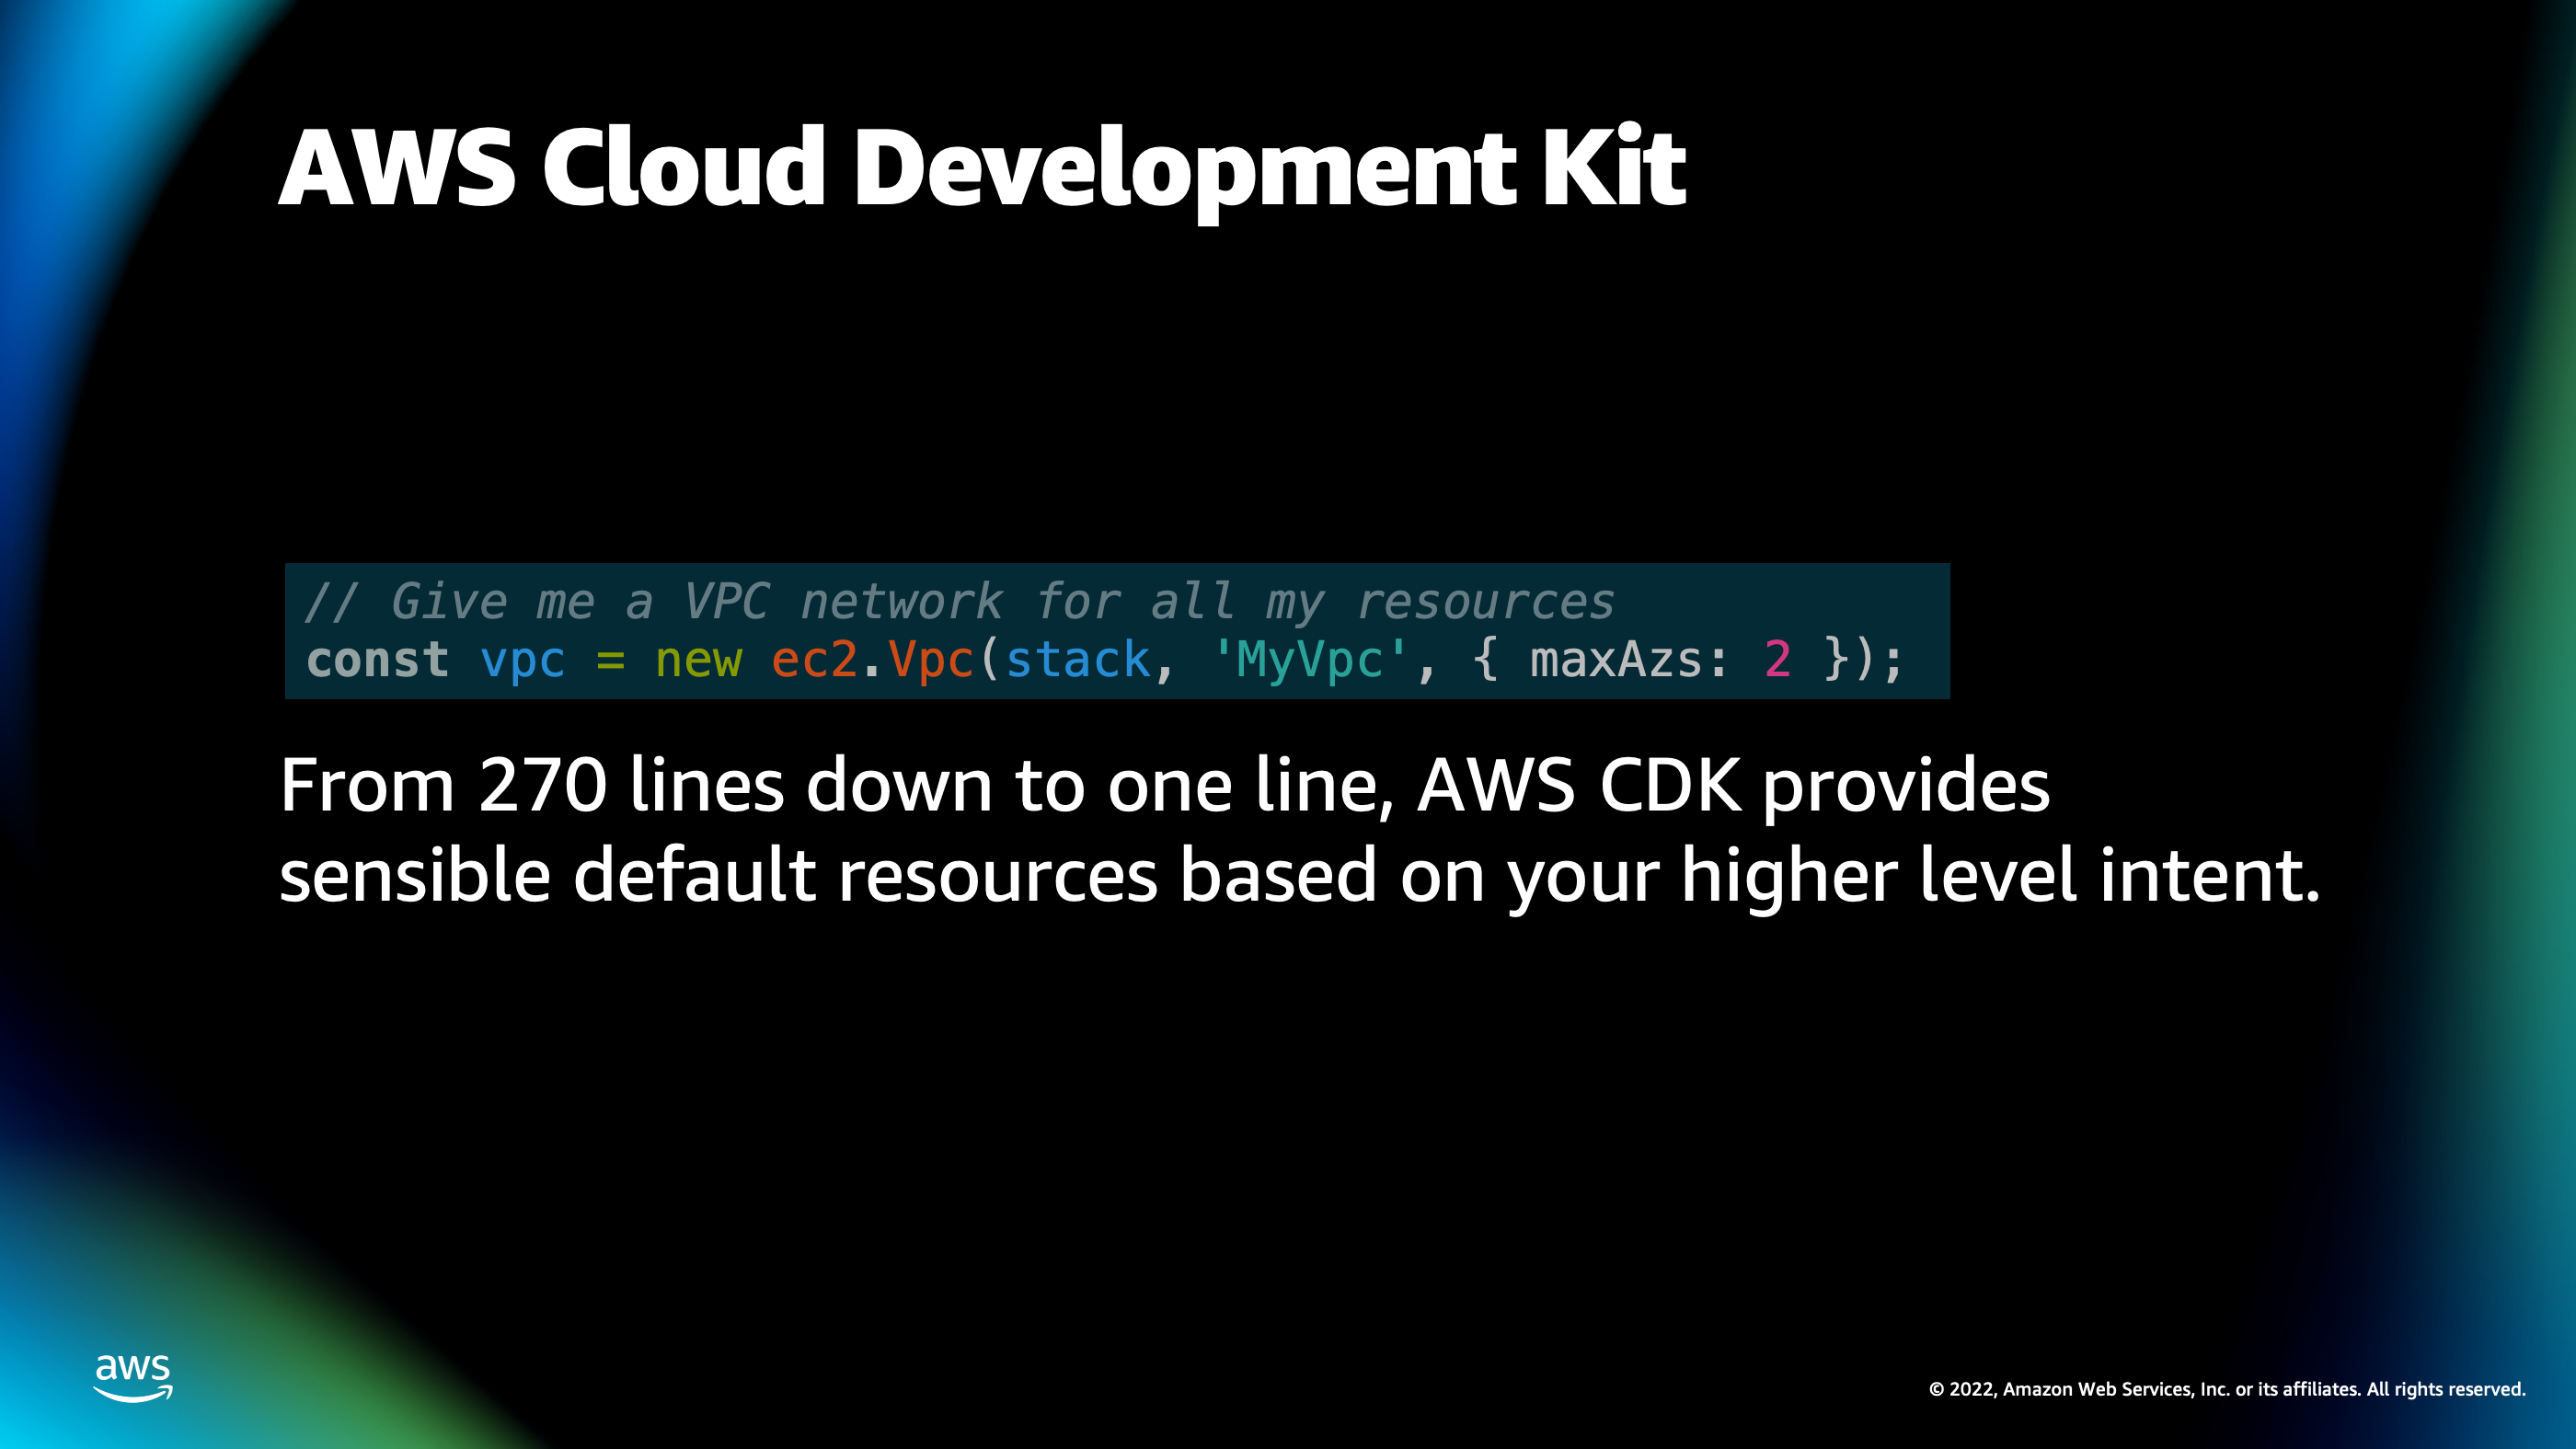
So, I can create that same set of resources, that 270 lines of CloudForrmation, using one line of AWS Cloud Development Code. All I have to do is instantiate a new instance of the class ec2.Vpc with the parameters maxAzs: 2. It will go out, it will automatically set up this highly available VPC that spans two availability zones, has net gateways inside of it, it has all the things that are necessary for a production ready network.
Now, this also goes beyond just the underlying cloud resources up to your application resources as well.
So, one of my favorite features of CDK is its ability to tie into your local development experience as well.
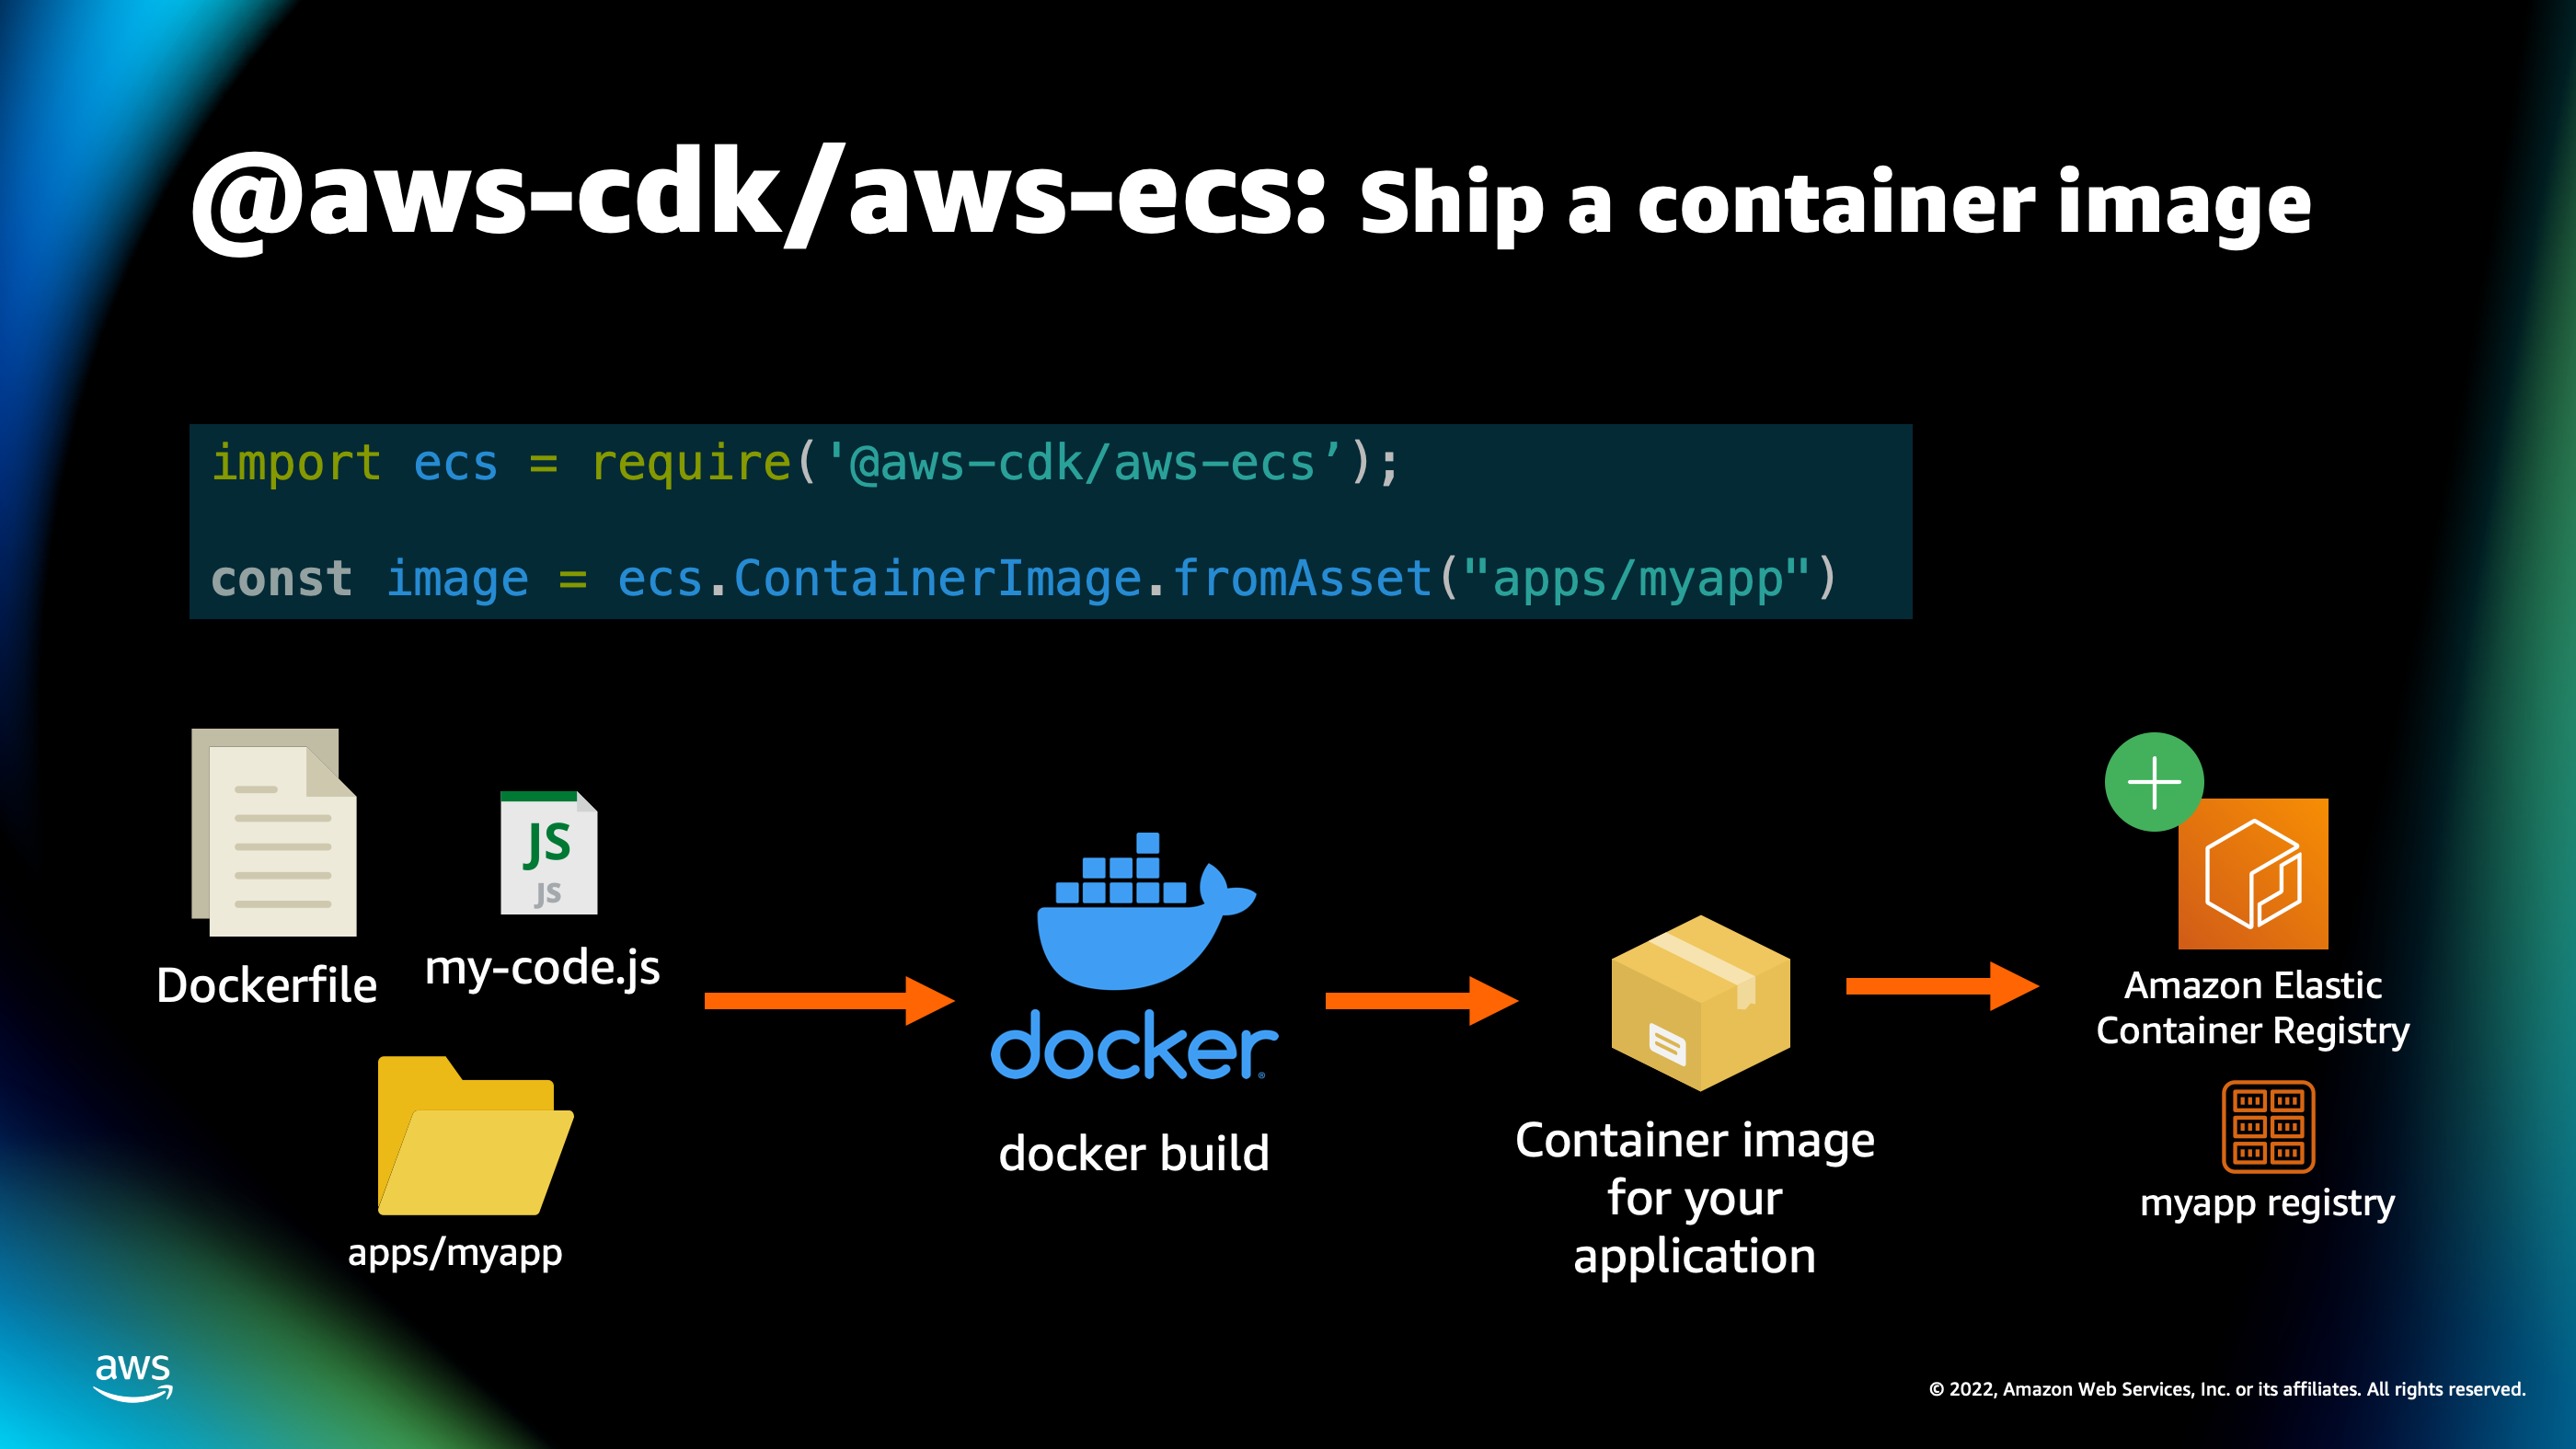
Here, for example, you can see a feature of the AWS CDK ECS pattern for building a container image and shipping it to production. So, if you’ve built a container image before, you know that you have all your code, your libraries, your different binaries on your local developer laptop. But in order to ship that to production, you’ve got to package that up into a Docker image. You’ve got to upload that container image into a registry that has to exist. And there’s quite a few steps involved in that process.
Well, all those steps are actually encompassing this one command here where I say: ecs.ContainerImage.fromAsset()
And I specify a local directory there, apps/myapp.
So, what’s gonna happen is, CDK is gonna go inside that directory, gonna find my docker file, it’s gonna automatically build a container image, it’s gonna create its own unique, elastic container registry for storing my container image and upload it to that registry.
That also extends to the actual patterns for turning that container image into a deployment.
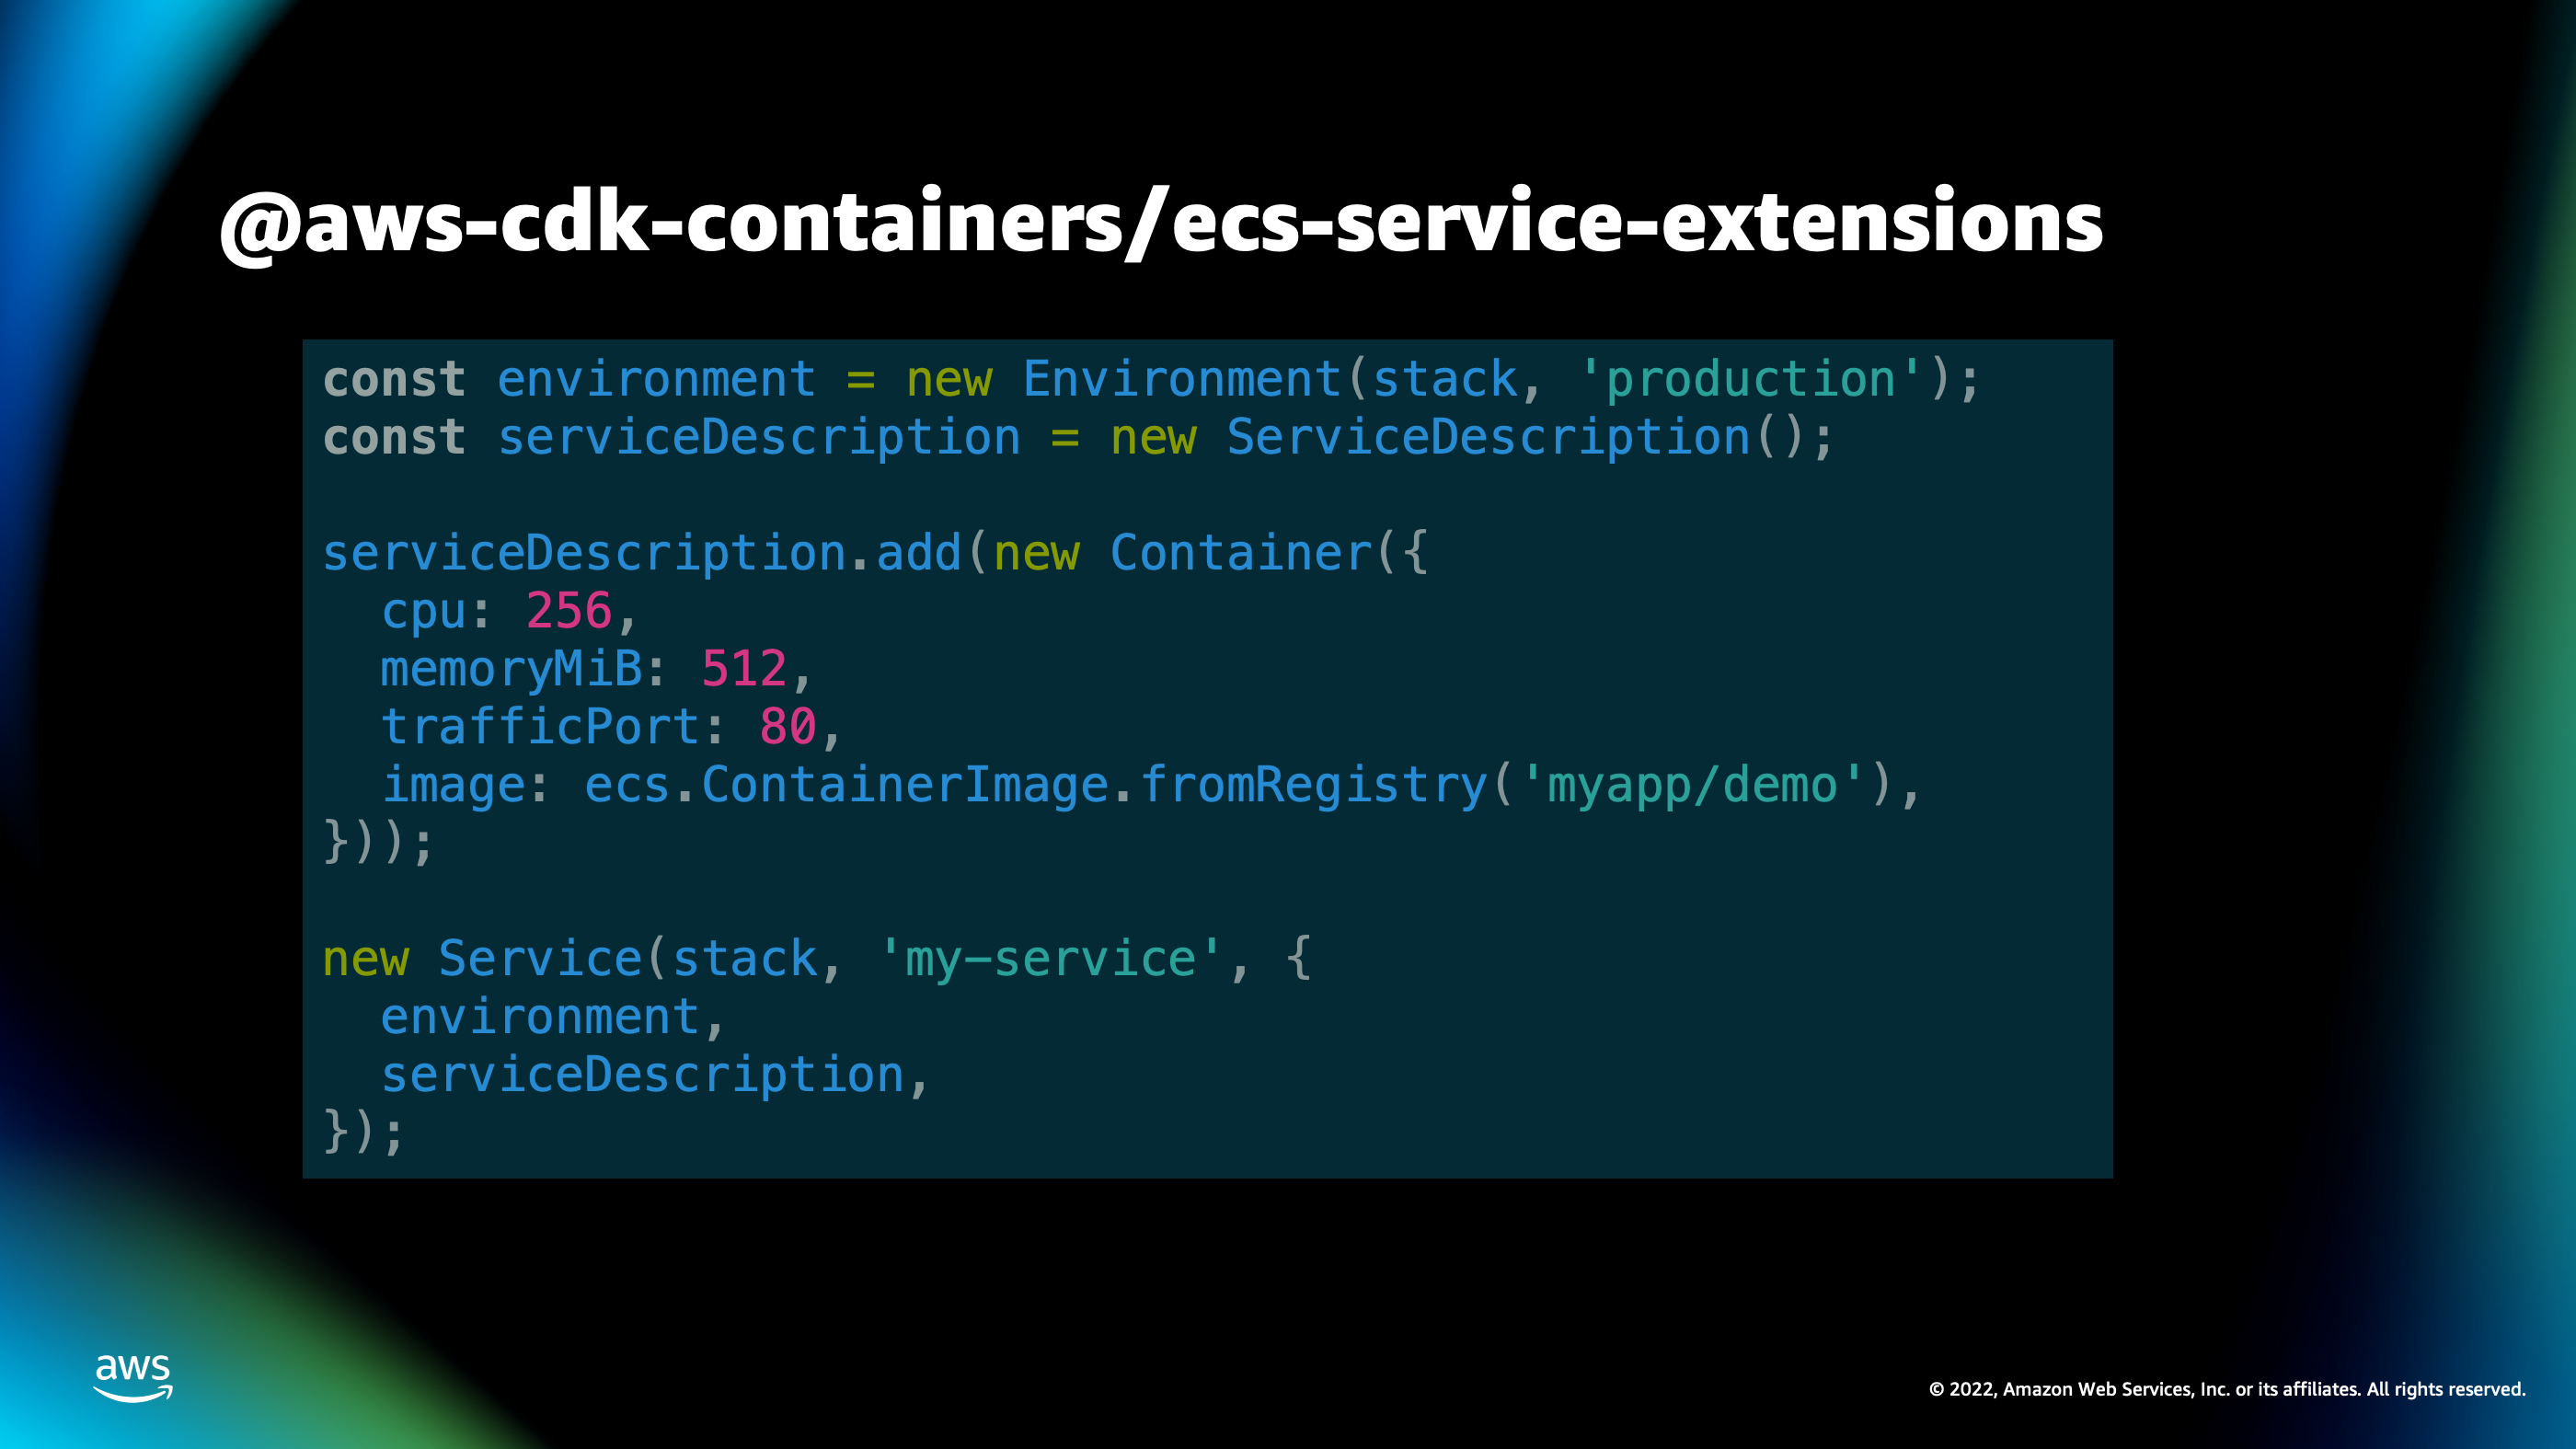
So, here you can see one of the patterns we’ve built called ecs-service-extensions for deploying a container that’s been built by CDK as a service.
We can see that we have this very simple high level classes, such as Environment and ServiceDescription and Container, where you can build out an environment, build a service description and add your container to that service description, and then deploy that service description as a service inside of an environment.
So, I’ll demo this in more detail later, but I wanna show an example of what CDK looks like when you’re using these higher-level interfaces as an abstraction for creating an infrastructure.
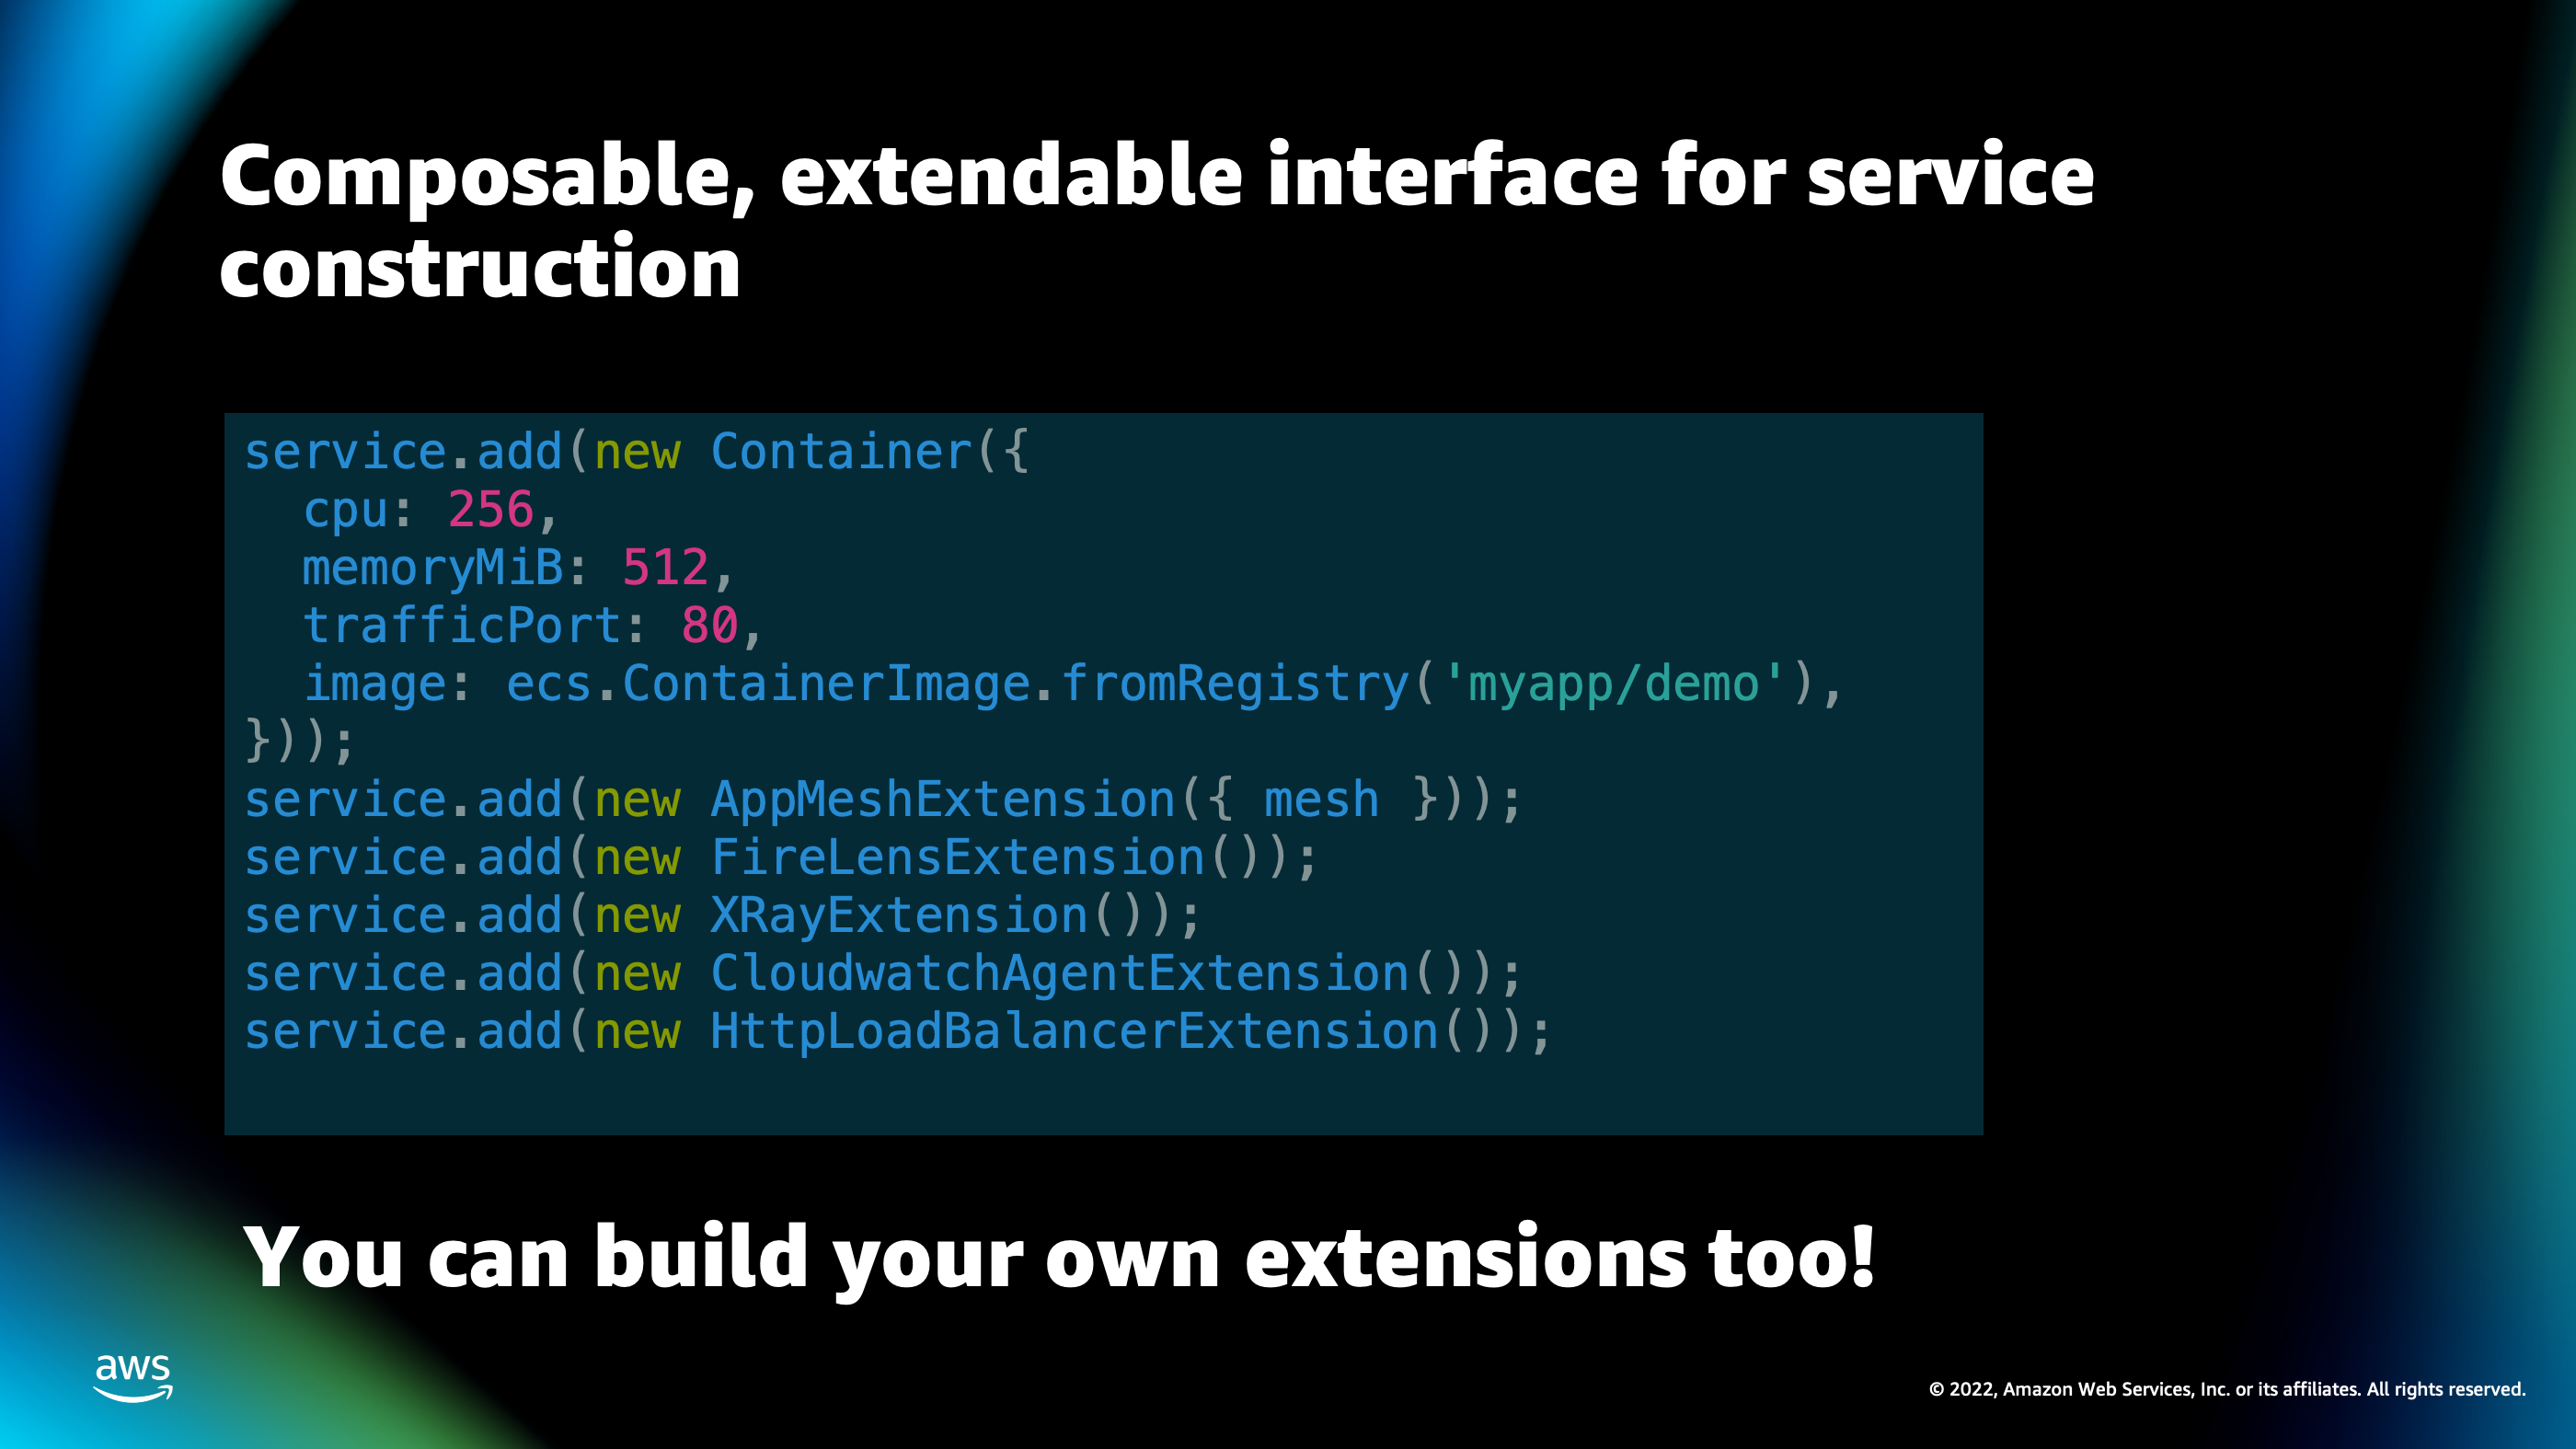
So, if you’ve turned on different features of AWS platform, you know that certain things like X-ray or Cloudwatch can be a little bit challenging to set up at times.
Well, with CDK, all you have to do is add different components onto your service using this very simple SDK of service that add, and then you’re adding on a particular feature of CDK. And it will enable that feature inside of your service and do all the setup and plumbing, all of that Cloud information writing for you in order to turn on that particular service. Then again, that gets deployed, and you can even build your own extensions that turn on or enable different services for the underlying container infrastructure.
So, CDK is one way of doing it, especially if you are more into the coding side of things. CDK is designed for folks who likes to deploy infrastructure but they like to do it using a programming language. Another option is AWS Copilot.
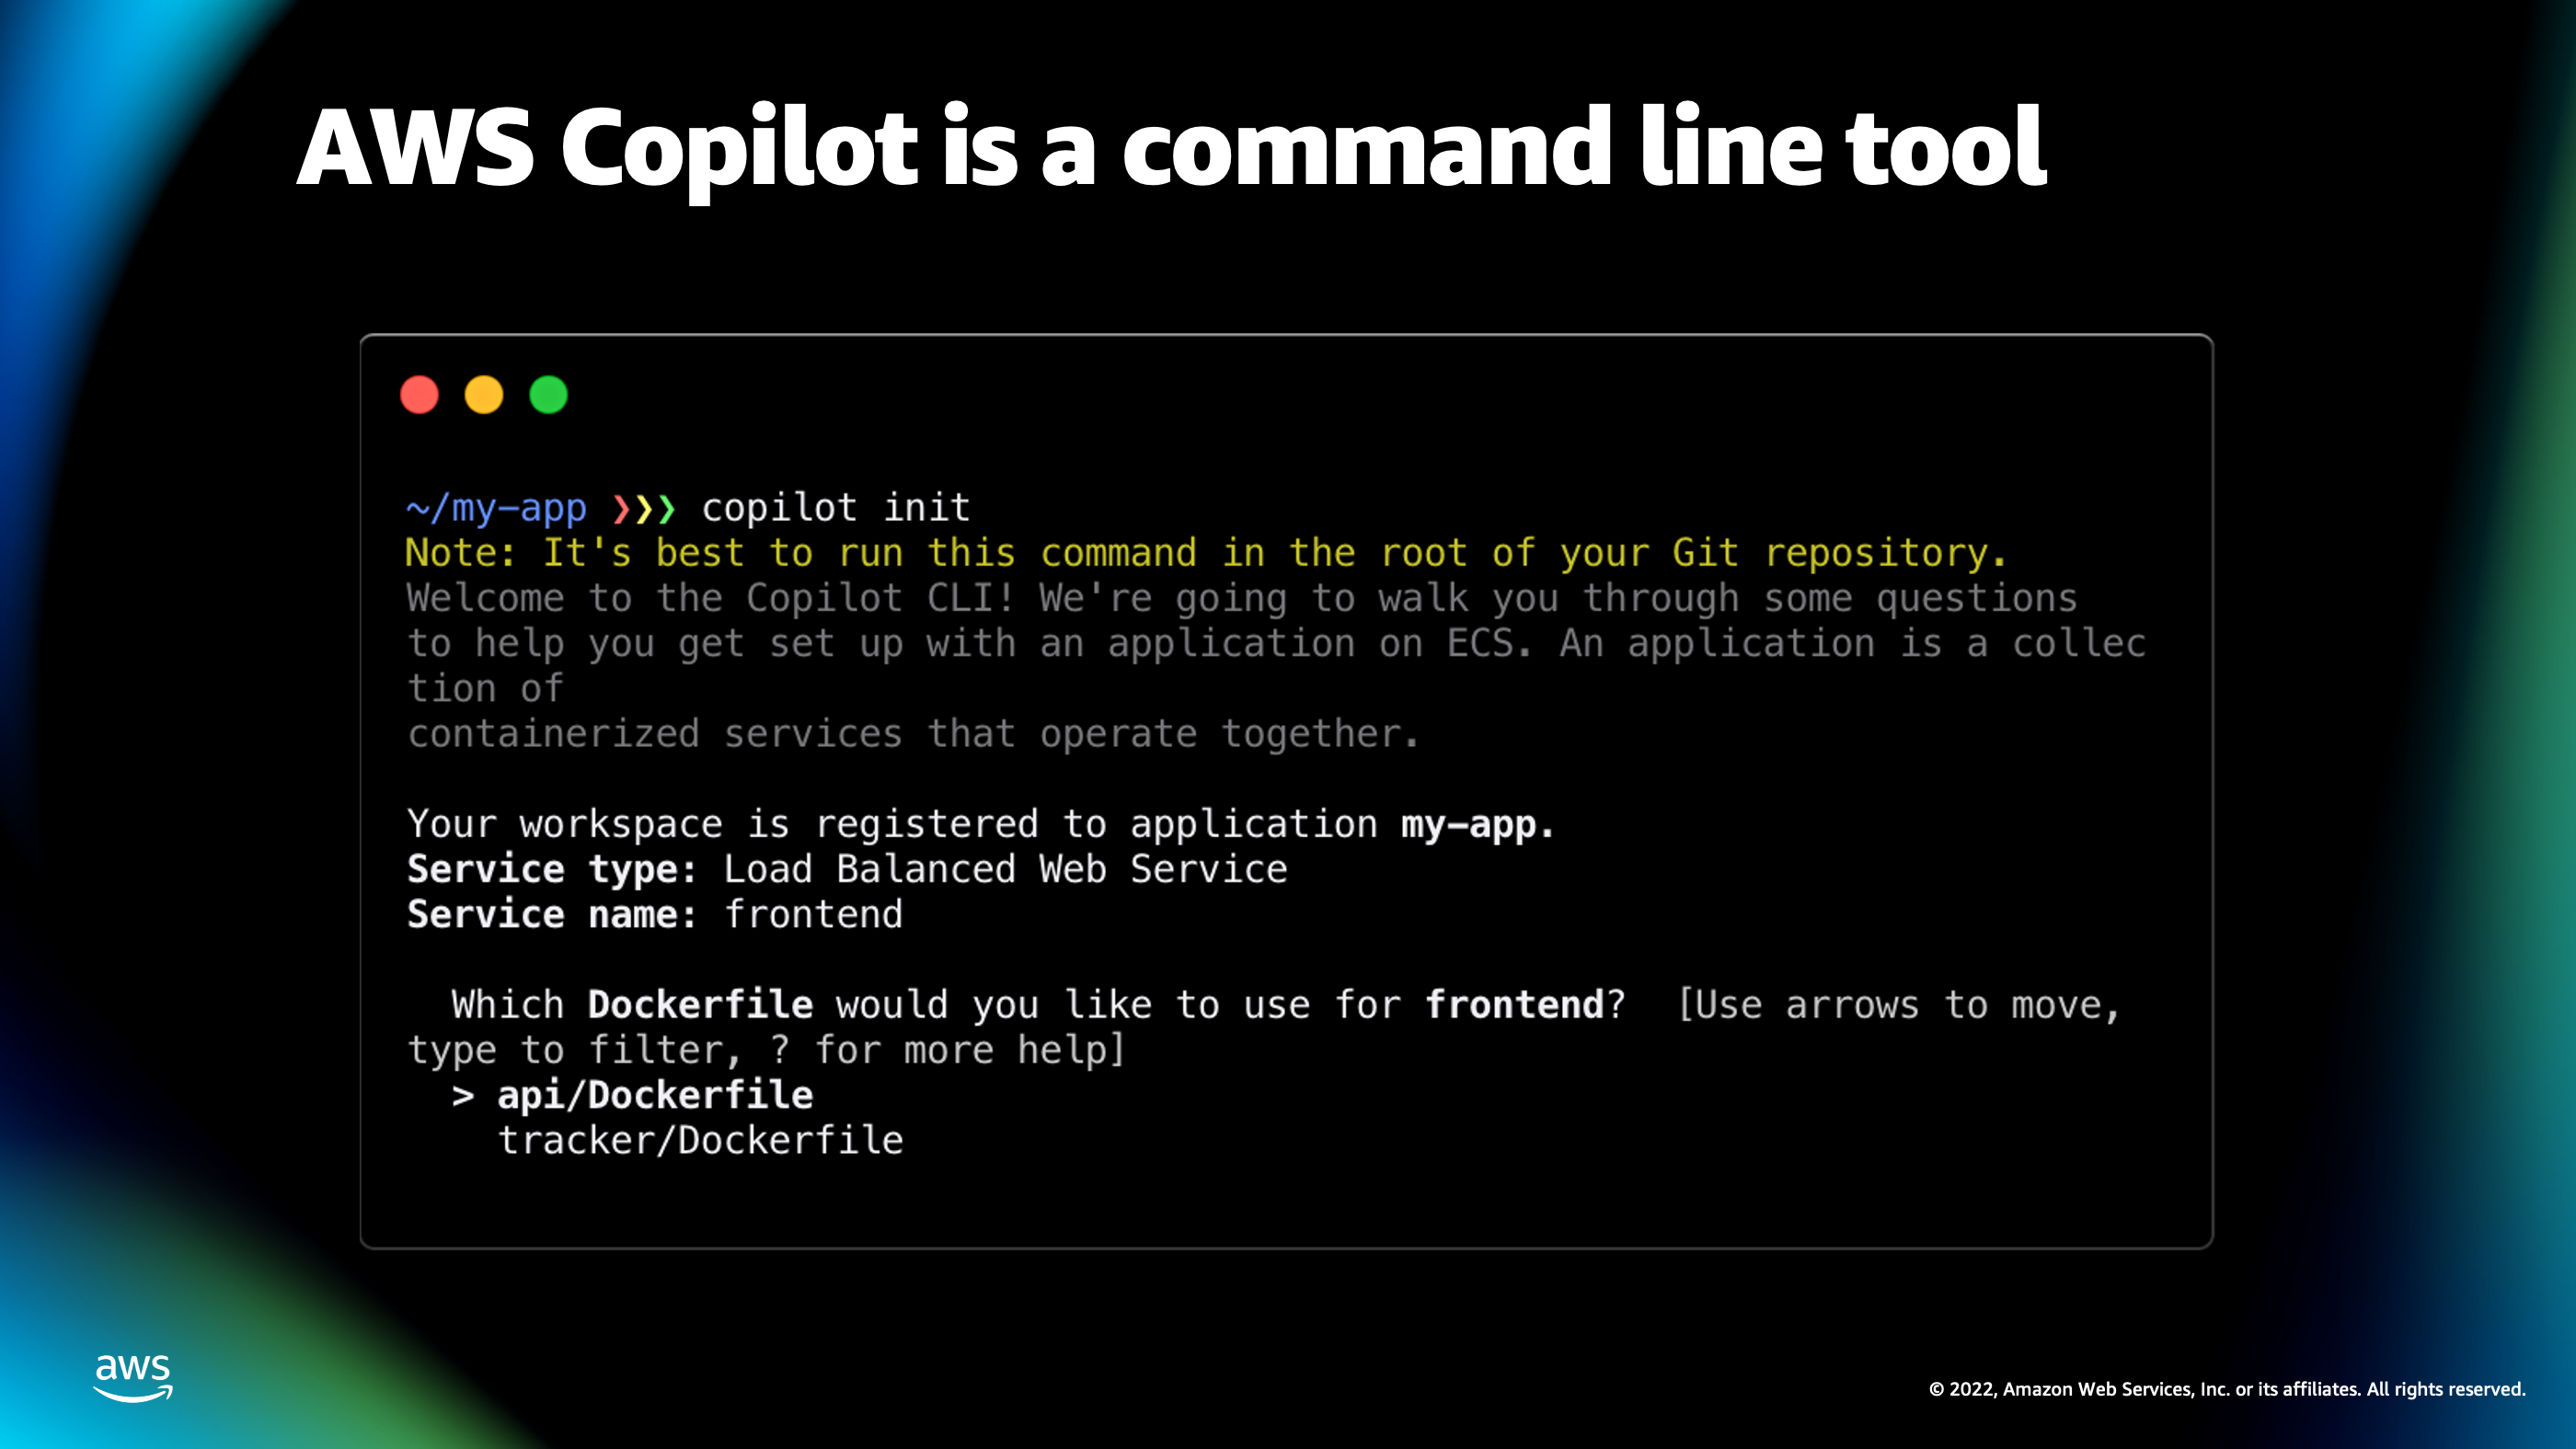
And AWS Copilot is a command line tool.
So, it’s designed to be simple to get into because you can just type copilot init and it starts asking you some questions like: “What type of application would you like to deploy?”
Which I can then choose load balanced application.
It will go in and it’ll explore your code tree and find a Dockerfile and suggest, “Would you like to deploy this api/Dockerfile as a container service?”
The general idea behind AWS Copilot is it give you these command line tools for solving several different phases of your application.
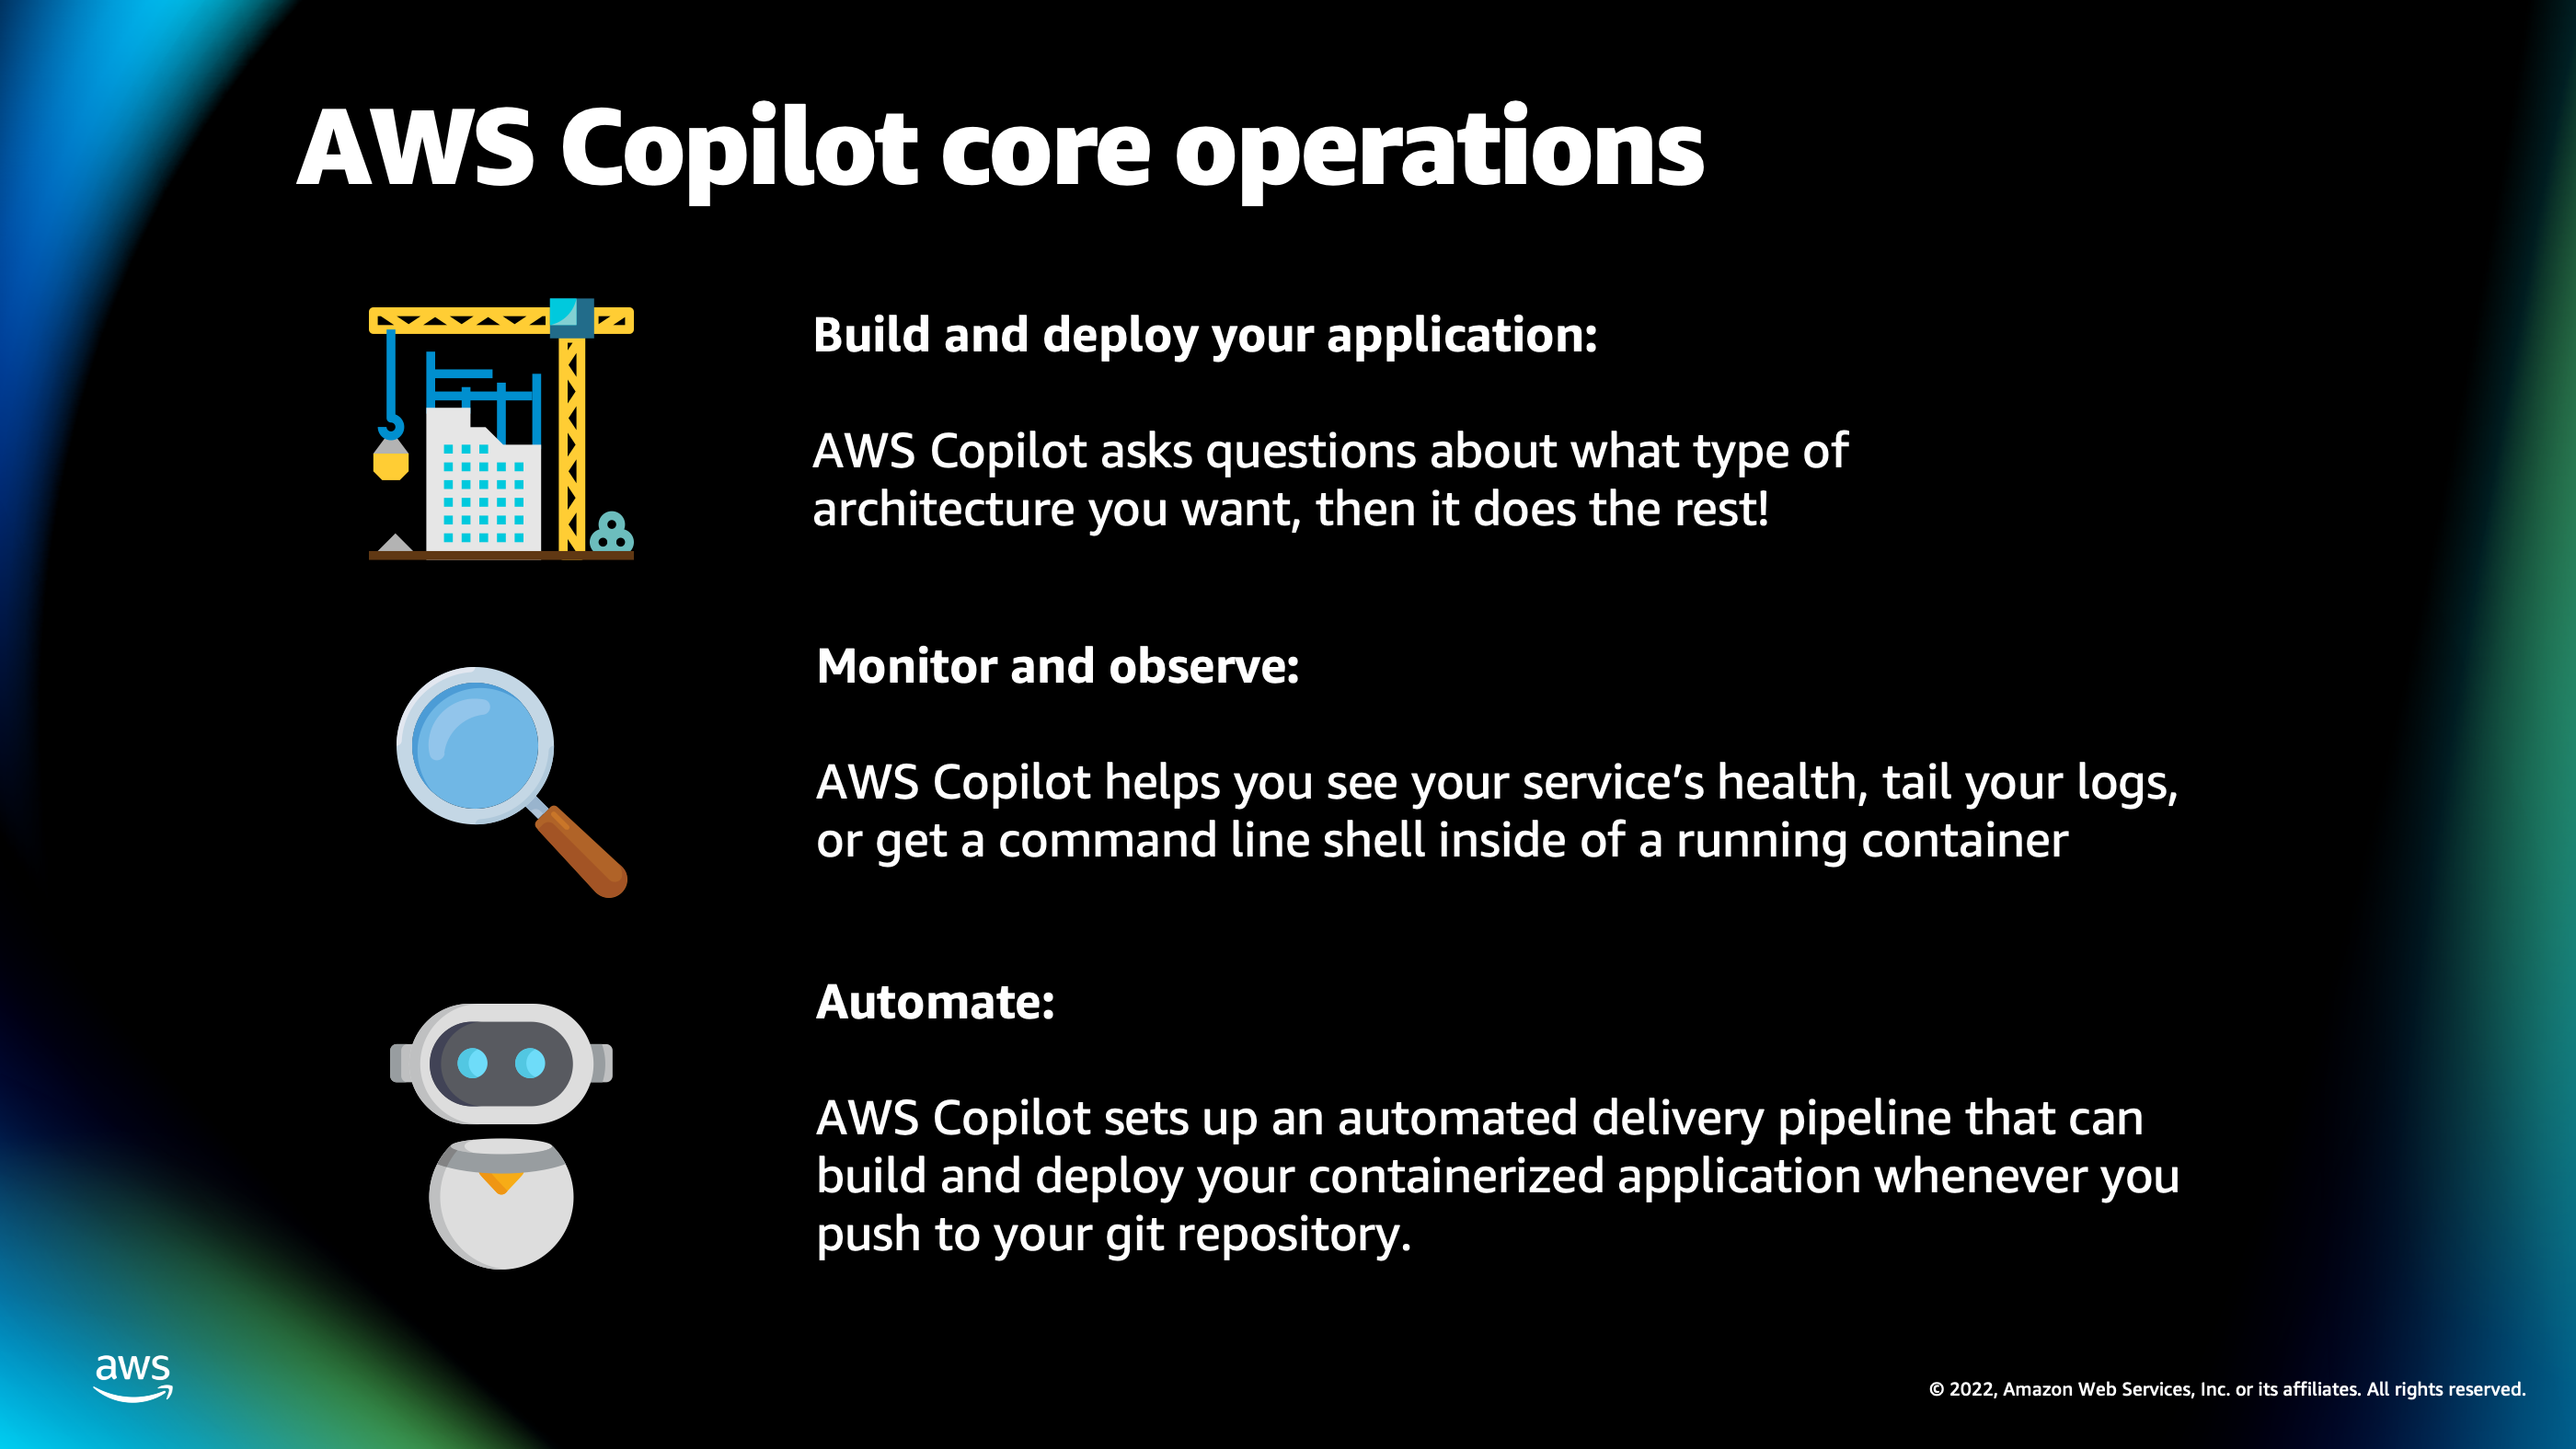
The first phase is building and deploying your application. It has a walkthrough process where it will explore, come up with some sensible defaults based on Docker file that it finds, and suggest different infrastructure patterns you may want to deploy such as a load balanced service. And then, it’ll do everything else for you. It’ll create that, write that Cloud formation for you and deploy the infrastructure onto AWS account.
The second phase is when it’s time to monitor and observe the application. So, AWS Copilot gives you really helpful helper commands that you can use to do things like tail the logs in your production environment, or even get a command line shell inside one of the running containers inside of your Cloud environment so you can run commands directly inside that container.
And the last phase of AWS Copilot is it helps you automate things. So, this is where we really get into the streamlining aspect of containerized deployments. It will help you set up an automated delivery pipeline where all I have to do is type git push and it will start building and deploying my service in the background.
Now, I talked about all these different features and talking about them is great, but I’d like to actually show these features in action because I think that’s a lot more fun. So, I’m going to transition over to the demo now, and we’ll see these things in action on my AWS account.
Demo
You can also download the PowerPoint presentation that has the source slides for the presentation.